Hugo è un framework di siti Web gratuito e open source scritto in sviluppato in Go. Hugo fornisce un generatore di siti statici affidabile e moderno che ti consente di creare facilmente un sito Web semplice e veloce. Viene fornito con modelli predefiniti e altre funzionalità tra cui SEO, commenti, analisi e altre funzioni. I siti Hugo possono essere eseguiti senza costosi tempi di esecuzione come PHP, Python, Ruby e non necessitano di alcun database.
In questo post, ti mostreremo come installare e utilizzare il generatore di siti Hugo su Debian 11.
Prerequisiti
- Un server che esegue Debian 11.
- Sul server è configurata una password di root.
Installa Hugo su Debian 11
Per impostazione predefinita, il pacchetto Hugo è incluso nel repository predefinito di Debian 11. Puoi installarlo usando il seguente comando:
apt-get install hugo -y
Una volta installato Hugo, puoi verificare la versione di Hugo utilizzando il comando seguente:
hugo version
Dovresti ottenere il seguente output:
Hugo Static Site Generator v0.80.0/extended linux/amd64 BuildDate: 2021-07-18T09:31:51Z (debian 0.80.0-6+b5)
Crea un sito web con Hugo
In questa sezione creeremo un nuovo sito web chiamato hugo.example.com.
Esegui il comando seguente per creare un sito Web:
hugo new site hugo.example.com
Una volta creato il sito web, dovresti ottenere il seguente output:
Congratulations! Your new Hugo site is created in /root/hugo.example.com. Just a few more steps and you're ready to go: 1. Download a theme into the same-named folder. Choose a theme from https://themes.gohugo.io/ or create your own with the "hugo new theme" command. 2. Perhaps you want to add some content. You can add single files with "hugo new / . ". 3. Start the built-in live server via "hugo server". Visit https://gohugo.io/ for quickstart guide and full documentation.
Puoi elencare tutti i file creati da Hugo usando il seguente comando:
ls -l hugo.example.com
Otterrai il seguente output:
drwxr-xr-x 2 root root 4096 Nov 13 09:27 archetypes
-rw-r--r-- 1 root root   82 Nov 13 09:27 config.toml
drwxr-xr-x 2 root root 4096 Nov 13 09:27 content
drwxr-xr-x 2 root root 4096 Nov 13 09:27 data
drwxr-xr-x 2 root root 4096 Nov 13 09:27 layouts
drwxr-xr-x 2 root root 4096 Nov 13 09:27 static
drwxr-xr-x 2 root root 4096 Nov 13 09:27 themes
Crea una pagina Informazioni e un post di esempio
Per prima cosa, cambia la directory del tuo sito web usando il seguente comando:
cd hugo.example.com
Quindi, crea una pagina Informazioni usando il seguente comando:
hugo new about.md
Otterrai il seguente output:
/root/hugo.example.com/content/about.md created
Quindi, modifica la pagina about.md con il seguente comando:
nano content/about.md
Modifica il file come mostrato di seguito:
---
title: "About Us"
date: 2021-11-13T09:28:18Z
draft: false
---

This is About Us page for this website.
Quindi, crea un post di esempio utilizzando il seguente comando:
hugo new post/page.md
Otterrai il seguente output:
/root/hugo.example.com/content/post/page.md created
Quindi, modifica la pagina del post di esempio con il seguente comando:
nano content/post/page.md
Modifica il file come mostrato di seguito:
---
title: "Page"
date: 2021-11-13T09:29:29Z
draft: true
---

# Hugo Page

This is my first hugo website page!
Salva e chiudi il file quando hai finito.
Installa temi sul tuo sito web
Successivamente, dovrai scaricare e impostare un tema per accedere al tuo sito Web Hugo.
Innanzitutto, cambia la directory in temi con il seguente comando:
cd themes
Quindi, scarica il tema Hugo con il seguente comando:
wget https://github.com/digitalcraftsman/hugo-strata-theme/archive/master.zip
Quindi, decomprimi il tema scaricato con il seguente comando:
unzip master.zip
Quindi, rinomina il tema estratto con il seguente comando:
mv hugo-strata-theme-master hugo-strata-theme
Quindi, copia il contenuto di config.toml nella configurazione del tuo sito.
cat hugo-strata-theme/exampleSite/config.toml > ../config.toml
Quindi, modifica il file config.toml con il seguente comando:
nano ../config.toml
Aggiungi / Modifica le seguenti righe:
baseurl = "/"

[[menu.main]]
  name = "About"
  url  = "about"
  weight = 5
Salva e chiudi il file, quindi crea un file index.html per il tuo sito web:
cd ../
nano layouts/index.html
Aggiungi le seguenti righe:
{{ define "main" }}
        {{ if not .Site.Params.about.hide }}
                {{ partial "about" . }}
        {{ end }}

        {{ if not .Site.Params.portfolio.hide }}
                {{ partial "portfolio" . }}
        {{ end }}

        {{ if not .Site.Params.recentposts.hide }}
                {{ partial "recent-posts" . }}
        {{ end }}

        {{ if not .Site.Params.contact.hide }}
                {{ partial "contact" . }}
        {{ end }}
{{ end }}
Salva e chiudi il file.
Crea e lancia il tuo sito web
Ora dovrai creare il tuo sito web per usarlo. Puoi compilarlo eseguendo il seguente comando:
hugo
Otterrai il seguente output:
    {{ with .OutputFormats.Get "RSS" }}{{ .RelPermalink }}{{ end }}

                   | EN
-------------------+-----
  Pages            |  8
  Paginator pages  |  0
  Non-page files   |  0
  Static files     | 26
  Processed images |  0
  Aliases          |  2
  Sitemaps         |  1
  Cleaned          |  0

Total in 48 ms
Quindi, avvia il server Hugo e associalo all'IP del tuo server utilizzando il seguente comando:
hugo server --bind=0.0.0.0 --baseUrl=http://104.245.34.233 -D -F
Otterrai il seguente output:
    {{ with .OutputFormats.Get "RSS" }}{{ .RelPermalink }}{{ end }}

                   | EN
-------------------+-----
  Pages            | 11
  Paginator pages  |  0
  Non-page files   |  0
  Static files     | 26
  Processed images |  0
  Aliases          |  3
  Sitemaps         |  1
  Cleaned          |  0

Built in 42 ms
Watching for changes in /root/hugo.example.com/{archetypes,content,data,layouts,static,themes}
Watching for config changes in /root/hugo.example.com/config.toml
Environment: "development"
Serving pages from memory
Running in Fast Render Mode. For full rebuilds on change: hugo server --disableFastRender
Web Server is available at http://104.245.34.233:1313/ (bind address 0.0.0.0)
Press Ctrl+C to stop
A questo punto, il server Hugo viene avviato ed è in ascolto sulla porta 1313.
Accedi al sito web di Hugo
Ora apri il tuo browser web e accedi al tuo sito web utilizzando l'URL http://your-server-ip:1313 . Dovresti vedere la pagina predefinita di Hugo:

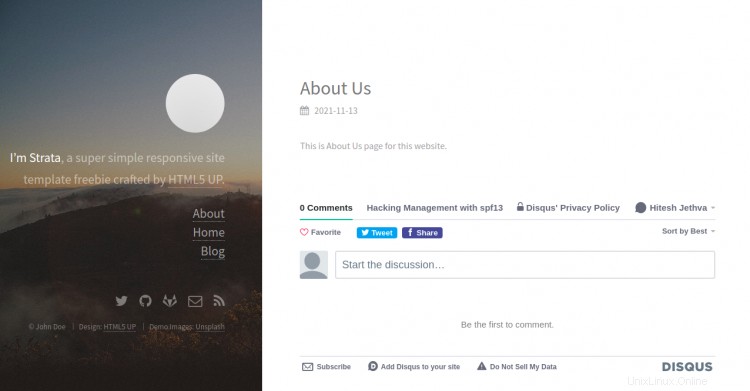
Fai clic su Informazioni su nel riquadro di sinistra. Dovresti vedere la tua pagina Informazioni nella schermata seguente:
Conclusione
Congratulazioni! hai installato correttamente Hugo e creato un sito Web su Debian 11. Ora puoi creare facilmente un sito Web sicuro e veloce utilizzando Hugo.