GitLab è una piattaforma DevOps gratuita e open source che consente ai team di iterare più velocemente e innovare insieme. È uno strumento basato sul Web sviluppato da GitLab Inc. È molto simile a GitHub e fornisce un gestore di repository Git che fornisce wiki, rilevamento dei problemi e integrazione e distribuzione continue. GitLab Community Edition è disponibile gratuitamente per l'ambiente di sviluppo e produzione.
In questo tutorial, ti mostrerò come installare GitLab con Nginx e Let's Encrypt SSL su Debian 11.
Prerequisiti
- Un server che esegue Debian 11 con un minimo di 8 GB di RAM.
- Un nome di dominio valido puntato con l'IP del server.
- Sul server è configurata una password di root.
Per iniziare
Prima di iniziare, si consiglia di aggiornare la cache del pacchetto all'ultima versione. Puoi farlo con il seguente comando:
apt-get update -y
Al termine, installa le altre dipendenze richieste utilizzando il comando seguente:
apt-get install curl ca-certificates apt-transport-https gnupg2 -y
Una volta installate tutte le dipendenze necessarie, puoi procedere al passaggio successivo.
Aggiungi repository GitLab
Per impostazione predefinita, il pacchetto GitLab non è disponibile nel repository predefinito di Debian. Quindi dovrai aggiungere il repository GitLab ad APT.
Puoi aggiungerlo eseguendo il seguente script:
curl -s https://packages.gitlab.com/install/repositories/gitlab/gitlab-ce/script.deb.sh | bash
Questo aggiungerà il repository GitLab al file dell'elenco dei sorgenti APT.
Al momento della stesura di questo articolo, il pacchetto GitLab non è disponibile per Debian 11. Quindi dovrai modificare il file sorgente di GitLab e sostituire il nome in codice di Debian 11 con Debian 10:
nano /etc/apt/sources.list.d/gitlab_gitlab-ce.list
Trova le seguenti righe:
deb https://packages.gitlab.com/gitlab/gitlab-ce/debian/ bullseye main
deb-src https://packages.gitlab.com/gitlab/gitlab-ce/debian/ bullseye main
Sostituiti con le seguenti righe:
deb https://packages.gitlab.com/gitlab/gitlab-ce/debian/ buster main
deb-src https://packages.gitlab.com/gitlab/gitlab-ce/debian/ buster main
Salva e chiudi il file, quindi aggiorna il repository con il seguente comando:
apt-get update -y
Installa GitLab CE
È ora possibile installare GitLab CE eseguendo il comando seguente:
apt-get install gitlab-ce -y
Una volta installato GitLab, dovresti ottenere il seguente output:
It looks like GitLab has not been configured yet; skipping the upgrade script.

       *.                  *.
      ***                 ***
     *****               *****
    .******             *******
    ********            ********
   ,,,,,,,,,***********,,,,,,,,,
  ,,,,,,,,,,,*********,,,,,,,,,,,
  .,,,,,,,,,,,*******,,,,,,,,,,,,
      ,,,,,,,,,*****,,,,,,,,,.
         ,,,,,,,****,,,,,,
            .,,,***,,,,
                ,*,.


     _______ __  __          __
    / ____(_) /_/ /   ____ _/ /_
   / / __/ / __/ /   / __ `/ __ \
  / /_/ / / /_/ /___/ /_/ / /_/ /
  \____/_/\__/_____/\__,_/_.___/


Thank you for installing GitLab!
GitLab was unable to detect a valid hostname for your instance.
Please configure a URL for your GitLab instance by setting `external_url`
configuration in /etc/gitlab/gitlab.rb file.
Then, you can start your GitLab instance by running the following command:
  sudo gitlab-ctl reconfigure

For a comprehensive list of configuration options please see the Omnibus GitLab readme
https://gitlab.com/gitlab-org/omnibus-gitlab/blob/master/README.md

Help us improve the installation experience, let us know how we did with a 1 minute survey:
https://gitlab.fra1.qualtrics.com/jfe/form/SV_6kVqZANThUQ1bZb?installation=omnibus&release=14-3
Configura GitLab
A questo punto GitLab è installato sul tuo sistema ma non è ancora configurato. Puoi configurarlo modificando il seguente file:
nano /etc/gitlab/gitlab.rb
Modifica la seguente riga con il tuo nome di dominio:
external_url 'https://gitlab.linuxbuz.com'
Quindi, modifica le seguenti righe per abilitare Let's Encrypt SSL:
# Enable the Let's encrypt SSL
letsencrypt['enable'] = true

# This is optional to get SSL related alerts
letsencrypt['contact_emails'] = ['[email protected]']

# This example renews every 7th day at 02:00 AM
letsencrypt['auto_renew_hour'] = "2"
letsencrypt['auto_renew_minute'] = "0"
letsencrypt['auto_renew_day_of_month'] = "*/7"
Salva e chiudi il file, quindi riconfigura GitLab usando il seguente comando:
gitlab-ctl reconfigure
Una volta riconfigurato GitLab, dovresti ottenere il seguente output contenente la password di accesso a GitLab:
Notes:
Default admin account has been configured with following details:
Username: root
Password: You didn't opt-in to print initial root password to STDOUT.
Password stored to /etc/gitlab/initial_root_password. This file will be cleaned up in first reconfigure run after 24 hours.

NOTE: Because these credentials might be present in your log files in plain text, it is highly recommended to reset the password following https://docs.gitlab.com/ee/security/reset_user_password.html#reset-your-root-password.

gitlab Reconfigured!
Successivamente, recupera la password di accesso a GitLab utilizzando il seguente comando:
cat /etc/gitlab/initial_root_password
Dovresti vedere il seguente output:
# WARNING: This value is valid only in the following conditions
#          1. If provided manually (either via `GITLAB_ROOT_PASSWORD` environment variable or via `gitlab_rails['initial_root_password']` setting in `gitlab.rb`, it was provided before database was seeded for the first time (usually, the first reconfigure run).
#          2. Password hasn't been changed manually, either via UI or via command line.
#
#          If the password shown here doesn't work, you must reset the admin password following https://docs.gitlab.com/ee/security/reset_user_password.html#reset-your-root-password.

Password: WBgnk2SH4xK5FeJVsJX0Qo79IeyE5LSTGWm3EjDVEkw=

# NOTE: This file will be automatically deleted in the first reconfigure run after 24 hours.
Accedi a GitLab
Ora puoi accedere alla dashboard di GitLab utilizzando l'URL https://gitlab.linuxbuz.com . Verrai reindirizzato alla pagina di accesso di GitLab:

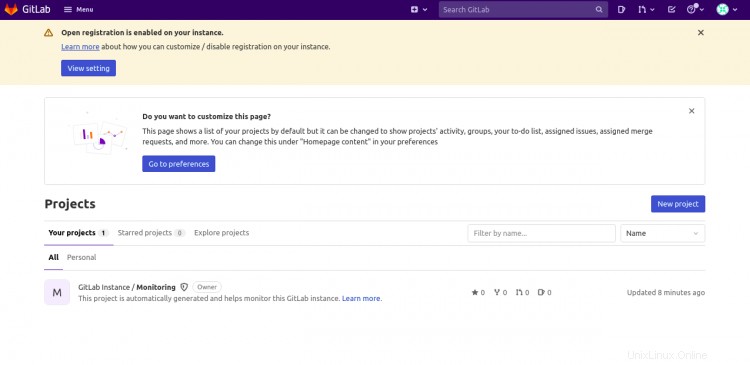
Fornisci il tuo nome utente, password e fai clic su Accedi pulsante. Dovresti vedere la dashboard di GitLab nella schermata seguente:

Configura backup GitLab
Dopo l'installazione, si consiglia di eseguire un backup completo di GitLab. Puoi farlo con il seguente comando:
gitlab-rake gitlab:backup:create
Puoi anche pianificare il backup modificando il file /etc/crontab:
nano /etc/crontab
Aggiungi la seguente riga:
0 22 * * * root gitlab-rake gitlab:backup:create
Salva e chiudi il file quando hai finito.
Conclusione
Congratulazioni! hai installato con successo GitLab con Nginx e Let's Encrypt SSL su Debian 11. Ora puoi implementare GitLab nell'ambiente di sviluppo per rendere più veloce il processo di sviluppo del software. Sentiti libero di chiedermi se hai domande.