In questa guida imparerai come installare MySQL in Ubuntu Linux e poi come impostare MySQL root password utente e infine come accedere al server MySQL come root utente.
Tutti i passaggi indicati di seguito sono testati su un'edizione server LTS Ubuntu 20.04 appena installata.
Prerequisiti
Prima di installare MySQL, assicurati che il tuo sistema Ubuntu sia aggiornato con gli ultimi pacchetti:
$ sudo apt update
$ sudo apt upgrade
Una volta installati tutti gli aggiornamenti, riavvia il sistema:
$ sudo reboot
1. Installa MySQL in Ubuntu Linux
MySQL è disponibile nei repository predefiniti di Ubuntu Linux. Per installare MySQL in Ubuntu Linux, esegui:
$ sudo apt install mysql-server
Questo comando installa tutti i componenti necessari per configurare un server di database MySQL in Ubuntu.
Per verificare la versione di MySQL, esegui:
$ mysql --version
Oppure usa la V maiuscola :
$ mysql -V
Risultato di esempio:
mysql Ver 8.0.25-0ubuntu0.20.04.1 for Linux on x86_64 ((Ubuntu))
1.1. Avvia, riavvia e arresta il servizio MySQL
In Ubuntu, il servizio MySQL viene avviato automaticamente una volta installato il server MySQL. Per verificare se il servizio MySQL è avviato o meno, esegui:
$ sudo systemctl status mysql
Risultato di esempio:
● mysql.service - MySQL Community Server
      Loaded: loaded (/lib/systemd/system/mysql.service; enabled; vendor preset: enabled)
      Active: active (running) since Wed 2021-05-26 10:55:17 UTC; 4min 26s ago
    Main PID: 1520 (mysqld)
      Status: "Server is operational"
       Tasks: 37 (limit: 2280)
      Memory: 332.8M
      CGroup: /system.slice/mysql.service
              └─1520 /usr/sbin/mysqld
 May 26 10:55:15 ubuntu2004.localdomain systemd[1]: Starting MySQL Community Server…
May 26 10:55:17 ubuntu2004.localdomain systemd[1]: Started MySQL Community Server. 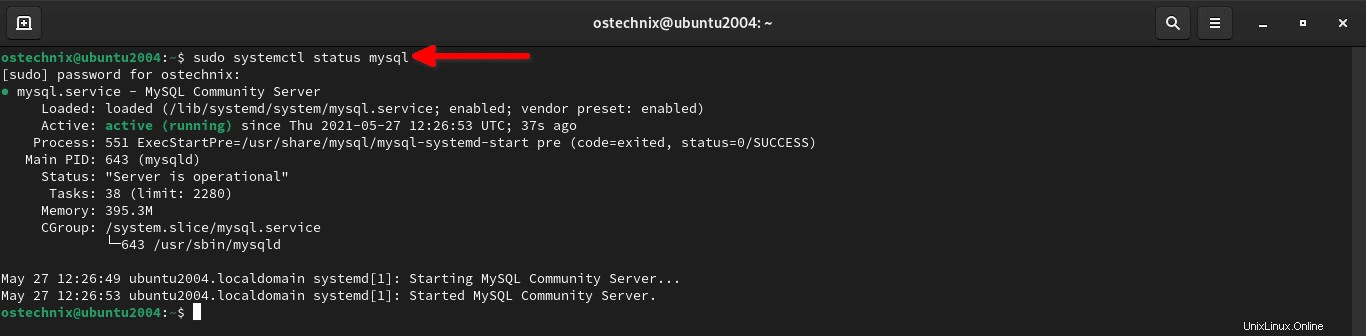
Come puoi vedere, il servizio MySQL è caricato e funzionante! Se non viene avviato per qualsiasi motivo, puoi avviare il servizio MySQL usando il comando:
$ sudo systemctl start mysql
Per consentire a MySQL di avviarsi automaticamente ad ogni riavvio, eseguire:
$ sudo systemctl enable mysql
Per riavviare il servizio MySQL, esegui:
$ sudo systemctl restart mysql
2. Imposta la password utente root MySQL
Per impostazione predefinita, la password root di MySQL è vuota, il che non è consigliato in produzione. È necessario impostare un utente amministrativo del database forte e univoco, ad esempio la password dell'utente root. MySQL viene fornito con uno script chiamato mysql_secure_installation per rimuovere le impostazioni predefinite non sicure e proteggere il server del database.
La mysql_secure_installation lo script eseguirà le seguenti operazioni:
- Imposta
VALIDATE PASSWORD COMPONENT, - Se
VALIDATE PASSWORD COMPONENTè abilitato, imposta la tuapassword validationpreferita politica, - Rimuovi gli utenti anonimi,
- Non consentire
rootaccesso utente da remoto, - Rimuovi il database di test e rimuovi i privilegi sul database di test,
- Ricarica finalmente le tabelle dei privilegi.
Ora eseguiamo questo script:
$ sudo mysql_secure_installation
Quando esegui questo comando per la prima volta dopo l'installazione di MySQL, verrai connesso a MySQL con una password vuota. Quindi, ti verrà chiesto se desideri impostare VALIDATE PASSWORD PLUGIN .
Il VALIDATE PASSWORD PLUGIN viene utilizzato per testare le password e migliorare la sicurezza. Verifica la sicurezza della password e consente agli utenti di impostare solo le password sufficientemente sicure. L'impostazione del COMPONENTE CONVALIDA PASSWORD è facoltativa. È sicuro lasciarlo disabilitato . Tuttavia, ti consiglio di utilizzare password complesse e univoche durante la creazione di ruoli utente. Se non vuoi abilitare VALIDATE PASSWORD PLUGIN , è sufficiente premere un tasto qualsiasi per saltare la parte di convalida della password e continuare con il resto dei passaggi.
Voglio usare questo VALIDATE PASSWORD PLUGIN , quindi ho inserito y per sì:
 Securing the MySQL server deployment.

 Connecting to MySQL using a blank password.

 VALIDATE PASSWORD COMPONENT can be used to test passwords
 and improve security. It checks the strength of password
 and allows the users to set only those passwords which are
 secure enough. Would you like to setup VALIDATE PASSWORD component?

 Press y|Y for Yes, any other key for No: y
Se scegli sì , ti verrà chiesto di scegliere un livello di policy per la password. Sono disponibili tre criteri di convalida della password. Sono BASSA , MEDIO e FORTE . Ciascun criterio password contiene una serie di regole password da utilizzare durante la creazione di nuovi ruoli del database. Ad esempio, se scegli MEDIA, la password deve contenere almeno 8 caratteri inclusi un numero, lettere minuscole e maiuscole e un carattere speciale. Scegli la politica della password che fa per te.
Uso la politica della password di livello BASSO, quindi scelgo 0 (zero):
 There are three levels of password validation policy:

 LOW    Length >= 8
 MEDIUM Length >= 8, numeric, mixed case, and special characters
 STRONG Length >= 8, numeric, mixed case, special characters and dictionary                  file

 Please enter 0 = LOW, 1 = MEDIUM and 2 = STRONG:
Quindi inserisci due volte la password dell'utente root MySQL. Dopo aver inserito la password, verrà visualizzato il punteggio di sicurezza della password. Nel mio caso, ho ottenuto 100. Se la sicurezza della password va bene per te, premi y per continuare con la password indicata. Altrimenti, digita un'altra password complessa e quindi premi Y continuare.
 Please set the password for root here.

 New password:

 Re-enter new password:

 Estimated strength of the password: 100
 Do you wish to continue with the password provided?(Press y|Y for Yes, any other key for No) : y
Per favore, non confonderlo con la root del tuo sistema account. È un account amministrativo per il nostro server di database.
Quindi, premi y e premi INVIO per accettare le impostazioni predefinite per tutte le domande successive. Ciò rimuoverà l'utente anonimo, non consentirà l'accesso root in remoto e rimuoverà i database di test.
Remove anonymous users? (Press y|Y for Yes, any other key for No) : y
Success.

Normally, root should only be allowed to connect from
'localhost'. This ensures that someone cannot guess at
the root password from the network.

Disallow root login remotely? (Press y|Y for Yes, any other key for No) : y
Success.

By default, MySQL comes with a database named 'test' that
anyone can access. This is also intended only for testing,
and should be removed before moving into a production
environment.

Remove test database and access to it? (Press y|Y for Yes, any other key for No) : y
 - Dropping test database...
Success.

 - Removing privileges on test database...
Success.

Reloading the privilege tables will ensure that all changes
made so far will take effect immediately.

Reload privilege tables now? (Press y|Y for Yes, any other key for No) : y
Success.

All done!
Abbiamo impostato la password utente root di MySQL.
Hai dimenticato la tua password di root MySQL? Nessun problema! Puoi facilmente reimpostare la password di root in MySQL come descritto nei seguenti link:
- Come reimpostare la password di root in MySQL 8 su Ubuntu Linux
- Come reimpostare la password utente root MySQL in Linux
3. Accedi a MySQL
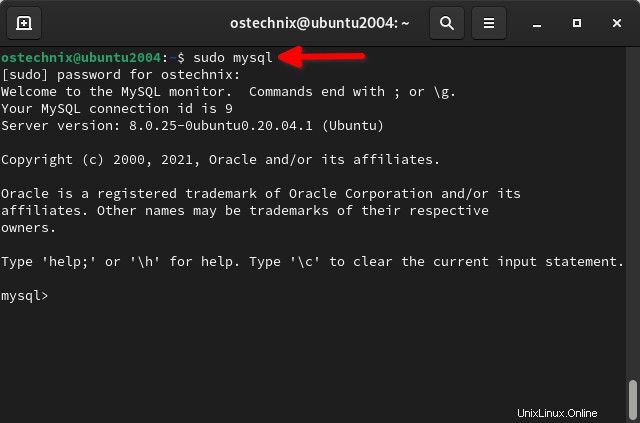
Per accedere al server MySQL come root utente, esegui semplicemente:
$ sudo mysql
Inserisci la password dell'utente per accedere al prompt di MySQL:
Welcome to the MySQL monitor.  Commands end with ; or \g.
Your MySQL connection id is 18
Server version: 8.0.25-0ubuntu0.20.04.1 (Ubuntu)

Copyright (c) 2000, 2021, Oracle and/or its affiliates.

Oracle is a registered trademark of Oracle Corporation and/or its
affiliates. Other names may be trademarks of their respective
owners.

Type 'help;' or '\h' for help. Type '\c' to clear the current input statement.

mysql>
Inizia a creare i ruoli utente e i database per i tuoi progetti. Lo tratteremo presto in una guida separata.
Per visualizzare la help sezione, digita help o \h e premi ENTER chiave:
mysql> help
Per uscire dal prompt di MySQL e tornare al tuo Terminale, esegui:
mysql> exit
4. Cambia il metodo di autenticazione per l'utente root MySQL
Hai notato che ho effettuato l'accesso al server MySQL senza fornire la password dell'utente root MySQL. Ho semplicemente inserito la password del mio account utente di sistema, ma non la password dell'utente root MySQL. Questo perché l'utente root MySQL utilizza auth_socket plug-in per l'autenticazione con il server MySQL nei sistemi Ubuntu che eseguono MySQL 5.7 e versioni successive.
Il auth_socket plugin autentica i client che si connettono al server MySQL dall'host locale tramite il file socket Unix. Quindi non puoi autenticarti sul server MySQL come root utente fornendo una password.
Se desideri utilizzare l'autenticazione tramite password per l'utente root MySQL, devi riconfigurare il server MySQL per utilizzare un metodo di autenticazione diverso, come descritto nel seguente articolo.
>> Change Authentication Method For MySQL Root User In Ubuntu
Conclusione
In questa guida abbiamo imparato a installare MySQL nel sistema operativo Ubuntu Linux. Abbiamo anche imparato come impostare la password utente root di MySQL e come accedere o connetterci al server MySQL come root utente.