
In questo tutorial, ti mostreremo come impostare un proxy inverso. Per quelli di voi che non lo sapessero, un proxy inverso HTTPS Nginx è un servizio proxy intermediario che accetta un client richiesta, la passa a uno o più server e successivamente restituisce la risposta del server al client. Se si dispone di più server, un proxy inverso può aiutare a bilanciare i carichi tra i server e migliorare le prestazioni. Poiché un proxy inverso fornisce un unico punto di contatto per i clienti, può centralizzare la registrazione e il reporting su più server.
Questo articolo presuppone che tu abbia almeno una conoscenza di base di Linux, sappia come usare la shell e, soprattutto, che ospiti il tuo sito sul tuo VPS. L'installazione è abbastanza semplice e presuppone che tu sono in esecuzione nell'account root, in caso contrario potrebbe essere necessario aggiungere 'sudo ' ai comandi per ottenere i privilegi di root. Ti mostrerò passo dopo passo la configurazione di un proxy inverso.
Prerequisiti
- Un server che esegue uno dei seguenti sistemi operativi:CentOS o Ubuntu Linux.
- Si consiglia di utilizzare una nuova installazione del sistema operativo per prevenire potenziali problemi.
- Un
non-root sudo usero accedere all'root user. Ti consigliamo di agire comenon-root sudo user, tuttavia, poiché puoi danneggiare il tuo sistema se non stai attento quando agisci come root.
Imposta proxy inverso Nginx
Passaggio 1. Innanzitutto, iniziamo assicurandoci che il tuo sistema sia aggiornato.
sudo dnf update
Passaggio 2. Installazione di Nginx sul sistema Linux.
- Installare Nginx su CentOS 8 è semplice come digitare:
sudo dnf install nginx
- Installare Nginx su Ubuntu 20.04 LTS è semplice come digitare:
sudo apt install nginx
Una volta completata l'installazione, abilita e avvia il servizio Nginx:
sudo systemctl enable nginx
sudo systemctl start nginx
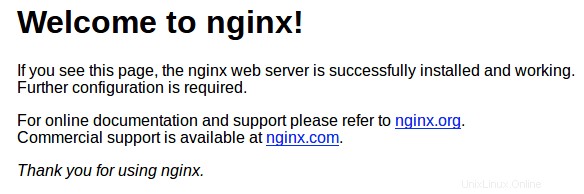
Vai a http://localhost nel browser per verificare che il server web funzioni come previsto:
Passaggio 3. Imposta il proxy inverso Nginx.
In primo luogo, segui il comando seguente per disabilitare l'host virtuale:
sudo unlink /etc/nginx/sites-enabled/default
Dobbiamo creare un file all'interno di /etc/nginx/sites-available directory che contiene le informazioni sul proxy inverso. Possiamo nominare questo reverse-proxy.conf ad esempio:
nano reverse-proxy.conf
server {
    listen 80;
    location / {
        proxy_pass http://192.168.77.20;
    }
}
La parte importante qui è il proxy_pass direttiva che essenzialmente dice a tutte le richieste provenienti dal proxy inverso Nginx da passare al socket remoto Apache 192.168.77.20:80.
Dopo aver aggiunto le direttive appropriate al tuo .conf file, attivalo collegandoti a /sites-enabled/ utilizzando il seguente comando:
ln -s /etc/nginx/sites-available/reverse-proxy.conf /etc/nginx/sites-enabled/reverse-proxy.conf
Testa il file di configurazione di Nginx:
$ sudo nginx -t

nginx: the configuration file /etc/nginx/nginx.conf syntax is ok
nginx: configuration file /etc/nginx/nginx.conf test is successful
Infine, dobbiamo eseguire un test di configurazione di Nginx e riavviare Nginx per verificarne le prestazioni:
sudo systemctl restart nginx
Passaggio 4. Nginx Reverse Proxy utilizzando Let's Encrypt.
Esegui questi comandi sulla riga di comando sulla macchina per installare Certbot:
wget https://dl.eff.org/certbot-auto
sudo mv certbot-auto /usr/local/bin/certbot-auto
sudo chown root /usr/local/bin/certbot-auto
sudo chmod 0755 /usr/local/bin/certbot-auto
Quindi, esegui questo comando per ottenere un certificato e fare in modo che Certbot modifichi automaticamente la tua configurazione Nginx:
sudo /usr/local/bin/certbot-auto --nginx
Il risultato è il seguente:
Creating virtual environment...
Installing Python packages...
Installation succeeded.
Saving debug log to /var/log/letsencrypt/letsencrypt.log
Plugins selected: Authenticator nginx, Installer nginx
Enter email address (used for urgent renewal and security notices) (Enter 'c' to
cancel): your@email.com

- - - - - - - - - - - - - - - - - - - - - - - - - - - - - - - - - - - - - - - -
Please read the Terms of Service at
https://letsencrypt.org/documents/LE-SA-v1.2-November-15-2017.pdf. You must
agree in order to register with the ACME server at
https://acme-v02.api.letsencrypt.org/directory
- - - - - - - - - - - - - - - - - - - - - - - - - - - - - - - - - - - - - - - -
(A)gree/(C)ancel: A

- - - - - - - - - - - - - - - - - - - - - - - - - - - - - - - - - - - - - - - -
Would you be willing to share your email address with the Electronic Frontier
Foundation, a founding partner of the Let's Encrypt project and the non-profit
organization that develops Certbot? We'd like to send you email about our work
encrypting the web, EFF news, campaigns, and ways to support digital freedom.
- - - - - - - - - - - - - - - - - - - - - - - - - - - - - - - - - - - - - - - -
(Y)es/(N)o: Y

Which names would you like to activate HTTPS for?
- - - - - - - - - - - - - - - - - - - - - - - - - - - - - - - - - - - - - - - -
1: your-domain.com
- - - - - - - - - - - - - - - - - - - - - - - - - - - - - - - - - - - - - - - -
Select the appropriate numbers separated by commas and/or spaces, or leave input
blank to select all options shown (Enter 'c' to cancel): 1
Obtaining a new certificate
Performing the following challenges:
http-01 challenge for your-domain-a.com
Waiting for verification...
Cleaning up challenges
Deploying Certificate to VirtualHost /etc/nginx/sites-enabled/reverse-proxy.conf

Please choose whether or not to redirect HTTP traffic to HTTPS, removing HTTP access.
- - - - - - - - - - - - - - - - - - - - - - - - - - - - - - - - - - - - - - - -
1: No redirect - Make no further changes to the webserver configuration.
2: Redirect - Make all requests redirect to secure HTTPS access. Choose this for
new sites, or if you're confident your site works on HTTPS. You can undo this
change by editing your web server's configuration.
- - - - - - - - - - - - - - - - - - - - - - - - - - - - - - - - - - - - - - - -
Select the appropriate number [1-2] then [enter] (press 'c' to cancel): 2
Redirecting all traffic on port 80 to ssl in /etc/nginx/sites-enabled/reverse-proxy.conf

- - - - - - - - - - - - - - - - - - - - - - - - - - - - - - - - - - - - - - - -
Congratulations! You have successfully enabled https://your-domain.com

You should test your configuration at:
https://www.ssllabs.com/ssltest/analyze.html?d=your-domain.com
- - - - - - - - - - - - - - - - - - - - - - - - - - - - - - - - - - - - - - - -

IMPORTANT NOTES:
 - Congratulations! Your certificate and chain have been saved at:
   /etc/letsencrypt/live/your-domain.com/fullchain.pem
   Your key file has been saved at:
   /etc/letsencrypt/live/your-domain.com/privkey.pem
   Your cert will expire on 2020-08-03. To obtain a new or tweaked
   version of this certificate in the future, simply run certbot-auto
   again with the "certonly" option. To non-interactively renew *all*
   of your certificates, run "certbot-auto renew"
 - Your account credentials have been saved in your Certbot
   configuration directory at /etc/letsencrypt. You should make a
   secure backup of this folder now. This configuration directory will
   also contain certificates and private keys obtained by Certbot so
   making regular backups of this folder is ideal.
 - If you like Certbot, please consider supporting our work by:

   Donating to ISRG / Let's Encrypt:   https://letsencrypt.org/donate
   Donating to EFF:                    https://eff.org/donate-le
Congratulazioni! Hai impostato correttamente un proxy inverso. Grazie per aver utilizzato questo tutorial per configurare un proxy inverso Nginx sul sistema Linux. Per ulteriore aiuto o informazioni utili, ti consigliamo di controllare il sito web ufficiale di Nginx.