In questo tutorial, ti mostreremo come installare LEMP su CentOS 6. Per quelli di voi che non lo sapessero, uno stack software LEMP è un gruppo di software open source che è tipicamente installati insieme per consentire a un server di ospitare siti web dinamici e app Web. Questo termine è in realtà un acronimo che rappresenta il sistema operativo Linux, con il webserver Nginx (che sostituisce il componente Apache di uno stack LAMP).I dati del sito sono archiviati in un database MySQL (usando MariaDB) e il contenuto dinamico viene elaborato da PHP.
Questo articolo presuppone che tu abbia almeno una conoscenza di base di Linux, sappia come usare la shell e, soprattutto, che ospiti il tuo sito sul tuo VPS. L'installazione è abbastanza semplice. Lo farò mostrarti l'installazione passo passo di LEMP (Linux Nginx, MariaDB e PHP) sul server CentOS 6.
Installa LEMP su CentOS 6
Passaggio 1. Innanzitutto, devi abilitare il repository EPEL sul tuo sistema e assicurarti che tutti i pacchetti siano aggiornati.
## RHEL/CentOS 6 64-Bit ##
wget http://download.fedoraproject.org/pub/epel/6/x86_64/epel-release-6-8.noarch.rpm
rpm -ivh epel-release-6-8.noarch.rpm
## RHEL/CentOS 6 32-Bit ##
wget http://download.fedoraproject.org/pub/epel/6/i386/epel-release-6-8.noarch.rpm
rpm -ivh epel-release-6-8.noarch.rpm
Passaggio 2. Installazione di Nginx.
Installeremo Nginx con yum, con il seguente comando:
yum update
yum install nginx
Avvia Nginx e aggiungilo per avviarlo automaticamente all'avvio del tuo sistema usando:
service nginx start
chkconfig nginx on
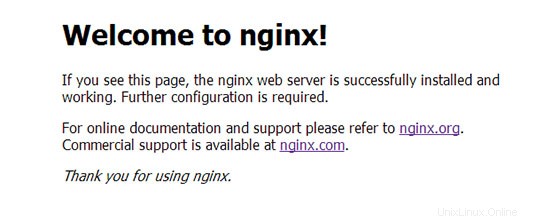
Puoi verificare che Nginx sia realmente in esecuzione aprendo il tuo browser web preferito e inserendo l'URL http://indirizzo-del-tuo-server e devi aprire la porta 80 per rendere accessibile il tuo server web:
/sbin/iptables -I INPUT -p tcp --dport 80 -j ACCEPT
/etc/rc.d/init.d/iptables save

Passaggio 3. Configurazione di Nginx e dell'host virtuale predefinito.
Infine, dobbiamo configurare i nostri host virtuali Nginx. Questo è molto più semplice da configurare rispetto ad Apache. Dai un'occhiata alla configurazione qui sotto, è leggermente diversa dalla nostra configurazione predefinita, ma spiegherò le modifiche di seguito:
nano /etc/nginx/conf.d/default.conf
# The default server
#
server {
    listen       80;
    server_name mydomain.com;

    location / {
        root   /var/www/html;
        index index.php  index.html index.htm;
    }

    error_page  404              /404.html;
    location = /404.html {
        root   /usr/share/nginx/html;
    }

    error_page   500 502 503 504  /50x.html;
    location = /50x.html {
        root   /usr/share/nginx/html;
    }

    # pass the PHP scripts to FastCGI server listening on 127.0.0.1:9000
    #
    location ~ \.php$ {
        root           /var/www/html;
        fastcgi_pass   127.0.0.1:9000;
        fastcgi_index  index.php;
        fastcgi_param  SCRIPT_FILENAME   $document_root$fastcgi_script_name;
        include        fastcgi_params;
    }
Passaggio 4. Installazione di MySQL.
Installa MySQL con il seguente comando per iniziare l'installazione:
yum install mysql mysql-server
Dopodiché aggiungilo all'avvio del tuo sistema e avvia il server MySQL usando i seguenti comandi:
chkconfig --levels 235 mysqld on
service mysqld start
Per impostazione predefinita, MySQL non è protetto. Puoi proteggere MySQL utilizzando lo script mysql_secure_installation. dovresti leggere attentamente e sotto ogni passaggio che imposterà una password di root, rimuovere anonimo utenti, non consentire l'accesso root remoto e rimuovere il database di test e l'accesso per proteggere MySQL:
mysql_secure_installation
Per accedere a MySQL, usa il comando seguente (nota che è lo stesso comando che useresti per accedere a un database MySQL):
mysql -u root -p
Passaggio 5. Installazione di PHP.
Infine, esegui i comandi seguenti per installare PHP insieme ad altri moduli utili:
yum install php php-common php-fpm php-mysql
Puoi installare alcune altre estensioni PHP richieste dalle tue applicazioni. Di seguito è riportato un elenco dei moduli PHP disponibili:
php-bcmath          =>     A module for PHP applications using the bcmath library
php-cli             =>     Command-line interface for PHP
php-common          =>     Common files for PHP
php-dba             =>     A database abstraction layer module for PHP applications
php-devel           =>     Files needed for building PHP extensions
php-embedded        =>     PHP library for embedding in applications
php-enchant         =>     Human Language and Character Encoding Support
php-gd              =>     A module for PHP applications using the gd graphics library
php-imap            =>     A module for PHP applications that use IMAP
php-intl            =>     Internationalization extension for PHP applications
php-ldap            =>     A module for PHP applications that use LDAP
php-mbstring        =>     A module for PHP applications which need multi-byte string handling
php-mysql           =>     A module for PHP applications that use MySQL databases
php-odbc            =>     A module for PHP applications that use ODBC databases
php-pdo             =>     A database access abstraction module for PHP applications
php-pear.noarch     =>     PHP Extension and Application Repository framework
php-pecl-apc        =>     APC cache optimizing PHP intermediate code
php-pecl-memcache   =>     Extension to work with the Memcached caching daemon
php-pgsql           =>     A PostgreSQL database module for PHP
php-process         =>     Modules for PHP scripts using system process interfaces
php-pspell          =>     A module for PHP applications using pspell interfaces
php-recode          =>     A module for PHP applications using the recode library
php-snmp            =>     A module for PHP applications that query SNMP-managed devices
php-soap            =>     A module for PHP applications that use the SOAP protocol
php-tidy            =>     Standard PHP module provides tidy library support
php-xml             =>     A module for PHP applications which use XML
php-xmlrpc          =>     A module for PHP applications which use the XML-RPC protocol
php-zts             =>     Thread-safe PHP interpreter for use with the Apache HTTP Server
Configura PHP-FPM:
nano /etc/php-fpm.d/www.conf
Sostituisci i valori di utente e gruppo con Nginx come di seguito:
; Unix user/group of processes
; Note: The user is mandatory. If the group is not set, the default user's group
;       will be used.
; RPM: apache Choosed to be able to access some dir as httpd
user = nginx
; RPM: Keep a group allowed to write in log dir.
group = nginx
Riavvia Nginx in modo che tutte le modifiche abbiano effetto:
service nginx restart
service php-fpm restart
Per testare PHP, crea un file di prova chiamato info.php con il contenuto seguente. Salva il file, quindi cercalo per vedere se PHP funziona:
nano /var/www/html/info.php
<?php
phpinfo();
?>
Congratulazioni! Hai installato con successo lo stack LEMP. Grazie per aver utilizzato questo tutorial per l'installazione di LAMP (Linux Nginx, MariaDB e PHP) sul sistema CentOS 6. Per ulteriore aiuto o informazioni utili, ti consiglio di controllare i siti Web ufficiali di Nginx, MySQL e PHP.