
In questo tutorial, ti mostreremo come installare e abilitare Alternative PHP Cache (APC) su CentOS. Per chi non lo sapesse, The Alternative PHP Cache (APC) è un framework gratuito, aperto e robusto per la memorizzazione nella cache e l'ottimizzazione del codice intermedio PHP. È un'estensione PECL che condivide il sistema di confezionamento e distribuzione con sua sorella, PEAR. In questo post, mostrerò come abilitare APC (Alternative PHP Cache) e rende PHP veloce.
Questo articolo presuppone che tu abbia almeno una conoscenza di base di Linux, sappia come usare la shell e, soprattutto, che ospiti il tuo sito sul tuo VPS. L'installazione è abbastanza semplice e presuppone che tu sono in esecuzione nell'account root, in caso contrario potrebbe essere necessario aggiungere 'sudo ' ai comandi per ottenere i privilegi di root. Ti mostrerò l'installazione passo passo di Alternative PHP Cache (APC) sul sistema CentOS.
Prerequisiti
- Un server che esegue uno dei seguenti sistemi operativi:CentOS Linux.
- Si consiglia di utilizzare una nuova installazione del sistema operativo per prevenire potenziali problemi
- Un
non-root sudo usero accedere all'root user. Ti consigliamo di agire comenon-root sudo user, tuttavia, poiché puoi danneggiare il tuo sistema se non stai attento quando agisci come root.
Installa la cache PHP alternativa (APC) su CentOS
Passaggio 1. Installa le dipendenze.
yum install php-pear php-devel httpd-devel pcre-devel gcc make
Passaggio 2. Installazione della cache PHP alternativa (APC) su CentOS.
pecl install apc
Passaggio 3. Configurazione di APC.
Puoi inserire la tua configurazione in php.ini file ma preferisco avere un file separato come sopra per la configurazione. I valori indicati di seguito sono a scopo dimostrativo, è possibile impostare valori diversi per APC che dipendono dal numero di pagine PHP, dalla dimensione della memoria nel server, dal numero di visite alla pagina e.t.c
#nano /etc/php.d/apc.ini

; Enable the extension module
extension = apc.so

; Options for the APC module version >= 3.1.3
; See http://www.php.net/manual/en/apc.configuration.php

; This can be set to 0 to disable APC.
apc.enabled=1
; The number of shared memory segments to allocate for the compiler cache.
apc.shm_segments=1
; The size of each shared memory segment, with M/G suffixe
apc.shm_size=512M
; A "hint" about the number of distinct source files that will be included or
; requested on your web server. Set to zero or omit if you're not sure;
apc.num_files_hint=1024
; Just like num_files_hint, a "hint" about the number of distinct user cache
; variables to store.  Set to zero or omit if you're not sure;
apc.user_entries_hint=4096
; The number of seconds a cache entry is allowed to idle in a slot in case this
; cache entry slot is needed by another entry.
apc.ttl=7200
; use the SAPI request start time for TTL
apc.use_request_time=1
; The number of seconds a user cache entry is allowed to idle in a slot in case
; this cache entry slot is needed by another entry.
apc.user_ttl=7200
; The number of seconds that a cache entry may remain on the garbage-collection list.
apc.gc_ttl=3600
; On by default, but can be set to off and used in conjunction with positive
; apc.filters so that files are only cached if matched by a positive filter.
apc.cache_by_default=1
; A comma-separated list of POSIX extended regular expressions.
apc.filters
; The mktemp-style file_mask to pass to the mmap module
apc.mmap_file_mask=/tmp/apc.XXXXXX
; This file_update_protection setting puts a delay on caching brand new files.
apc.file_update_protection=2
; Setting this enables APC for the CLI version of PHP (Mostly for testing and debugging).
apc.enable_cli=0
; Prevents large files from being cached
apc.max_file_size=1M
; Whether to stat the main script file and the fullpath includes.
apc.stat=1
; Vertification with ctime will avoid problems caused by programs such as svn or rsync by making
; sure inodes havn't changed since the last stat. APC will normally only check mtime.
apc.stat_ctime=0
; Whether to canonicalize paths in stat=0 mode or fall back to stat behaviour
apc.canonicalize=0
; With write_lock enabled, only one process at a time will try to compile an
; uncached script while the other processes will run uncached
apc.write_lock=1
; Logs any scripts that were automatically excluded from being cached due to early/late binding issues.
apc.report_autofilter=0
;This setting is deprecated, and replaced with apc.write_lock, so let's set it to zero.
apc.slam_defense=0
Passaggio 4. Abilita l'estensione PHP APC
Al termine, esegui il comando seguente per abilitare l'estensione APC nella configurazione di Apache.
echo "extension=apc.so" > /etc/php.d/apc.ini
Passaggio 4. Riavvia Apache.
Ora riavviamo Apache usando il seguente comando:
service httpd restart
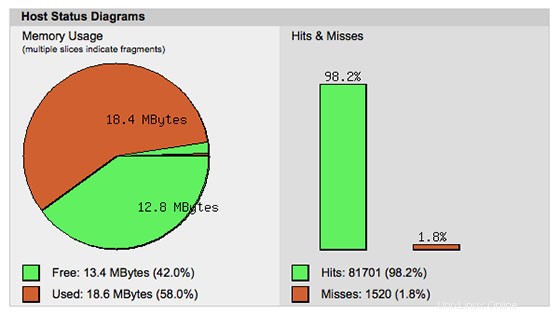
APC fornisce un'interfaccia web con informazioni dettagliate sulla cache (utilizzo della memoria, hit e voci mancate della cache). Per impostazione predefinita, non è accessibile, quindi è necessario copia il file /usr/share/php/apc.php in un posto dove puoi navigare. Ora dal browser puoi andare su http://your-domain.com/apc.php . Preferisco aspettare un giorno per vedere le prestazioni dell'APC in modo da poter avere un'idea chiara di come è andata bene la nostra configurazione.
Congratulazioni! Hai installato con successo Alternative PHP Cache (APC). Grazie per aver utilizzato questo tutorial per installare Alternative PHP Cache (APC) sul sistema CentOS. Per ulteriore aiuto o informazioni utili, ti consigliamo controlla il sito Web ufficiale di PHP.