Introduzione
La cache è spesso il software più critico per un'azienda basata sul Web.
Cache di vernice è un popolare e potente motore HTTP open source/proxy HTTP inverso utilizzato da oltre 3,4 milioni di siti Web.
Varnish Cache è un proxy inverso HTTP con memorizzazione nella cache open source che può aiutare a migliorare le prestazioni di un server Web.
In questa guida, ti mostreremo come installare Varnish Cache e usarlo.
Quindi gentilmente segui i passaggi seguenti:
Installa Apache
- Installa il server HTTP Apache con il comando:
dnf install httpd -y- Cambia la porta di Apache da 80 a 8080 . apri semplicemente httpd.conf e cambialo.
vim /etc/httpd/conf/httpd.confLa linea dovrebbe essere così:
Listen 8080- Avvia e abilita Apache
systemctl start httpd.service
systemctl enable httpd.service
Configura le impostazioni del firewall
- Modifica semplicemente il firewall per consentire il traffico sulla porta 80
firewall-cmd --zone=public --add-service=http --permanent
firewall-cmd --reload
Controlla le configurazioni di Apache
- Tocca un file chiamato unixcop.html
touch /var/www/html/unixcop.html- Usa arricciatura per testare il server alla porta 8080.
[root@unixcop ~]# curl -I http://localhost:8080/unixcop.html
HTTP/1.1 200 OK
Date: Wed, 29 Sep 2021 14:59:19 GMT
Server: Apache/2.4.37 (centos)
Last-Modified: Wed, 29 Sep 2021 14:58:59 GMT
ETag: "0-5cd2391f65f14"
Accept-Ranges: bytes
Content-Type: text/html; charset=UTF-8
[root@unixcop ~]#
Installa la cache di Varnish
- Scarica il repository EPEL-Release.
dnf install epel-release -y- Aggiungi il repository Varnish Cache. Apri /etc/yum.repos.d/varnish.repo con vim.
vim /etc/yum.repos.d/varnish.repo- Quindi aggiungi quanto segue.
[varnish]
name=varnishcache_varnish
baseurl=https://packagecloud.io/varnishcache/varnish60lts/el/8/x86_64
repo_gpgcheck=1
gpgcheck=0
enabled=1
gpgkey=https://packagecloud.io/varnishcache/varnish60lts/gpgkey
sslverify=1
sslcacert=/etc/pki/tls/certs/ca-bundle.crt
metadata_expire=300- Aggiorna la cache dnf per il repository Varnish.
[root@unixcop ~]# dnf -q makecache -y --disablerepo='*' --enablerepo='varnish'
Importing GPG key 0xA750EDCD:
 Userid     : "https://packagecloud.io/varnishcache/varnish60lts (https://packagecloud.io/docs#gpg_signing) <support@packagecloud.io>"
 Fingerprint: 48D8 1A24 CB04 56F5 D594 31D9 4CFC FD6B A750 EDCD
 From       : https://packagecloud.io/varnishcache/varnish60lts/gpgkey
[root@unixcop ~]# - Installa la cache di Varnish.
dnf install varnish -y - Verifica che Varnish sia installato.
[root@unixcop ~]# varnishd -V
varnishd (varnish-6.0.6 revision 29a1a8243dbef3d973aec28dc90403188c1dc8e7)
Copyright (c) 2006 Verdens Gang AS
Copyright (c) 2006-2019 Varnish Software AS
[root@unixcop ~]#- Abilita Varnish sul sistema dopo il riavvio.
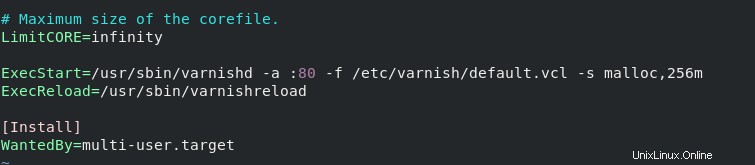
systemctl enable --now varnish- Il porto predefinito di vernice è 6081 . Quindi modifica varnish.service quindi sostituirlo con la porta 80 .
vim /usr/lib/systemd/system/varnish.serviceDevi modificare ExecStart e sostituire la porta. La linea dovrebbe essere come quella mostrata nello screenshot.
- Riavvia la vernice.
systemctl restart varnishVernice di prova
- Usa anche arricciatura per testare la vernice.
curl -I http://localhost/unixcop.htmlL'output dovrebbe apparire così.
La vernice X:2 e Via:vernice 1.1 (vernice/6.0) quando Varnish Cache è in esecuzione.
[root@unixcop ~]# curl -I http://localhost/unixcop.html
HTTP/1.1 200 OK
Date: Wed, 29 Sep 2021 15:08:35 GMT
Server: Apache/2.4.37 (centos)
Last-Modified: Wed, 29 Sep 2021 14:58:59 GMT
ETag: "0-5cd2391f65f14"
Content-Length: 0
Content-Type: text/html; charset=UTF-8
X-Varnish: 2
Age: 0
Via: 1.1 varnish (Varnish/6.0)
Accept-Ranges: bytes
Connection: keep-alive

[root@unixcop ~]#
Assicurati che sia tutto a posto
- Quindi Controlla le porte per verificare quale processo è in ascolto su quale porta utilizzando ss come mostrato di seguito:
ss -lnpt | grep 80
Potresti notare che verniciato è in ascolto sulla porta 80 e httpd è sulla porta 8080 come mostrato nella schermata sopra.
Verifica la vernice da un altro server
- Devi usare curl per testare la vernice e fornire l'IP del server su cui è in esecuzione la vernice.
[qadry@rhel-pc ~]$ curl -I http://192.168.13.135/unixcop.html
HTTP/1.1 200 OK
Date: Wed, 29 Sep 2021 15:11:26 GMT
Server: Apache/2.4.37 (centos)
Last-Modified: Wed, 29 Sep 2021 14:58:59 GMT
ETag: "0-5cd2391f65f14"
Content-Length: 0
Content-Type: text/html; charset=UTF-8
X-Varnish: 5
Age: 0
Via: 1.1 varnish (Varnish/6.0)
Accept-Ranges: bytes
Connection: keep-alive

[qadry@rhel-pc ~]$
Conclusione
Quindi è tutto..
Abbiamo illustrato come installare e utilizzare la cache di vernice che può aiutare a migliorare le prestazioni di un server web.
Grazie!!