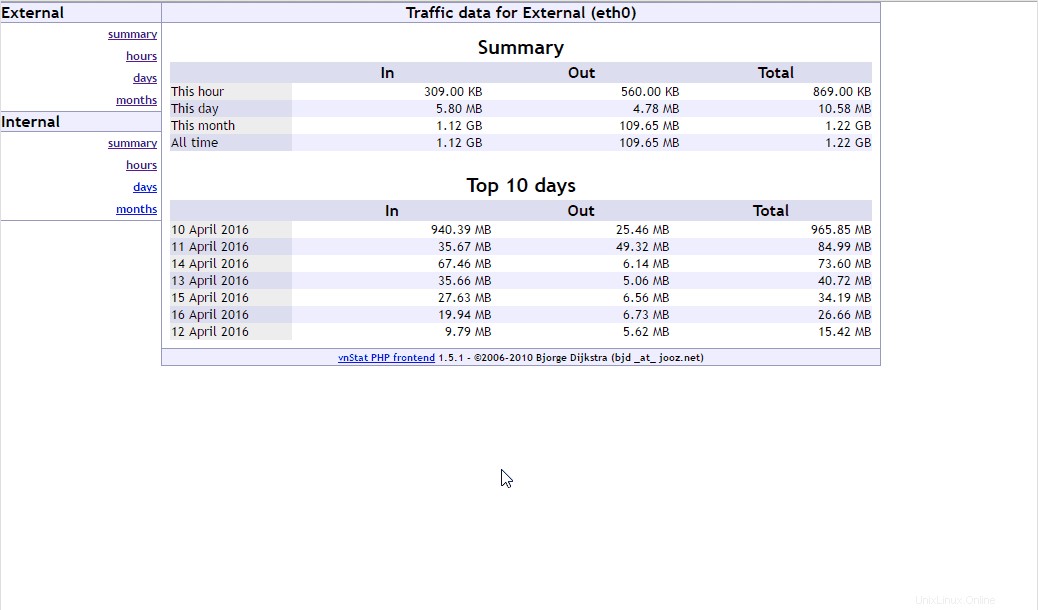
Interfaccia PHP VnStat è un'interfaccia web grafica per l'utilità di rete chiamata VnStat. VnStat PHP fornisce un semplice formato grafico in cui possiamo monitorare il traffico IN e OUT delle interfacce di rete, inclusa la cronologia delle statistiche (oraria, giorni, mesi o riepilogo completo).
Questa guida ti aiuta a installare VnStat PHP frontend su sistemi Linux.
Requisiti di sistema
- Sistema operativo Linux (CentOS 6 / CentOS 7 / RHEL 6 / RHEL 7 / Ubuntu 16.04 / Ubuntu 14.04 e Debian 9 )
- Configurazione VnStat funzionante
- Server Web (Apache) con supporto PHP
- Estensione PHP-GD per i grafici PNG.
Installa e configura VnStat
VnStat è un'utilità della riga di comando per monitorare la larghezza di banda di rete delle interfacce e mantiene le statistiche storiche sul suo database.
CentOS/RHEL
VnStat non è disponibile nel repository principale, quindi è necessario abilitare il repository EPEL per i derivati basati su Redhat.
# yum -y install vnstat
Dopo aver installato VnStat, avvialo usando il comando seguente. (Ignora se è già in esecuzione).
# service vnstat start
Avvia VnStat all'avvio del sistema utilizzando il comando seguente.
# chkconfig vnstat on
Debian/Ubuntu
$ sudo apt-get install vnstat
Attendi almeno dieci minuti, quindi esegui il comando seguente. Dovresti ottenere un output simile come di seguito; questo assicura che VnStat funzioni.
# vnstat

Database updated: Sun Apr 17 17:03:53 2016
   eth0 since 04/10/16
          rx:  1.12 GiB      tx:  110.13 MiB      total:  1.22 GiB
   monthly
                     rx      |     tx      |    total    |   avg. rate
     ------------------------+-------------+-------------+---------------
       Apr '16      1.12 GiB |  110.13 MiB |    1.22 GiB |    7.11 kbit/s
     ------------------------+-------------+-------------+---------------
     estimated      2.00 GiB |     197 MiB |    2.19 GiB |
   daily
                     rx      |     tx      |    total    |   avg. rate
     ------------------------+-------------+-------------+---------------
     yesterday     19.94 MiB |    6.73 MiB |   26.66 MiB |    2.53 kbit/s
         today      5.92 MiB |    5.26 MiB |   11.18 MiB |    1.49 kbit/s
     ------------------------+-------------+-------------+---------------
     estimated         7 MiB |       7 MiB |      14 MiB |
Installa Apache, PHP e php-gd
Installa i pacchetti utilizzando “yum ” su CentOS e “apt-get ” su Debian, avvia il server Apache dopo l'installazione.
CentOS/RHEL
# yum -y install httpd php php-gd wget
# chkconfig httpd on
# service httpd start
Configura il firewall per consentire il traffico Apache (CentOS / RHEL).
### FirewallD ###

# firewall-cmd --permanent--add-service=http
# firewall-cmd --reload

### IPTables ###

# iptables -A INPUT -m tcp -p tcp --dport 80 -j ACCEPT
# service iptables restart
Ubuntu/Debian
### Ubuntu 15.10 / 14.04 and older/ Debian ###

$ sudo apt-get install apache2 php5 php5-gd wget
$ sudo service apache2 restart

### Adding PHP 5.6 PPA for Ubuntu 16.04 ###

$ sudo add-apt-repository ppa:ondrej/php
$ sudo apt-get update
$ sudo apt-get install apache2 php5.6 php5.6-gd wget libapache2-mod-php5.6
$ sudo service apache2 restart
Scarica e installa VnStat frontend PHP
Usa il comando wget per scaricare l'ultimo frontend PHP VnStat dal sito Web ufficiale.
# cd /tmp
# wget http://www.sqweek.com/sqweek/files/vnstat_php_frontend-1.5.1.tar.gz
Estrai il pacchetto scaricato usando il comando “tar”.
# tar -zxvf vnstat_php_frontend-1.5.1.tar.gz
Una volta completata l'estrazione, sposta le directory nella directory principale del server web.
CentOS/RHEL
# cp -a vnstat_php_frontend-1.5.1 /var/www/html/vnstat
# restorecon -Rv /var/www/html/vnstat/
Ubuntu/Debian
### Debain / Ubuntu 14.04 and later (Apache 2.4 and later) ###

$ sudo cp -a vnstat_php_frontend-1.5.1  /var/www/html/vnstat

### Ubuntu 13.10 and below (i.e older Apache 2.x) ###

$ sudo cp -a vnstat_php_frontend-1.5.1  /var/www/vnstat
Configura il frontend PHP VnStat
Apri il file di configurazione e modifica i parametri mostrati di seguito.
### CentOS / RHEL ###

# vi /var/www/html/vnstat/config.php

### Debain / Ubuntu 14.04 and later (Apache 2.4 and later) ###

$ sudo nano /var/www/html/vnstat/config.php

### Ubuntu 13.10 and below (i.e older Apache 2.x) ###

$ sudo nano /var/www/vnstat/config.php
Imposta la lingua predefinita.
// edit these to reflect your particular situation
//
$locale = 'en_US.UTF-8';
$language = 'en';
Imposta quale interfaccia monitorare.
// list of network interfaces monitored by vnStat
$iface_list = array('eth0', 'eth1');
Puoi nominare le tue interfacce di rete.
// optional names for interfaces
// if there's no name set for an interface then the interface identifier
// will be displayed instead
//
$iface_title['eth1'] = 'Internal';
$iface_title['eth0'] = 'External';
Accedi al frontend PHP VnStat
Apri il browser e naviga su uno qualsiasi dei seguenti collegamenti. Otterresti un output come di seguito; ti mostra il riepilogo di utilizzo (in ore, giorni e mesi) della tua interfaccia di rete.
http://localhost/vnstatO
http://tuo.ip.addr.ess/vnstat Se non ottieni alcun dato nel grafico, considera disabilitando SELinux su CentOS 7 / CentOS 6.
 Riferimento
Settimana quadrata – Pagina iniziale ufficiale