Questo tutorial mostra l'installazione di ISPConfig 3.2 su un server CentOS 8 (64 bit). ISPConfig è un pannello di controllo di web hosting che consente di configurare i seguenti servizi tramite un browser web:server web Apache, PHP, server di posta Postfix, MySQL, server dei nomi BIND, PureFTPd, SpamAssassin, ClamAV, Mailman e molti altri.
1 Requisiti
Per installare un tale sistema avrai bisogno di quanto segue:
- Un sistema server minimo Centos 8. Può trattarsi di un server installato da zero, come descritto nel nostro tutorial sul server minimo di Centos 8, o di un server virtuale o root-server di una società di hosting che ha installato una configurazione minima di Centos 8.
- Una connessione Internet veloce.
2 Nota preliminare
In questo tutorial, utilizzo l'hostname server1.example.com con l'indirizzo IP 192.168.0.100 e il gateway 192.168.0.1. Queste impostazioni potrebbero differire per te, quindi devi sostituirle dove appropriato.
3 Prepara il server
Imposta il layout della tastiera
Nel caso in cui il layout della tastiera del server non corrisponda alla tua tastiera, puoi passare alla tastiera giusta (nel mio caso "de" per un layout di tastiera tedesco, con il comando localectl:
localectl set-keymap de
Per ottenere un elenco di tutte le keymap disponibili, esegui:
localectl list-keymaps
Voglio installare ISPConfig alla fine di questo tutorial, ISPConfig viene fornito con lo script del firewall Bastille che userò come firewall, quindi disabilito il firewall CentOS predefinito ora. Naturalmente, sei libero di lasciare attivo il firewall CentOS e configurarlo in base alle tue esigenze (ma in seguito non dovresti utilizzare nessun altro firewall poiché molto probabilmente interferirà con il firewall CentOS).
Corri...
dnf -y install net-tools wget rsyslog curl
systemctl stop firewalld.service
systemctl disable firewalld.service
per fermare e disabilitare il firewall CentOS. Va bene quando ricevi errori qui, questo indica solo che il firewall non è stato installato.
Quindi dovresti controllare che il firewall sia stato davvero disabilitato. Per farlo, esegui il comando:
iptables -L
L'output dovrebbe essere simile a questo:
[[email protected] ~]# iptables -L
Chain INPUT (policy ACCEPT)
target prot opt source destination
Chain FORWARD (policy ACCEPT)
target prot opt source destination
Chain OUTPUT (policy ACCEPT)
target prot opt source destination
Oppure usa il comando firewall-cmd:
firewall-cmd --state
[[email protected] ~]# firewall-cmd --state
not running
[[email protected] ~]#
Ora installerò l'editor di configurazione di rete e l'editor basato su shell "nano" che utilizzerò nei prossimi passaggi per modificare i file di configurazione:
dnf -y install nano wget NetworkManager-tui yum-utils
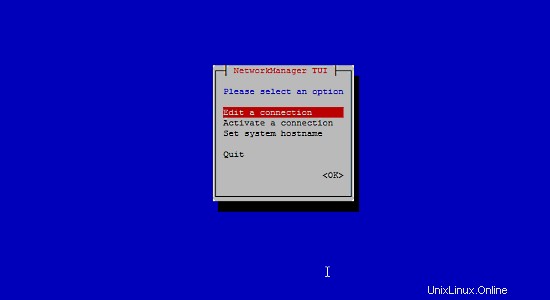
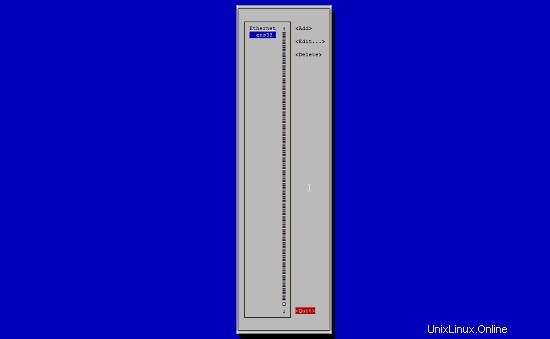
Se non hai configurato la tua scheda di rete durante l'installazione, puoi farlo ora. Corri...
nmtui
... e vai su Modifica una connessione:
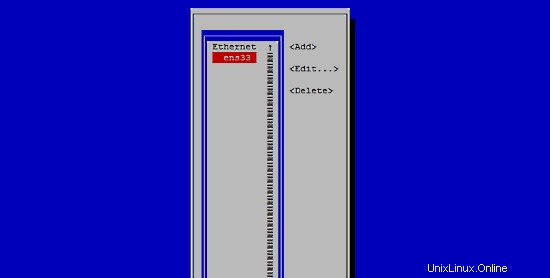
Seleziona la tua interfaccia di rete:
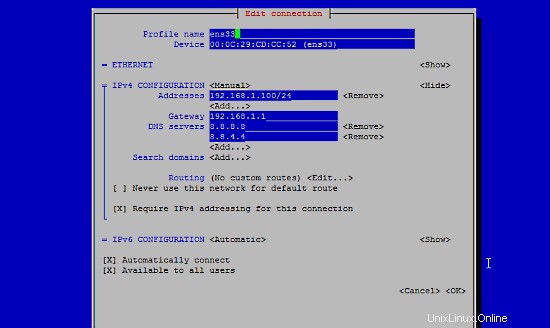
Quindi inserisci i dettagli della tua rete:disabilita DHCP e inserisci un indirizzo IP statico, una maschera di rete, il tuo gateway e uno o due server dei nomi, quindi premi OK:
Quindi seleziona OK per confermare le modifiche apportate nelle impostazioni di rete
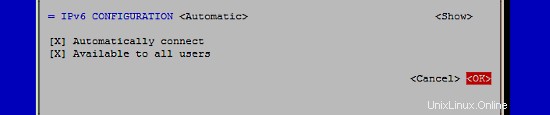
e Esci per chiudere lo strumento di configurazione della rete nmtui.
Dovresti correre
ifconfig
ora per verificare se il programma di installazione ha ottenuto il tuo indirizzo IP corretto:
[[email protected] ~]# ifconfig
ens33: flags=4163<UP,BROADCAST,RUNNING,MULTICAST>  mtu 1500
        inet 192.168.0.100  netmask 255.255.255.0  broadcast 192.168.0.255
        inet6 fe80::20c:29ff:feee:b665  prefixlen 64  scopeid 0x20<link>
        inet6 2003:e1:bf22:1b00:20c:29ff:feee:b665  prefixlen 64  scopeid 0x0<global>
        ether 00:0c:29:ee:b6:65  txqueuelen 1000  (Ethernet)
        RX packets 2874  bytes 1369892 (1.3 MiB)
        RX errors 0  dropped 546  overruns 0  frame 0
        TX packets 968  bytes 160901 (157.1 KiB)
        TX errors 0  dropped 0 overruns 0  carrier 0  collisions 0
lo: flags=73<UP,LOOPBACK,RUNNING>  mtu 65536
        inet 127.0.0.1  netmask 255.0.0.0
        inet6 ::1  prefixlen 128  scopeid 0x10<host>
        loop  txqueuelen 1000  (Local Loopback)
        RX packets 0  bytes 0 (0.0 B)
        RX errors 0  dropped 0  overruns 0  frame 0
        TX packets 0  bytes 0 (0.0 B)
        TX errors 0  dropped 0 overruns 0  carrier 0  collisions 0
Se la tua scheda di rete non viene visualizzata lì, allora non è abilitata all'avvio. In questo caso, apri il file /etc/sysconfig/network-scripts/ifcfg-eth0
nano /etc/sysconfig/network-scripts/ifcfg-ens33
e imposta ONBOOT su sì:
[...]
ONBOOT=yes
[...]
e riavvia il server.
Controlla il tuo /etc/resolv.conf se elenca tutti i nameserver che hai precedentemente configurato:
cat /etc/resolv.conf
Se mancano i nameserver, esegui
nmtui
e aggiungi di nuovo i nameserver mancanti.
Ora, alla configurazione...
Regolare /etc/hosts e /etc/hostname
Successivamente, modificheremo /etc/hosts. Rendilo simile a questo:
nano /etc/hosts
127.0.0.1   localhost localhost.localdomain localhost4 localhost4.localdomain4
192.168.0.100   server1.example.com     server1

::1         localhost localhost.localdomain localhost6 localhost6.localdomain6
Imposta il nome host nel file /etc/hostname. Il file deve contenere il nome di dominio completo (ad es. server1.example.com nel mio caso) e non solo il nome breve come "server1". Apri il file con l'editor nano:
nano /etc/hostname
E imposta il nome host nel file.
server1.example.com
Salva il file ed esci da nano.
Imposta SELinux su permissivo
SELinux è un'estensione di sicurezza di CentOS che dovrebbe fornire una sicurezza estesa. ISPConfig non viene fornito con un set di regole SELinux, quindi l'ho impostato su permissivo (questo è un must se vuoi installare ISPConfig in un secondo momento).
Modifica /etc/selinux/config e imposta SELINUX=permissive:
nano /etc/selinux/config
# This file controls the state of SELinux on the system.
# SELINUX= can take one of these three values:
#     enforcing - SELinux security policy is enforced.
#     permissive - SELinux prints warnings instead of enforcing.
#     disabled - No SELinux policy is loaded.
SELINUX=permissive
# SELINUXTYPE= can take one of these two values:
#     targeted - Targeted processes are protected,
#     mls - Multi Level Security protection.
SELINUXTYPE=targeted
Successivamente dobbiamo riavviare il sistema:
reboot
4 Abilita repository aggiuntivi e installa alcuni software
Per prima cosa importiamo le chiavi GPG per i pacchetti software:
rpm --import /etc/pki/rpm-gpg/RPM-GPG-KEY*
Quindi abilitiamo il repository EPEL sul nostro sistema CentOS poiché molti dei pacchetti che installeremo nel corso di questo tutorial non sono disponibili nel repository CentOS 8 ufficiale:
dnf -y install epel-release
Attiva Power Tools:
dnf config-manager --set-enabled powertools
Quindi aggiorniamo i nostri pacchetti esistenti sul sistema:
dnf -y update
Ora installiamo alcuni pacchetti software che saranno necessari in seguito:
dnf -y groupinstall 'Development Tools'
5 quote
(Se hai scelto uno schema di partizionamento diverso dal mio, devi modificare questo capitolo in modo che la quota si applichi alle partizioni dove ne hai bisogno.)
Per installare quota, eseguiamo questo comando:
dnf -y install quota
Ora controlliamo se la quota è già abilitata per il file system in cui sono archiviati i dati del sito Web (/var/www) e Maildir (var/vmail). In questa configurazione di esempio, ho una grande partizione di root, quindi cerco ' / ':
mount | grep ' / '
[[email protected] ~]# mount | grep ' / '
/dev/mapper/centos-root on / type xfs (rw,relatime,attr2,inode64,noquota)
[[email protected] ~]#
Se hai una partizione /var separata, usa:
mount | grep ' /var '
invece. Se la riga contiene la parola "noquota ", quindi procedi con i passaggi seguenti per abilitare la quota.
Abilitazione della quota sulla partizione / (root)
Normalmente si abilita la quota nel file /etc/fstab, ma se il filesystem è il filesystem root "/", allora la quota deve essere abilitata da un parametro di avvio del kernel Linux.
Modifica il file di configurazione di grub:
nano /etc/default/grub
Cerca la riga che inizia con GRUB_CMDLINE_LINUX e aggiungi rootflags=uquota,gquota ai parametri della riga di comando in modo che la riga risultante assomigli a questa:
GRUB_CMDLINE_LINUX="crashkernel=auto resume=/dev/mapper/cl-swap rd.lvm.lv=cl/root rd.lvm.lv=cl/swap rootflags=uquota,gquota"
e applica le modifiche eseguendo il comando seguente.
cp /boot/grub2/grub.cfg /boot/grub2/grub.cfg_bak
grub2-mkconfig -o /boot/grub2/grub.cfg
e riavvia il server.
reboot
Ora controlla se la quota è abilitata:
mount | grep ' / '
[[email protected] ~]# mount | grep ' / '
/dev/mapper/centos-root on / type xfs (rw,relatime,attr2,inode64,usrquota,grpquota)
[[email protected] ~]#
Quando la quota è attiva, possiamo vedere "usrquota,grpquota " nell'elenco delle opzioni di montaggio.
Abilitazione della quota su una partizione /var separata
Se hai una partizione /var separata, modifica /etc/fstab e aggiungi ,uquota,gquota alla partizione / (/dev/mapper/centos-var):
nano /etc/fstab
#
# /etc/fstab
# Created by anaconda on Sun Sep 21 16:33:45 2014
#
# Accessible filesystems, by reference, are maintained under '/dev/disk'
# See man pages fstab(5), findfs(8), mount(8) and/or blkid(8) for more info
#
/dev/mapper/centos-root /                       xfs     defaults        1 1
/dev/mapper/centos-var /var                     xfs     defaults,uquota,gquota        1 2
UUID=9ac06939-7e43-4efd-957a-486775edd7b4 /boot                   xfs     defaults        1 3
/dev/mapper/centos-swap swap                    swap    defaults        0 0
Quindi esegui
mount -o remount /var
quotacheck -avugm
quotaon -avug
per abilitare la quota. Quando viene visualizzato un errore che indica che non è presente alcuna partizione con la quota abilitata, riavviare il server prima di procedere.
6 Installa Apache, PHP, MySQL e phpMyAdmin
Abilita il repository Remi per ottenere versioni PHP più recenti (attualmente PHP 7.4):
dnf install http://rpms.remirepo.net/enterprise/remi-release-8.rpm
dnf -y install yum-utils
dnf -y module reset php
dnf -y module install php:remi-7.4
dnf update
Possiamo installare i pacchetti necessari con un solo comando:
dnf -y install httpd mod_ssl mariadb-server php php-mysqlnd php-mbstring
Per garantire che il server non possa essere attaccato tramite la vulnerabilità HTTPOXY, disabiliteremo l'intestazione HTTP_PROXY in Apache a livello globale.
Aggiungi la regola dell'intestazione di apache alla fine del file httpd.conf:
echo "RequestHeader unset Proxy early" >> /etc/httpd/conf/httpd.conf
E riavvia httpd per applicare la modifica alla configurazione.
service httpd restart
Installa phpMyAdmin:
cd /tmp
wget https://files.phpmyadmin.net/phpMyAdmin/5.0.2/phpMyAdmin-5.0.2-all-languages.tar.gz
tar xzvf phpMyAdmin-5.0.2-all-languages.tar.gz
mkdir /usr/share/phpmyadmin
mv phpMyAdmin-5.0.2-all-languages/* /usr/share/phpmyadmin/
mkdir /usr/share/phpmyadmin/tmp
chown -R apache:apache /usr/share/phpmyadmin
chmod 777 /usr/share/phpmyadmin/tmp
Facoltativo:cambia il modulo Apache MPM
CentOS 8 utilizza il modulo Apache MPM Event per impostazione predefinita, questo è positivo da un lato, poiché consente di utilizzare il protocollo HTTP/2. D'altra parte, non ti permette di usare il modulo mod_php di apache. In generale, oggi si dovrebbe usare PHP-FPM come predefinito e ISPConfig lo supporta. Se hai bisogno della vecchia modalità mod_php per motivi di compatibilità, puoi cambiare Apache MPM in questo modo:
nano /etc/httpd/conf.modules.d/00-mpm.conf
Aggiungi un # davanti alla riga dell'evento MPM in modo che appaia così:
# LoadModule mpm_event_module modules/mod_mpm_event.so
Quindi rimuovi il # in dalla riga MPM Prefork, in modo che assomigli a questo:
LoadModule mpm_prefork_module modules/mod_mpm_prefork.so
Quindi riavvia httpd per applicare la modifica alla configurazione.
service httpd restart
7 Installa Dovecot
Dovecot può essere installato come segue:
dnf -y install dovecot dovecot-mysql dovecot-pigeonhole
Crea un file dovecot-sql.conf vuoto e crea collegamenti simbolici:
touch /etc/dovecot/dovecot-sql.conf
ln -s /etc/dovecot/dovecot-sql.conf /etc/dovecot-sql.conf
ln -s /etc/dovecot/dovecot.conf /etc/dovecot.conf
Ora crea i link di avvio del sistema e avvia Dovecot:
systemctl enable dovecot
systemctl start dovecot
8 Installa Postfix
Postfix può essere installato come segue:
dnf -y install postfix postfix-mysql
Quindi, apri le porte TLS/SSL e di invio in Postfix:
nano /etc/postfix/master.cf
Decommenta le sezioni di invio e smtps come segue e aggiungi righe ove necessario in modo che questa sezione del file master.cf assomigli esattamente a quella di seguito. IMPORTANTE: Rimuovi il # davanti alle righe che iniziano con smtps e submit anche e non solo dalle righe -o dopo queste righe!
[...]
submission inet n - n - - smtpd
 -o syslog_name=postfix/submission
 -o smtpd_tls_security_level=encrypt
 -o smtpd_sasl_auth_enable=yes
 -o smtpd_client_restrictions=permit_sasl_authenticated,reject
# -o smtpd_reject_unlisted_recipient=no
# -o smtpd_client_restrictions=$mua_client_restrictions
# -o smtpd_helo_restrictions=$mua_helo_restrictions
# -o smtpd_sender_restrictions=$mua_sender_restrictions
# -o smtpd_recipient_restrictions=
# -o smtpd_relay_restrictions=permit_sasl_authenticated,reject
# -o milter_macro_daemon_name=ORIGINATING
smtps inet n - n - - smtpd
 -o syslog_name=postfix/smtps
 -o smtpd_tls_wrappermode=yes
 -o smtpd_sasl_auth_enable=yes
 -o smtpd_client_restrictions=permit_sasl_authenticated,reject
# -o smtpd_reject_unlisted_recipient=no
# -o smtpd_client_restrictions=$mua_client_restrictions
# -o smtpd_helo_restrictions=$mua_helo_restrictions
# -o smtpd_sender_restrictions=$mua_sender_restrictions
# -o smtpd_recipient_restrictions=
# -o smtpd_relay_restrictions=permit_sasl_authenticated,reject
# -o milter_macro_daemon_name=ORIGINATING
[...]
Quindi disattiva Sendmail e avvia Postfix e MariaDB (MySQL):
systemctl enable mariadb.service
systemctl start mariadb.service
systemctl enable postfix.service
systemctl restart postfix.service
Disabilitiamo sendmail per assicurarci che non si avvii nel caso sia installato sul tuo server. Quindi il messaggio di errore "Impossibile emettere la chiamata al metodo:unità sendmail.service non caricata". può essere ignorato.
Per abilitare il supporto per dispositivi vecchi/obsoleti, esegui questo comando (opzionale, utilizzalo solo quando desideri che i vecchi dispositivi di posta si connettano poiché indebolisce la configurazione SSL/TLS consentendo crittografie meno sicure):
update-crypto-policies --set LEGACY
9 Installa Getmail
Getmail può essere installato come segue:
dnf install python2
cd /tmp
wget http://pyropus.ca/software/getmail/old-versions/getmail-5.14.tar.gz
tar xvfz getmail-5.14.tar.gz
cd getmail-5.14
python2 setup.py build
python2 setup.py install
10 Imposta password MySQL e configura phpMyAdmin
Imposta le password per l'account root MySQL:
mysql_secure_installation
[[email protected] tmp]# mysql_secure_installation


NOTE: RUNNING ALL PARTS OF THIS SCRIPT IS RECOMMENDED FOR ALL MariaDB
SERVERS IN PRODUCTION USE! PLEASE READ EACH STEP CAREFULLY!
In order to log into MariaDB to secure it, we'll need the current
password for the root user. If you've just installed MariaDB, and
you haven't set the root password yet, the password will be blank,
so you should just press enter here.
Enter current password for root (enter for none):
OK, successfully used password, moving on...
Setting the root password ensures that nobody can log into the MariaDB
root user without the proper authorisation.

Set root password? [Y/n] <-- ENTER
New password: <-- yourrootsqlpassword
Re-enter new password: <-- yourrootsqlpassword
Password updated successfully!
Reloading privilege tables..
 ... Success!


By default, a MariaDB installation has an anonymous user, allowing anyone
to log into MariaDB without having to have a user account created for
them. This is intended only for testing, and to make the installation
go a bit smoother. You should remove them before moving into a
production environment.

Remove anonymous users? [Y/n] <-- ENTER
 ... Success!

Normally, root should only be allowed to connect from 'localhost'.  This
ensures that someone cannot guess at the root password from the network.

Disallow root login remotely? [Y/n] <-- ENTER
 ... Success!

By default, MariaDB comes with a database named 'test' that anyone can
access. This is also intended only for testing, and should be removed
before moving into a production environment.

Remove test database and access to it? [Y/n] <-- ENTER
 - Dropping test database...
 ... Success!
 - Removing privileges on test database...
 ... Success!

Reloading the privilege tables will ensure that all changes made so far
will take effect immediately.

Reload privilege tables now? [Y/n] <-- ENTER
 ... Success!

Cleaning up...


All done! If you've completed all of the above steps, your MariaDB
installation should now be secure.

Thanks for using MariaDB!

[[email protected] tmp]#
Ora configuriamo phpMyAdmin. Crea questo file di configurazione di phpMyAdmin:
nano /etc/httpd/conf.d/phpmyadmin.conf
Aggiungi questo contenuto al file:
# phpMyAdmin - Web based MySQL browser written in php
#
# Allows only localhost by default
#
# But allowing phpMyAdmin to anyone other than localhost should be considered
# dangerous unless properly secured by SSL

Alias /phpMyAdmin /usr/share/phpmyadmin
Alias /phpmyadmin /usr/share/phpmyadmin

<Directory /usr/share/phpmyadmin/>
   <IfModule mod_authz_core.c>
     # Apache 2.4
  #  <RequireAny>
     #  Require ip 127.0.0.1
     #  Require ip ::1
  #  </RequireAny>
   </IfModule>
   <IfModule !mod_authz_core.c>
     # Apache 2.2
     Order Deny,Allow
     Deny from All
     Allow from 127.0.0.1
     Allow from ::1
   </IfModule>
</Directory>
Successivamente, modifichiamo l'autenticazione in phpMyAdmin da cookie a http:
cp -pf /usr/share/phpmyadmin/config.sample.inc.php /usr/share/phpmyadmin/config.inc.php
nano /usr/share/phpmyadmin/config.inc.php
[...]
/* Authentication type */
$cfg['Servers'][$i]['auth_type'] = 'http';
[...]
Quindi creiamo i collegamenti di avvio del sistema per Apache e lo avviamo:
systemctl enable httpd
systemctl restart httpd
Ora puoi indirizzare il tuo browser a http://server1.example.com/phpmyadmin/ o http://192.168.0.100/phpmyadmin/ e accedere con il nome utente root e la tua nuova password MySQL di root.
11 Installa Amavisd-new, SpamAssassin, ClamAV e Postgrey
Per installare amavisd-new, SpamAssassin e ClamAV, eseguire il comando seguente:
dnf -y install amavisd-new spamassassin clamav-server clamav-data clamav-update clamav-filesystem clamav clamav-scanner-systemd clamav-devel clamav-lib clamav-server-systemd unzip bzip2 perl-DBD-mysql postgrey re2c
Quindi iniziamo freshclam, amavisd e clamd.amavisd:
sa-update
freshclam
systemctl enable amavisd.service
systemctl start amavisd.service
systemctl start [email protected]
systemctl enable postgrey.service
systemctl start postgrey.service
Nel passaggio successivo, configuriamo postgrey. Apri il file /etc/sysconfig/postgrey in un editor:
nano /etc/sysconfig/postgrey
e cambia la riga:
POSTGREY_TYPE="--unix=/var/spool/postfix/postgrey/socket"
a
POSTGREY_TYPE="--inet=10023"
Salva il file e riavvia postgrey:
service postgrey restart
Per configurare amavisd, modificare il file /etc/clamd.d/amavisd.conf:
nano /etc/clamd.d/amavisd.conf
e cambia la riga:
LocalSocket /run/clamd.amavisd/clamd.sock
a
LocalSocket /var/spool/amavisd/clamd.sock
Salva il file di configurazione modificato e riavvia ClamAV:
systemctl restart [email protected]
Ora dobbiamo creare un'unità di sistema per il servizio freshclam. Crea un nuovo file /usr/lib/systemd/system/freshclam.service:
nano /usr/lib/systemd/system/freshclam.service
e inserisci il seguente contenuto in quel file:
[Unit]
Description = ClamAV Scanner
After = network.target

[Service]
Type = forking
# if you want to scan more than one in a day change the number 1 with your desired number in below line.
ExecStart = /usr/bin/freshclam -d -c 1
Restart = on-failure
PrivateTmp =true

[Install]
WantedBy=multi-user.target
Salva il file, quindi abilita e avvia il servizio.
systemctl enable freshclam.service
systemctl start freshclam.service
systemctl status freshclam.service
12 Installazione di Apache con mod_php, mod_fcgi/PHP, PHP-FPM
ISPConfig 3 ti consente di utilizzare mod_php, mod_fcgi/PHP, cgi/PHP e PHP-FPM per sito web.
Possiamo installare Apache2 con mod_php, mod_fcgid e PHP come segue:
dnf -y install php php-devel php-gd php-imap php-ldap php-mysql php-odbc php-pear php-xml php-xmlrpc php-pecl-apc php-mbstring php-mcrypt php-snmp php-soap php-tidy curl curl-devel perl-libwww-perl ImageMagick libxml2 libxml2-devel mod_fcgid php-cli httpd-devel php-fpm php-intl php-imagick php-pspell wget
Successivamente, apriamo /etc/php.ini...
nano /etc/php.ini
... e cambia la segnalazione degli errori (in modo che gli avvisi non vengano più mostrati), imposta il fuso orario e decommenta cgi.fix_pathinfo=1:
[...]
;error_reporting = E_ALL & ~E_DEPRECATED
error_reporting = E_ALL & ~E_NOTICE & ~E_DEPRECATED & ~E_STRICT
[...]
; cgi.fix_pathinfo provides *real* PATH_INFO/PATH_TRANSLATED support for CGI.  PHP's
; previous behaviour was to set PATH_TRANSLATED to SCRIPT_FILENAME, and to not grok
; what PATH_INFO is.  For more information on PAppp.tldTH_INFO, see the cgi specs.  Setting
; this to 1 will cause PHP CGI to fix its paths to conform to the spec.  A setting
; of zero causes PHP to behave as before.  Default is 1.  You should fix your scripts
; to use SCRIPT_FILENAME rather than PATH_TRANSLATED.
; http://www.php.net/manual/en/ini.core.php#ini.cgi.fix-pathinfo
cgi.fix_pathinfo=1
[...]
date.timezone = 'Europe/Berlin'
[...]
Abilita httpd e PHP-FPM per iniziare all'avvio e avviare il servizio PHP-FPM.
systemctl start php-fpm.service
systemctl enable php-fpm.service
systemctl enable httpd.service
Infine, riavviamo Apache:
systemctl restart httpd.service
Ora aggiungeremo il supporto per Let's encrypt. ISPConfig sta usando acme.sh ora come client Let's Encrypt. Installa acme.sh usando il seguente comando:
curl https://get.acme.sh | sh -s
13 Installazione di mod_python
Il modulo Apache mod_python non è disponibile come pacchetto RPM, quindi lo compileremo dal sorgente. Il primo passo è installare i file di sviluppo python e scaricare l'attuale versione mod_python come file .tar.gz
dnf -y install python3-devel
cd /usr/local/src/
wget http://dist.modpython.org/dist/mod_python-3.5.0.tgz
tar xfz mod_python-3.5.0.tgz
cd mod_python-3.5.0
e quindi configurare e compilare il modulo.
./configure --with-python=/usr/bin/python3
make
Si è verificato un errore nel modulo compilato che causerà il fallimento dell'installazione con l'errore "version ="fatale:non è un repository git (o una qualsiasi delle directory principali):.git ". Per risolvere il problema, esegui questo comando sed (il comando è una riga!).
sed -e 's/(git describe --always)/(git describe --always 2>\/dev\/null)/g' -e 's/`git describe --always`/`git describe --always 2>\/dev\/null`/g' -i $( find . -type f -name Makefile\* -o -name version.sh )
Quindi installa il modulo con questo comando.
make install
e abilita il modulo in Apache:
echo 'LoadModule python_module modules/mod_python.so' > /etc/httpd/conf.modules.d/10-python.conf
systemctl restart httpd.service
14 Installa PureFTPd
PureFTPd può essere installato con il seguente comando:
dnf -y install pure-ftpd
Quindi crea i collegamenti di avvio del sistema e avvia PureFTPd:
systemctl enable pure-ftpd.service
systemctl start pure-ftpd.service
Ora configuriamo PureFTPd per consentire sessioni FTP e TLS. FTP è un protocollo molto insicuro perché tutte le password e tutti i dati vengono trasferiti in chiaro. Utilizzando TLS, l'intera comunicazione può essere crittografata, rendendo così l'FTP molto più sicuro.
OpenSSL è necessario per TLS; per installare OpenSSL, eseguiamo semplicemente:
dnf install openssl
Apri /etc/pure-ftpd/pure-ftpd.conf...
nano /etc/pure-ftpd/pure-ftpd.conf
Se desideri consentire sessioni FTP e TLS, imposta TLS su 1 rimuovendo il # davanti alla riga TLS. Si consiglia vivamente di abilitare TLS.
[...]
# This option can accept three values :
# 0 : disable SSL/TLS encryption layer (default).
# 1 : accept both traditional and encrypted sessions.
# 2 : refuse connections that don't use SSL/TLS security mechanisms,
#     including anonymous sessions.
# Do _not_ uncomment this blindly. Be sure that :
# 1) Your server has been compiled with SSL/TLS support (--with-tls),
# 2) A valid certificate is in place,
# 3) Only compatible clients will log in.

TLS                      1
[...]
Per utilizzare TLS, dobbiamo creare un certificato SSL. Lo creo in /etc/ssl/private/, quindi creo prima quella directory:
mkdir -p /etc/ssl/private/
Successivamente, possiamo generare il certificato SSL come segue:
openssl req -x509 -nodes -days 7300 -newkey rsa:2048 -keyout /etc/ssl/private/pure-ftpd.pem -out /etc/ssl/private/pure-ftpd.pem
Nome del Paese (codice di 2 lettere) [XX]:<-- Inserisci il nome del tuo Paese (ad es. "DE").
Nome Stato o Provincia (nome completo) []:<-- Inserisci il nome del tuo Stato o Provincia .
Nome località (es. città) [Città predefinita]:<-- Inserisci la tua città.
Nome organizzazione (es. azienda) [Default Company Ltd]:<-- Inserisci il nome della tua organizzazione (es. , il nome della tua azienda).
Nome dell'unità organizzativa (ad es. sezione) []:<-- Inserisci il nome dell'unità organizzativa (ad es. "Dipartimento IT").
Nome comune (ad es. il tuo nome o il nome host del tuo server) []:<-- Inserisci il nome di dominio completo del sistema (ad es. "server1.example.com").
Indirizzo e-mail []:<-- Inserisci il tuo indirizzo e-mail.
Modifica le autorizzazioni del certificato SSL:
chmod 600 /etc/ssl/private/pure-ftpd.pem
Crea un file DHParam:
openssl dhparam -out /etc/ssl/private/pure-ftpd-dhparams.pem 2048
Infine, riavvia PureFTPd:
systemctl restart pure-ftpd.service
Questo è tutto. Ora puoi provare a connetterti usando il tuo client FTP; tuttavia, dovresti configurare il tuo client FTP per utilizzare TLS.
15 Installa BIND
Possiamo installare BIND come segue:
dnf -y install bind bind-utils haveged
Fai un backup del file /etc/named.conf esistente e creane uno nuovo come segue:
cp /etc/named.conf /etc/named.conf_bak
cat /dev/null > /etc/named.conf
nano /etc/named.conf
//
// named.conf
//
// Provided by Red Hat bind package to configure the ISC BIND named(8) DNS
// server as a caching only nameserver (as a localhost DNS resolver only).
//
// See /usr/share/doc/bind*/sample/ for example named configuration files.
//
options {
        listen-on port 53 { any; };
        listen-on-v6 port 53 { any; };
        directory       "/var/named";
        dump-file       "/var/named/data/cache_dump.db";
        statistics-file "/var/named/data/named_stats.txt";
        memstatistics-file "/var/named/data/named_mem_stats.txt";
        allow-query     { any; };
				allow-recursion {"none";};
        recursion no;
};
logging {
        channel default_debug {
                file "data/named.run";
                severity dynamic;
        };
};
zone "." IN {
        type hint;
        file "named.ca";
};
include "/etc/named.conf.local";
Crea il file /etc/named.conf.local che è incluso alla fine di /etc/named.conf (/etc/named.conf.local verrà successivamente popolato da ISPConfig se crei zone DNS in ISPConfig):
touch /etc/named.conf.local
Quindi creiamo i collegamenti di avvio e avviamo BIND:
systemctl enable named.service
systemctl start named.service
systemctl enable haveged.service
systemctl start haveged.service
16 Installa AWStats
AWSstats può essere installato come segue:
dnf -y install awstats perl-DateTime-Format-HTTP perl-DateTime-Format-Builder
L'applicazione di statistiche web alternativa 'webalizer' non è più disponibile per CentOS 8, quindi potrai utilizzare solo AWStats.
17 Installa Jailkit
Jailkit viene utilizzato per eseguire il chroot di utenti SSH e cronjob. Può essere installato come segue:
ln -s /usr/bin/python2 /usr/bin/python
cd /tmp
wget http://olivier.sessink.nl/jailkit/jailkit-2.21.tar.gz
tar xvfz jailkit-2.21.tar.gz
cd jailkit-2.21
./configure
make
make install
cd ..
rm -rf jailkit-2.21*
18 Installa Fail2Ban
Questo è facoltativo ma consigliato, perché il monitor ISPConfig tenta di mostrare il registro.
dnf -y install iptables-services fail2ban fail2ban-systemd
systemctl stop firewalld.service
systemctl mask firewalld.service
systemctl disable firewalld.service
Quindi creiamo il file /etc/fail2ban/jail.local e abilitiamo il monitoraggio per ssh, email e servizio ftp.
nano /etc/fail2ban/jail.local
Aggiungi il seguente contenuto al file jail.local:
[sshd]
enabled = true
action = iptables[name=sshd, port=ssh, protocol=tcp]

[pure-ftpd]
enabled = true
action = iptables[name=FTP, port=ftp, protocol=tcp]
maxretry = 3

[dovecot]
enabled = true
action = iptables-multiport[name=dovecot, port="pop3,pop3s,imap,imaps", protocol=tcp]
maxretry = 5

[postfix-sasl]
enabled = true
action = iptables-multiport[name=postfix-sasl, port="smtp,smtps,submission", protocol=tcp]
maxretry = 3
Quindi crea i collegamenti di avvio del sistema per fail2ban e avvialo:
systemctl enable fail2ban.service
systemctl start fail2ban.service
19 Installa rkhunter
rkhunter può essere installato come segue:
dnf -y install rkhunter
20 Installa Mailman
Se ti piace gestire le mailing list con Mailman sul tuo server, installa subito mailman. Mailman è supportato da ISPConfig, quindi potrai creare nuove mailing list tramite ISPConfig in un secondo momento.
dnf -y install mailman
Prima di poter avviare Mailman, è necessario creare una prima mailing list chiamata mailman:
touch /var/lib/mailman/data/aliases
postmap /var/lib/mailman/data/aliases
/usr/lib/mailman/bin/newlist mailman
ln -s /usr/lib/mailman/mail/mailman /usr/bin/mailman
[[email protected] tmp]# /usr/lib/mailman/bin/newlist mailman
Inserisci l'e-mail della persona che esegue l'elenco: <-- indirizzo e-mail admin, ad es. [email protetta]
Password iniziale del postino: <-- password admin per l'elenco del postino
Per terminare la creazione della lista mail, devi modificare il tuo /etc/alias (o
equivalente) file tramite aggiungendo le righe seguenti e possibilmente eseguendo il programma
`newaliases':
## mailing list di mailman
mailman: "|/usr/lib/mailman/mail/mailman post mailman"
mailman-admin: "|/usr/lib/mailman/mail/mailman admin mailman"
mailman-bounces: "|/usr/lib/mailman/mail/mailman bounces mailman"
mailman-confirm: "|/usr/lib/mailman/mail/mailman confirm mailman"
mailman-join: "|/usr/lib/mailman/mail/mailman join mailman"
mailman- leave: "|/usr/lib/mailman/mail/mailman leave mailman"
mailman-owner: "|/usr/lib/mailman/mail/mailman owner mailman"
mailman-request: "| /usr/lib/mailman/mail/mailman request mailman"
mailman-subscribe: "|/usr/lib/mailman/mail/mailman subscribe mailman"
mailman-unsub scribe: "|/usr/lib/mailman/mail/mailman unsubscribe mailman"
Premi invio per notificare il proprietario del postino... <-- ENTER
[[email protetta ] tmp]#
Apri /etc/alias in seguito...
nano /etc/aliases
... e aggiungi le seguenti righe:
[...]
mailman:              "|/usr/lib/mailman/mail/mailman post mailman"
mailman-admin:        "|/usr/lib/mailman/mail/mailman admin mailman"
mailman-bounces:      "|/usr/lib/mailman/mail/mailman bounces mailman"
mailman-confirm:      "|/usr/lib/mailman/mail/mailman confirm mailman"
mailman-join:         "|/usr/lib/mailman/mail/mailman join mailman"
mailman-leave:        "|/usr/lib/mailman/mail/mailman leave mailman"
mailman-owner:        "|/usr/lib/mailman/mail/mailman owner mailman"
mailman-request:      "|/usr/lib/mailman/mail/mailman request mailman"
mailman-subscribe:    "|/usr/lib/mailman/mail/mailman subscribe mailman"
mailman-unsubscribe:  "|/usr/lib/mailman/mail/mailman unsubscribe mailman"
Corri
newaliases
in seguito e riavvia Postfix:
systemctl restart postfix.service
Ora apri il file di configurazione di Mailman Apache /etc/httpd/conf.d/mailman.conf...
nano /etc/httpd/conf.d/mailman.conf
... e aggiungi la riga ScriptAlias /cgi-bin/mailman/ /usr/lib/mailman/cgi-bin/. Commenta Alias /pipermail/ /var/lib/mailman/archives/public/ e aggiungi la riga Alias /pipermail /var/lib/mailman/archives/public/:
#
#  httpd configuration settings for use with mailman.
#

ScriptAlias /mailman/ /usr/lib/mailman/cgi-bin/
ScriptAlias /cgi-bin/mailman/ /usr/lib/mailman/cgi-bin/
<Directory /usr/lib/mailman/cgi-bin/>
    AllowOverride None
    Options ExecCGI
    Order allow,deny
    Allow from all
</Directory>


#Alias /pipermail/ /var/lib/mailman/archives/public/
Alias /pipermail /var/lib/mailman/archives/public/
<Directory /var/lib/mailman/archives/public>
    Options Indexes MultiViews FollowSymLinks
    AllowOverride None
    Order allow,deny
    Allow from all
    AddDefaultCharset Off
</Directory>

# Uncomment the following line, to redirect queries to /mailman to the
# listinfo page (recommended).

# RedirectMatch ^/mailman[/]*$ /mailman/listinfo
Riavvia Apache:
systemctl restart httpd.service
Crea i collegamenti di avvio del sistema per Mailman e avvialo:
systemctl enable mailman.service
systemctl start mailman.service
Dopo aver installato ISPConfig 3, puoi accedere a Mailman come segue:
Puoi usare l'alias /cgi-bin/mailman per tutti i vhost Apache (tieni presente che suExec e CGI devono essere disabilitati per tutti i vhost da cui vuoi accedere a Mailman!), Ciò significa che puoi accedere all'interfaccia di amministrazione di Mailman per un elenco su http://
Sotto http://
21 Installa Roundcube webmail
Per installare il client webmail RoundCube, scarica l'ultima versione con wget nella cartella /tmp:
cd /tmp
wget https://github.com/roundcube/roundcubemail/releases/download/1.4.3/roundcubemail-1.4.3-complete.tar.gz
Decomprimi l'archivio tar.gz e sposta il sorgente RoundCube in /usr/share/roundcubemail
tar xfz roundcubemail-1.4.3-complete.tar.gz
mkdir /usr/share/roundcubemail
mv /tmp/roundcubemail-1.4.3/* /usr/share/roundcubemail/
chown -R root:root /usr/share/roundcubemail
chown apache /usr/share/roundcubemail/temp
chown apache /usr/share/roundcubemail/logs
Crea un file di configurazione roundcubemail.conf con nano editor:
nano /etc/httpd/conf.d/roundcubemail.conf
E aggiungi il seguente contenuto a quel file:
#
# Round Cube Webmail is a browser-based multilingual IMAP client
#

Alias /roundcubemail /usr/share/roundcubemail
Alias /webmail /usr/share/roundcubemail

# Define who can access the Webmail
# You can enlarge permissions once configured

<Directory /usr/share/roundcubemail/>
        Options none
        AllowOverride Limit
        Require all granted
</Directory>

# Define who can access the installer
# keep this secured once configured

<Directory /usr/share/roundcubemail/installer>
        Options none
        AllowOverride Limit
        Require all granted
</Directory>


# Those directories should not be viewed by Web clients.
<Directory /usr/share/roundcubemail/bin/>
    Order Allow,Deny
    Deny from all
</Directory>
<Directory /usr/share/roundcubemail/plugins/enigma/home/>
    Order Allow,Deny
    Deny from all
</Directory>
Riavvia Apache:
systemctl restart httpd.service
Ora abbiamo bisogno di un database per la posta RoundCube, lo inizializzeremo come segue:
mysql -u root -p
Al prompt di MariaDB utilizzare:
CREATE DATABASE roundcubedb;
CREATE USER [email protected] IDENTIFIED BY 'roundcubepassword';
GRANT ALL PRIVILEGES on roundcubedb.* to [email protected] ;
FLUSH PRIVILEGES;
exit
Sto utilizzando i dettagli del database RoundCube come esempio, per motivi di sicurezza sostituisci i valori secondo la tua scelta.
Ora installeremo RoundCube nel browser all'indirizzo http://192.168.0.100/roundcubemail/installer
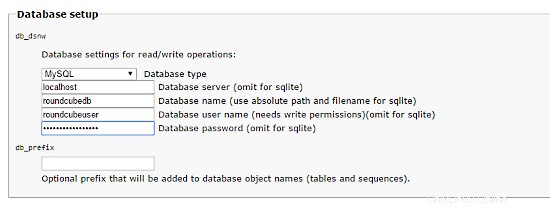
Ora crea il file config.inc.php:
nano /usr/share/roundcubemail/config/config.inc.php
<?php

/* Local configuration for Roundcube Webmail */

// ----------------------------------
// SQL DATABASE
// ----------------------------------
// Database connection string (DSN) for read+write operations
// Format (compatible with PEAR MDB2): db_provider://user:[email protected]/database
// Currently supported db_providers: mysql, pgsql, sqlite, mssql, sqlsrv, oracle
// For examples see http://pear.php.net/manual/en/package.database.mdb2.intro-dsn.php
// NOTE: for SQLite use absolute path (Linux): 'sqlite:////full/path/to/sqlite.db?mode=0646'
// or (Windows): 'sqlite:///C:/full/path/to/sqlite.db'
$config['db_dsnw'] = 'mysql://roundcubeuser:[email protected]/roundcubedb';

// ----------------------------------
// IMAP
// ----------------------------------
// The IMAP host chosen to perform the log-in.
// Leave blank to show a textbox at login, give a list of hosts
// to display a pulldown menu or set one host as string.
// To use SSL/TLS connection, enter hostname with prefix ssl:// or tls://
// Supported replacement variables:
// %n - hostname ($_SERVER['SERVER_NAME'])
// %t - hostname without the first part
// %d - domain (http hostname $_SERVER['HTTP_HOST'] without the first part)
// %s - domain name after the '@' from e-mail address provided at login screen
// For example %n = mail.domain.tld, %t = domain.tld
// WARNING: After hostname change update of mail_host column in users table is
// required to match old user data records with the new host.
$config['default_host'] = 'localhost';
$config['smtp_server'] = 'localhost';
$config['smtp_port'] = 25;

// provide an URL where a user can get support for this Roundcube installation
// PLEASE DO NOT LINK TO THE ROUNDCUBE.NET WEBSITE HERE!
$config['support_url'] = '';

// This key is used for encrypting purposes, like storing of imap password
// in the session. For historical reasons it's called DES_key, but it's used
// with any configured cipher_method (see below).
$config['des_key'] = 'pb0UucO0eqjgvhrqYlFTBVjE';

// ----------------------------------
// PLUGINS
// ----------------------------------
// List of active plugins (in plugins/ directory)
$config['plugins'] = array();

// Set the spell checking engine. Possible values:
// - 'googie' - the default (also used for connecting to Nox Spell Server, see 'spellcheck_uri' setting)
// - 'pspell' - requires the PHP Pspell module and aspell installed
// - 'enchant' - requires the PHP Enchant module
// - 'atd' - install your own After the Deadline server or check with the people at http://www.afterthedeadline.com before using their API
// Since Google shut down their public spell checking service, the default settings
// connect to http://spell.roundcube.net which is a hosted service provided by Roundcube.
// You can connect to any other googie-compliant service by setting 'spellcheck_uri' accordingly.
$config['spellcheck_engine'] = 'pspell';
$config['enable_installer'] = true;
Then press "continue" in the web installer. On the following page, press on the button "Initialize database".
Finally, disable the Roundecubemail installer. Change the RoundCube config.inc.php configuration file
nano /usr/share/roundcubemail/config/config.inc.php
and change the line:
$config['enable_installer'] = true;
to:
$config['enable_installer'] = false;
Roundcube is available now under the aliases /webmail and /roundcubemail on your server:
http://192.168.0.100/webmail
The RoundCube login is the email address and password of an email account that you create later in ISPConfig.
22 Install ISPConfig 3.2
The ISPConfig installer will configure all services like Postfix, Dovecot, etc. for you.
You now also have the possibility to let the installer create an SSL vhost for the ISPConfig control panel so that ISPConfig can be accessed using https:// instead of http://. To achieve this, just press ENTER when you see this question:Do you want a secure (SSL) connection to the ISPConfig web interface (y,n) [y]:.
To install ISPConfig 3.2 nightly build, do this:
cd /tmp
wget -O ispconfig.tar.gz https://www.ispconfig.org/downloads/ISPConfig-3-stable.tar.gz
tar xfz ispconfig.tar.gz
cd ispconfig3*/install/
The next step is to run:
php -q install.php
Questo avvierà il programma di installazione di ISPConfig 3. L'installatore configurerà per te tutti i servizi come Postfix, Dovecot, ecc.
[[email protected] install]# php install.php
--------------------------------------------------------------------------------
_____ ___________ _____ __ _ ____
|_ _/ ___| ___ \ / __ \ / _(_) /__ \
| | \ `--.| |_/ / | / \/ ___ _ __ | |_ _ __ _ _/ /
| | `--. \ __/ | | / _ \| '_ \| _| |/ _` | |_ |
_| |_/\__/ / | | \__/\ (_) | | | | | | | (_| | ___\ \
\___/\____/\_| \____/\___/|_| |_|_| |_|\__, | \____/
__/ |
|___/
--------------------------------------------------------------------------------
>> Initial configuration
Operating System: CentOS 8.2
Following will be a few questions for primary configuration so be careful.
Default values are in [brackets] and can be accepted with <ENTER>.
Tap in "quit" (without the quotes) to stop the installer.
Select language (en,de) [en]: <-- Hit Enter
Installation mode (standard,expert) [standard]: <-- Hit Enter
Full qualified hostname (FQDN) of the server, eg server1.domain.tld [server1.example.com]: <-- Hit Enter
MySQL server hostname [localhost]: <-- Hit Enter
MySQL server port [3306]: <-- Hit Enter
MySQL root username [root]: <-- Hit Enter
MySQL root password []: <-- Ente the MySQL root password here
MySQL database to create [dbispconfig]: <-- Hit Enter
MySQL charset [utf8]: <-- Hit Enter
Configuring Postgrey
Configuring Postfix
Generating a 4096 bit RSA private key
................................++
.....................................................................................................................................................................................................................................................................................................................................................++
writing new private key to 'smtpd.key'
-----
You are about to be asked to enter information that will be incorporated
into your certificate request.
What you are about to enter is what is called a Distinguished Name or a DN.
There are quite a few fields but you can leave some blank
For some fields there will be a default value,
If you enter '.', the field will be left blank.
-----
Country Name (2 letter code) [XX]: <-- Enter 2 Letter country code, e.g. US
State or Province Name (full name) []: <-- Enter anme of State or Province
Locality Name (eg, city) [Default City]: <-- Name of city
Organization Name (eg, company) [Default Company Ltd]: <-- Company name
Organizational Unit Name (eg, section) []: <-- Hit Enter
Common Name (eg, your name or your server's hostname) []: <-- Enter server hostname here, in my case: server1.example.com
Email Address []: <-- Enter Email address
Configuring mailman
Configuring Dovecot
Configuring Spamassassin
Configuring Amavisd
Configuring Getmail
Configuring Jailkit
Configuring Pureftpd
Configuring BIND
Configuring Apache
Configuring vlogger
[INFO] service OpenVZ not detected
Configuring Bastille Firewall
[INFO] service Metronome XMPP Server not detected
Configuring Fail2ban
Configuring Apps vhost
Installing ISPConfig
ISPConfig Port [8080]: <-- Hit Enter
Admin password [fad579a6]: <-- Enter new password for ISPConfig admin user
Re-enter admin password []: <-- Repeat the password
Do you want a secure (SSL) connection to the ISPConfig web interface (y,n) [y]: <-- Hit Enter
Generating RSA private key, 4096 bit long modulus
.................................................................................++
.....++
e is 65537 (0x10001)
You are about to be asked to enter information that will be incorporated
into your certificate request.
What you are about to enter is what is called a Distinguished Name or a DN.
There are quite a few fields but you can leave some blank
For some fields there will be a default value,
If you enter '.', the field will be left blank.
-----
Country Name (2 letter code) [XX]: <-- Enter 2 Letter country code, e.g. US
State or Province Name (full name) []: <-- Enter anme of State or Province
Locality Name (eg, city) [Default City]: <-- Name of city
Organization Name (eg, company) [Default Company Ltd]: <-- Company name
Organizational Unit Name (eg, section) []: <-- Hit Enter
Common Name (eg, your name or your server's hostname) []: <-- Enter server hostname here, in my case: server1.example.com
Email Address []: <-- Enter Email address
Please enter the following 'extra' attributes
to be sent with your certificate request
A challenge password []: <-- Hit Enter
An optional company name []: <-- Hit Enter
writing RSA key
Configuring DBServer
Installing ISPConfig crontab
Installing ISPConfig crontab
no crontab for root
no crontab for getmail
Detect IP addresses
Restarting services ...
Installation completed.
Il programma di installazione configura automaticamente tutti i servizi sottostanti, quindi non è necessaria alcuna configurazione manuale.
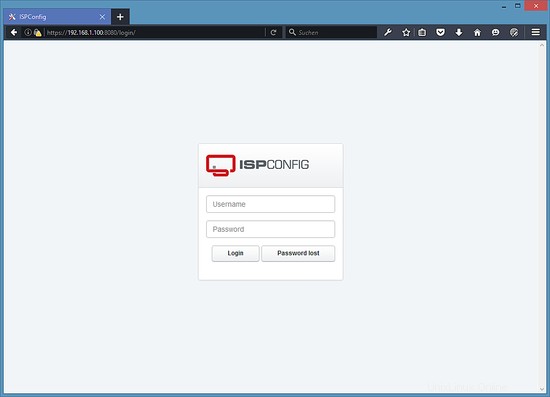
23 First ISPConfig Login
Afterwards you can access ISPConfig 3 under http(s)://server1.example.com:8080/ or http(s)://192.168.0.100:8080/ (http or https depends on what you chose during installation).
Accedi con il nome utente admin e la password admin (dovresti cambiare la password predefinita dopo il primo accesso):
23.1 The ISPConfig 3 Manual
In order to learn how to use ISPConfig 3, I strongly recommend downloading the ISPConfig 3 Manual.
Su più di 300 pagine, copre il concetto alla base di ISPConfig (amministratore, rivenditori, clienti), spiega come installare e aggiornare ISPConfig 3, include un riferimento per tutti i moduli e i campi dei moduli in ISPConfig insieme a esempi di input validi e fornisce tutorial per le attività più comuni in ISPConfig 3. Descrive anche come rendere più sicuro il tuo server e include una sezione per la risoluzione dei problemi alla fine.
24 Download as a virtual machine
Questa configurazione è disponibile come download della macchina virtuale in formato ova/ovf (compatibile con VMWare e Virtualbox) per gli abbonati howtoforge.
Dettagli di accesso per la VM
- The root password is:howtoforge
- The password of the ISPConfig "admin" user is: howtoforge
- There is another shell user with the name "howtoforge" and password:howtoforge
Modifica entrambe le password al primo accesso.
- The IP address of the VM is 192.168.0.100
25 Links
- CentOS:http://www.centos.org/
- Configurazione ISP:http://www.ispconfig.org/