oVirt è una soluzione di virtualizzazione distribuita gratuita e open source che può essere utilizzata per gestire l'intera infrastruttura. Si basa su Red Hat Enterprise Virtualization e consente di gestire macchine virtuali, elaborazione, storage e risorse di rete dall'interfaccia web-based. Utilizza l'hypervisor KVM e si basa su molti altri progetti della community, tra cui libvirt, Gluster, PatternFly e Ansible.
In questo tutorial spiegheremo come installare oVirt sul server CentOS 8.
Prerequisiti
- Un server che esegue CentOS 8 con almeno 16 GB di RAM.
- Una password di root è configurata sul server.
Per iniziare
Prima di iniziare, dovrai impostare il nome host FQDN nel tuo sistema. Puoi farlo con il seguente comando:
hostnamectl set-hostname centos.example.com
Successivamente, dovrai modificare il file /etc/hosts e associare l'IP del tuo sistema al nome host.
nano /etc/hosts
Aggiungi le seguenti righe:
your-server-ip centos.example.com
Salva e chiudi il file quando hai finito.
Installa repository richiesto
Successivamente, dovrai aggiungere oVirt e altri repository richiesti nel tuo sistema.
Innanzitutto, installa il repository oVirt con il seguente comando:
dnf install https://resources.ovirt.org/pub/yum-repo/ovirt-release44.rpm
Una volta installato, abilita lo strumento del pacchetto Java, pki-deps e il modulo PostgreSQL con il seguente comando:
dnf module enable javapackages-tools -y
dnf module enable pki-deps -y
dnf module enable postgresql:12 -y
Una volta terminato, puoi procedere al passaggio successivo.
Installa e configura oVirt Engine
Innanzitutto, aggiorna il repository utilizzando il seguente comando:
dnf update -y
Una volta aggiornato il repository, installa oVirt Engine utilizzando il seguente comando:
dnf install ovirt-engine -y
Una volta completata l'installazione, puoi configurare oVirt Engine con il seguente comando:
engine-setup
Ti verranno poste diverse domande durante la configurazione come mostrato di seguito:
          --== PRODUCT OPTIONS ==--

          Configure Cinderlib integration (Currently in tech preview) (Yes, No) [No]: Yes
          Configure Engine on this host (Yes, No) [Yes]: Yes

          Configuring ovirt-provider-ovn also sets the Default cluster.'s default network provider to ovirt-provider-ovn.
          Non-Default clusters may be configured with an OVN after installation.
          Configure ovirt-provider-ovn (Yes, No) [Yes]: Yes
          Configure WebSocket Proxy on this host (Yes, No) [Yes]: Yes

          * Please note * : Data Warehouse is required for the engine.
          If you choose to not configure it on this host, you have to configure
          it on a remote host, and then configure the engine on this host so
          that it can access the database of the remote Data Warehouse host.
          Configure Data Warehouse on this host (Yes, No) [Yes]: Yes
          Configure Grafana on this host (Yes, No) [Yes]: Yes
          Configure VM Console Proxy on this host (Yes, No) [Yes]: Yes

          --== PACKAGES ==--

[ INFO  ] Checking for product updates...
[ INFO  ] No product updates found

          --== NETWORK CONFIGURATION ==--

          Host fully qualified DNS name of this server [centos.example.com]: Yes
[WARNING] Host name Yes has no domain suffix
[ ERROR ] Host name is not valid: Yes did not resolve into an IP address
          Host fully qualified DNS name of this server [centos.example.com]:
[WARNING] Failed to resolve centos.example.com using DNS, it can be resolved only locally

          Setup can automatically configure the firewall on this system.
          Note: automatic configuration of the firewall may overwrite current settings.
          Do you want Setup to configure the firewall? (Yes, No) [Yes]: Yes
          --== DATABASE CONFIGURATION ==--

          Where is the DWH database located? (Local, Remote) [Local]: Local

          Setup can configure the local postgresql server automatically for the DWH to run. This may conflict with existing applications.
          Would you like Setup to automatically configure postgresql and create DWH database, or prefer to perform that manually? (Automatic, Manual) [Automatic]:
          Where is the ovirt cinderlib database located? (Local, Remote) [Local]:
          Setup can configure the local postgresql server automatically for the CinderLib to run. This may conflict with existing applications.
          Would you like Setup to automatically configure postgresql and create CinderLib database, or prefer to perform that manually? (Automatic, Manual) [Automatic]:
          Where is the Engine database located? (Local, Remote) [Local]:

          Setup can configure the local postgresql server automatically for the engine to run. This may conflict with existing applications.
          Would you like Setup to automatically configure postgresql and create Engine database, or prefer to perform that manually? (Automatic, Manual) [Automatic]:

          --== OVIRT ENGINE CONFIGURATION ==--

          Engine admin password:

          --== SUMMARY ==--

[ INFO  ] Restarting httpd
          Please use the user '[email protected]' and password specified in order to login
          Web access is enabled at:
              http://centos.example.com:80/ovirt-engine
              https://centos.example.com:443/ovirt-engine
          Internal CA 65:FA:CD:BF:DD:2D:F4:99:D6:63:85:80:97:B9:66:B9:C7:29:5A:F3
          SSH fingerprint: SHA256:Y46liXyme5Fz/oJA9QaYY1dhK8BKeJiw1kcSjOYL204
[WARNING] Less than 16384MB of memory is available
          Web access for grafana is enabled at:
              https://centos.example.com/ovirt-engine-grafana/
          Please run the following command on the engine machine centos.example.com, for SSO to work:
          systemctl restart ovirt-engine

          --== END OF SUMMARY ==--

[ INFO  ] Stage: Clean up
          Log file is located at /var/log/ovirt-engine/setup/ovirt-engine-setup-20200830105920-2u1ydn.log
[ INFO  ] Generating answer file '/var/lib/ovirt-engine/setup/answers/20200830110513-setup.conf'
[ INFO  ] Stage: Pre-termination
[ INFO  ] Stage: Termination
[ INFO  ] Execution of setup completed successfully
Dopo una corretta installazione, dovresti ottenere l'URL della console di amministrazione oVirt e del dashboard Grafana nell'output sopra.
Configura SELinux e Firewall
Per impostazione predefinita, SELinux è abilitato in CentOS 8. Quindi dovrai configurare SELinux per oVirt. Puoi configurarlo con il seguente comando:
setsebool -P httpd_can_network_connect 1
Successivamente, dovrai consentire le porte 80 e 443 tramite firewalld. Puoi farlo con il seguente comando:
firewall-cmd --permanent --zone public --add-port 80/tcp
firewall-cmd --permanent --zone public --add-port 443/tcp
firewall-cmd --reload
Una volta terminato, puoi procedere al passaggio successivo.
Accedi alla oVirt Admin Console
Ora apri il tuo browser web e digita l'URL https://centos.example.com/ovirt-engine/sso/login.html. Dovresti vedere la pagina di accesso di oVirt:
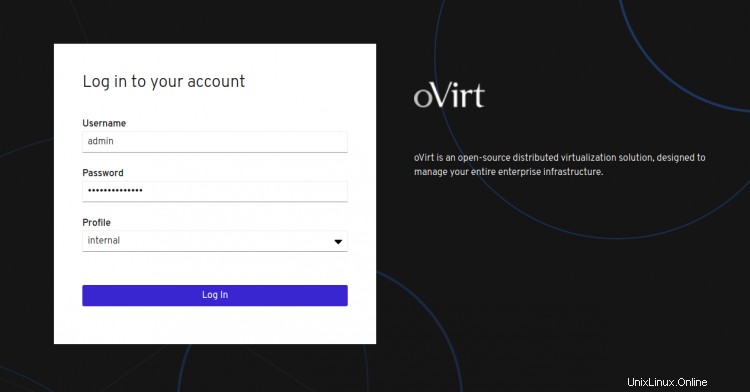
Fornisci il nome utente come amministratore e la password che hai impostato durante l'installazione e fai clic sul Registro In pulsante. Dovresti vedere la seguente schermata:
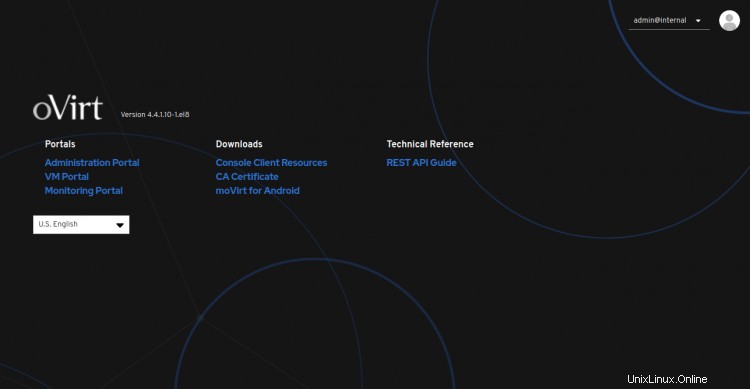
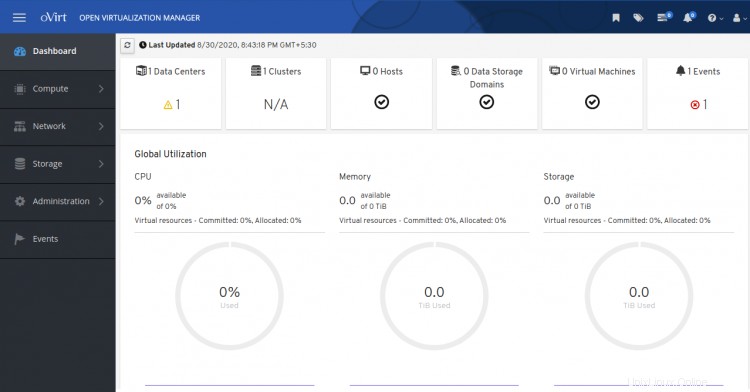
Ora, fai clic su Amministrazione Portale . Dovresti vedere il dashboard di oVirt nella schermata seguente:
Conclusione
Congratulazioni! hai installato correttamente oVirt Engine sul server CentOS 8. Ora puoi aggiungere un host di virtualizzazione remoto dalla console oVirt e iniziare a creare la tua prima macchina virtuale dal dashboard oVirt. Sentiti libero di chiedermi se hai domande.