OTRS (software di sistema di risoluzione dei problemi open source) è un sofisticato software open source utilizzato dalle aziende per migliorare le proprie operazioni relative all'assistenza clienti, all'help desk, ai call center e altro ancora. OTRS è scritto in PERL e fornisce le seguenti importanti funzionalità:
- I clienti possono registrarsi e creare/interagire con un Ticket tramite il portale clienti e tramite e-mail, telefono e fax con ciascuna coda (casella postale degli assistenti/tecnici).
- I biglietti possono essere gestiti in base alla loro priorità, assegnazione, trasmissione e follow-up. Un ticket può essere diviso, unito, possono essere applicate azioni collettive e possono essere impostati collegamenti tra loro e notifiche. I servizi possono essere configurati tramite il catalogo dei servizi.
- Per aumentare la capacità del team, è possibile configurare e-mail automatiche (risposte automatiche), modelli di testo e firme. Il sistema supporta note e allegati sui ticket.
- Altre funzionalità includono:statistiche e rapporti (CSV/PDF), SLA e molte altre funzionalità.
L'ambiente
Questo articolo illustra l'installazione e la configurazione di base di OTRS 5. Questo articolo è stato scritto in base al seguente ambiente:una VM Virtual Box con CENTOS 7 Minimal, 2 GB di RAM, 8 GB di HD e 2 interfacce di rete (solo host e NAT).
Preparazione
Supponendo che utilizzi una nuova installazione di Centos 7 Minimal, prima di installare OTRS, esegui il comando seguente per aggiornare il sistema e installare pacchetti aggiuntivi:
yum update
Transaction Summary ================================================================================ Install 1 Package Upgrade 39 Packages Total download size: 91 M Is this ok [y/d/N]: y
Installa un editor di testo o usa VI. In questo articolo utilizziamo VIM, esegui il seguente comando per installarlo:
yum install vim
Per installare il pacchetto WGET, eseguire il comando seguente:
yum install wget
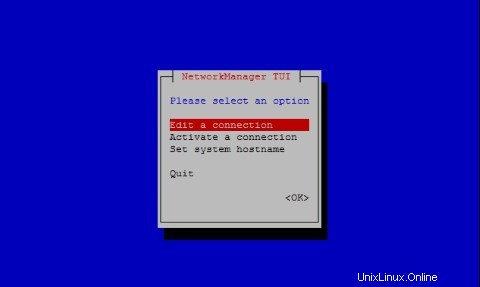
Per configurare la rete Centos 7, eseguire il comando seguente per aprire lo strumento NMTUI (Network Manager Text User Interface) e modificare le interfacce e il nome host, se necessario:
nmtui
Dopo aver configurato le impostazioni di rete e il nome host su CentOS 7, esegui il comando seguente per applicare le modifiche:
service networks restart
Per verificare le informazioni di rete, eseguire il comando seguente:
ip addr
L'output è simile al seguente sul mio sistema:
1: lo: <LOOPBACK,UP,LOWER_UP> mtu 65536 qdisc noqueue state UNKNOWN qlen 1
    link/loopback 00:00:00:00:00:00 brd 00:00:00:00:00:00
    inet 127.0.0.1/8 scope host lo
       valid_lft forever preferred_lft forever
    inet6 ::1/128 scope host
       valid_lft forever preferred_lft forever
2: enp0s3: <BROADCAST,MULTICAST,UP,LOWER_UP> mtu 1500 qdisc pfifo_fast state UP qlen 1000
    link/ether 08:00:27:67:bc:73 brd ff:ff:ff:ff:ff:ff
    inet 10.0.2.15/24 brd 10.0.2.255 scope global dynamic enp0s3
       valid_lft 84631sec preferred_lft 84631sec
    inet6 fe80::9e25:c982:1091:90eb/64 scope link
       valid_lft forever preferred_lft forever
3: enp0s8: <BROADCAST,MULTICAST,UP,LOWER_UP> mtu 1500 qdisc pfifo_fast state UP qlen 1000
    link/ether 08:00:27:68:88:f3 brd ff:ff:ff:ff:ff:ff
    inet 192.168.56.101/24 brd 192.168.56.255 scope global dynamic enp0s8
       valid_lft 1044sec preferred_lft 1044sec
    inet6 fe80::a00:27ff:fe68:88f3/64 scope link
       valid_lft forever preferred_lft forever
Disabilita SELINUX (Security Enhanced Linux) su Centos 7, modifica il seguente file di configurazione:
vim /etc/selinux/config
"/etc/selinux/config" 14L, 547C# This file controls the state of SELinux on the system.
# SELINUX= can take one of these three values:
#     enforcing - SELinux security policy is enforced.
#     permissive - SELinux prints warnings instead of enforcing.
#     disabled - No SELinux policy is loaded.
SELINUX=enforcing
# SELINUXTYPE= can take one of three two values:
#     targeted - Targeted processes are protected,
#     minimum - Modification of targeted policy. Only selected processes are prootected.
#     mls - Multi Level Security protection.
SELINUXTYPE=targeted
Modifica il valore applicando della direttiva SELINUX ai disabilitati , salva il file e riavvia il server.
Per controllare lo stato di SELinux su Centos 7, eseguire il comando seguente:
getenforce
L'output deve essere:
Disabled
Installa MariaDB su Centos 7
Per installare MariaDB su Centos 7, esegui il seguente comando:
yum -y install mariadb-server
Crea il file con il nome zotrs.cnf nella directory seguente:
/etc/my.cnf.d/
Per creare e modificare il file, eseguire il comando seguente:
vim /etc/my.cnf.d/zotrs.cnf
Riempi il file con il seguente contenuto e salvalo:
max_allowed_packet = 20M
query_cache_size = 32M
innodb_log_file_size = 256M
Per avviare MariaDB, esegui il seguente comando:
systemctl start mariadb
Per aumentare la sicurezza di MariaDB, esegui il seguente comando:
/usr/bin/mysql_secure_installation
Imposta le opzioni in base al seguente output:
NOTE: RUNNING ALL PARTS OF THIS SCRIPT IS RECOMMENDED FOR ALL MariaDB
      SERVERS IN PRODUCTION USE!  PLEASE READ EACH STEP CAREFULLY!

In order to log into MariaDB to secure it, we'll need the current
password for the root user.  If you've just installed MariaDB, and
you haven't set the root password yet, the password will be blank,
so you should just press enter here.

Enter current password for root (enter for none):<Press Enter>
OK, successfully used password, moving on... Setting the root password ensures that nobody can log into the MariaDB root user without the proper authorisation. Set root password? [Y/n] <Press Y>
Imposta la password di root:
New password:
Re-enter new password:
Password updated successfully!
Reloading privilege tables..
 ... Success!

By default, a MariaDB installation has an anonymous user, allowing anyone
to log into MariaDB without having to have a user account created for
them.  This is intended only for testing, and to make the installation
go a bit smoother.  You should remove them before moving into a
production environment.

Remove anonymous users? [Y/n] <Press Y>
 ... Success!

Normally, root should only be allowed to connect from 'localhost'.  This
ensures that someone cannot guess at the root password from the network.

Disallow root login remotely? [Y/n] <Choose acording your needs>
 ... Success!

By default, MariaDB comes with a database named 'test' that anyone can
access.  This is also intended only for testing, and should be removed
before moving into a production environment.

Remove test database and access to it? [Y/n] <Press Y>
 - Dropping test database...
 ... Success!
 - Removing privileges on test database...
 ... Success!

Reloading the privilege tables will ensure that all changes made so far
will take effect immediately.

Reload privilege tables now? [Y/n] <Press Y>
 ... Success!

Cleaning up...

All done!  If you've completed all of the above steps, your MariaDB
installation should now be secure.

Thanks for using MariaDB!
Configura MariaDB per l'avvio automatico all'avvio:
systemctl enable mariadb.service
Per scaricare OTRS, esegui il seguente comando:
wget http://ftp.otrs.org/pub/otrs/RPMS/rhel/7/otrs-5.0.15-01.n oarch.rpm
Installa EPEL
Prima di installare OTRS, configura il repository EPEL su Centos 7. Esegui il comando seguente per farlo:
[[email protected] ~]# yum -y http://mirror.globo.com/epel/7/x86_64/e/epel-r release-7-9.noarch.rpm
Installa OTRS
Installa OTRS con il seguente comando:
yum install -nogpgcheck otrs-5.0.15-01.noarch.rpm
Verrà installato un elenco di pacchetti software, ad es. Apache e tutte le dipendenze verranno risolte automaticamente, alla fine dell'output premere Y:
Transaction Summary
================================================================================
Install  1 Package (+143 Dependent packages)

Total size: 148 M
Total download size: 23 M
Installed size: 181 M
Is this ok [y/d/N]: y
Per avviare Apache (httpd), esegui il seguente comando:
systemctl start httpd.service
Per abilitare l'avvio di Apache (httpd) con systemd su Centos7, eseguire il comando seguente:
systemctl enable httpd.service
Abilita SSL in Apache e configura un certificato autofirmato. Installa il modulo Mod_SSL per Apache HTTP Server, esegui il seguente comando:
yum -y install mod_ssl
Per generare un certificato SSL autofirmato, vai alla directory seguente:
cd /etc/pki/tls/certs/
Ed esegui il seguente comando per generare la chiave (centos7.key è il nome del mio certificato, sentiti libero di cambiarlo):
make centos7.key
umask 77 ; \ /usr/bin/openssl genrsa -aes128 2048 > centos7.key Generating RSA private key, 2048 bit long modulus .+++ .........................................................................................+++ e is 65537 (0x10001) Enter pass phrase: <Insert your Own Password>
Verifying - Enter pass phrase:<Retype the Password>
Per generare la chiave privata SSL del server con OpenSSL, eseguire il comando seguente:
openssl rsa -in centos7.key -out centos7.key
Enter pass phrase for centos7.key: <Type the Password> writing RSA key
Esegui il seguente comando per creare il file CSR (Certificate Signing Request) (centos7.csr è il nome del mio certificato, sentiti libero di cambiarlo):
make centos7.csr
Rispondi alle domande in base alle tue esigenze:
umask 77 ; \ /usr/bin/openssl req -utf8 -new -key centos7.key -out centos7.csr You are about to be asked to enter information that will be incorporated into your certificate request. What you are about to enter is what is called a Distinguished Name or a DN. There are quite a few fields but you can leave some blank For some fields there will be a default value, If you enter '.', the field will be left blank. -----
Country Name (2 letter code) [XX]:
State or Province Name (full name) []:
Locality Name (eg, city) [Default City]:
Organization Name (eg, company) [Default Company Ltd]:
Organizational Unit Name (eg, section) []:
Centos7 Common Name (eg, your name or your server's hostname) []:
Email Address []:
Please enter the following 'extra' attributes to be sent with your certificate request A challenge password []: <press enter>
An optional company name []:
Genera una CSR (Richiesta di firma del certificato) per il server con lo strumento OpenSSL:
openssl x509 -in centos7.csr -out centos7.crt -req -signkey centos7.key
L'output è:
Signature ok subject=/C=BR/ST=SP/L=Campinas/O=Centos7/OU=Centos7/CN=centos7.local Getting Private key
Prima di modificare il file ssl.conf, fai una copia del file con il seguente comando:
cp /etc/httpd/conf.d/ssl.conf /etc/httpd/conf.d/ssl.conf.old
Quindi modifica il file:
vim /etc/httpd/conf.d/ssl.conf
Trova le seguenti direttive, decommentale ciascuna e modificale in questo modo:
SSLCertificateKeyFile /etc/pki/tls/certs/centos7.key
SSLCertificateFile /etc/pki/tls/certs/centos7.csr
SSLProtocol -All +TLSv1 +TLSv1.1 +TLSv1.2
ServerName centos7.local:443
Riavvia Apache con il seguente comando:
systemctl restart httpd
Per forzare l'esecuzione di OTRS in modalità https, modificare il seguente file:
vim /etc/httpd/conf/httpd.conf
Alla fine del file, decommenta la seguente direttiva:
IncludeOptional conf.d/*.conf
Modifica il file zzz_otrs.conf:
vim /etc/httpd/conf.d/zzz_otrs.conf
Dopo la riga 26 (prima del modulo di riga mod_version.c) aggiungi le seguenti direttive:
RewriteEngine On
RewriteCond %{HTTPS} off
RewriteRule (.*) https://%{HTTP_HOST}%{REQUEST_URI}
Riavvia Apache:
[[email protected] ~]# systemctl restart httpd
Per utilizzare le funzionalità estese in OTRS, dobbiamo installare alcuni moduli PERL. Esegui il seguente comando per installarli:
yum -y install "perl(Text::CSV_XS)" "perl(Crypt::Eksblowfish::Bcrypt)" "perl(YAML::XS)" "perl(JSON::XS)" "perl(Encode::HanExtra)" "perl(Mail::IMAPClient)" "perl(ModPerl::Util)"
Il sistema OTRS ha uno strumento per controllare i moduli PERL, eseguilo in questo modo per verificare i requisiti di sistema:
cd /opt/otrs/bin
ed esegui:
./otrs.CheckModules.pl
L'output per la nostra configurazione deve essere:
o Apache::DBI......................ok (v1.12) o Apache2::Reload..................ok (v0.13) o Archive::Tar.....................ok (v1.92) o Archive::Zip.....................ok (v1.30) o Crypt::Eksblowfish::Bcrypt.......ok (v0.009) o Crypt::SSLeay....................ok (v0.64) o Date::Format.....................ok (v2.24) o DBI..............................ok (v1.627) o DBD::mysql.......................ok (v4.023) o DBD::ODBC........................Not installed! (optional - Required to connect to a MS-SQL database.) o DBD::Oracle......................Not installed! (optional - Required to connect to a Oracle database.) o DBD::Pg..........................Not installed! Use: 'yum install "perl(DBD::Pg)"' (optional - Required to connect to a PostgreSQL database.) o Digest::SHA......................ok (v5.85) o Encode::HanExtra.................ok (v0.23) o IO::Socket::SSL..................ok (v1.94) o JSON::XS.........................ok (v3.01) o List::Util::XS...................ok (v1.27) o LWP::UserAgent...................ok (v6.13) o Mail::IMAPClient.................ok (v3.37) o IO::Socket::SSL................ok (v1.94) o ModPerl::Util....................ok (v2.000010) o Net::DNS.........................ok (v0.72) o Net::LDAP........................ok (v0.56) o Template.........................ok (v2.24) o Template::Stash::XS..............ok (undef) o Text::CSV_XS.....................ok (v1.00) o Time::HiRes......................ok (v1.9725) o Time::Piece......................ok (v1.20_01) o XML::LibXML......................ok (v2.0018) o XML::LibXSLT.....................ok (v1.80) o XML::Parser......................ok (v2.41) o YAML::XS.........................ok (v0.54)
Per avviare il demone OTRS con l'utente "otrs", eseguire il comando seguente:
su -c "/opt/otrs/bin/otrs.Daemon.pl start" -s /bin/bash otrs
Per disabilitare il firewall CentOS 7, esegui il comando seguente:
systemctl stop firewalld
Per disabilitare l'avvio automatico di CentOS 7 Firewall, esegui:
systemctl disable firewalld.service
Avvia il demone OTRS con:
su -c "/opt/otrs/bin/otrs.Daemon.pl start" -s /bin/bash otrsCron.sh
L'output del comando deve essere:
/opt/otrs/bin Cron.sh - start/stop OTRS cronjobs Copyright (C) 2001-2012 OTRS AG, http://otrs.org/ (using /opt/otrs) done
Se vuoi controllare lo stato del demone OTRS, esegui il comando seguente:
su -c "/opt/otrs/bin/otrs.Daemon.pl status" -s /bin/bash otrsCron.sh
Configurazione di OTRS nel crontab. Cambia la root dell'utente in otrs e inizia a modificare crontab:
su otrs
crontab -e
Riempi il crontab con il seguente contenuto e salvalo:
# --
# Copyright (C) 2001-2016 OTRS AG, http://otrs.com/
# --
# This software comes with ABSOLUTELY NO WARRANTY. For details, see
# the enclosed file COPYING for license information (AGPL). If you
# did not receive this file, see http://www.gnu.org/licenses/agpl.txt.
# --

# Who gets the cron emails?
MAILTO="[email protected]"
# --
# Copyright (C) 2001-2016 OTRS AG, http://otrs.com/
# --
# This software comes with ABSOLUTELY NO WARRANTY. For details, see
# the enclosed file COPYING for license information (AGPL). If you
# did not receive this file, see http://www.gnu.org/licenses/agpl.txt.
# --

# check OTRS daemon status
*/5 * * * *    $HOME/bin/otrs.Daemon.pl start >> /dev/null
Configura OTRS su CentOS 7
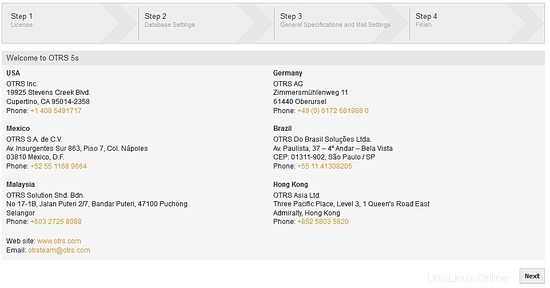
Apri un browser web e apri l'URL https://centos7.local/otrs/installer.pl. Ricorda, centos7.local è il nome del mio server, inserisci il tuo nome host o indirizzo IP. La prima schermata mostra i 4 passaggi per concludere l'installazione di OTRS, premere Avanti.
Licenza:per continuare, leggere e accettare la licenza per continuare:

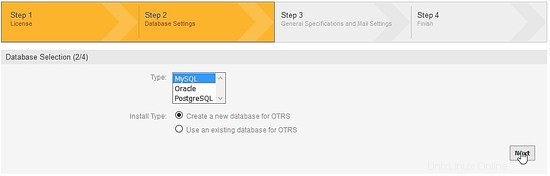
Selezione database:seleziona l'opzione MySQL e nel Tipo di installazione, contrassegnare l'opzione Crea un nuovo database per OTRS e fare clic sul pulsante successivo:
Configura MySQL:compila i campi Utente, Password e Host (ricorda i dati della configurazione di MariaDB che abbiamo fatto) e premi controlla le impostazioni del database:

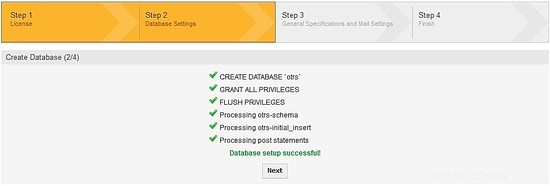
Il programma di installazione OTRS creerà il database in MariaDB, premere il pulsante successivo:
Database OTRS creato correttamente:
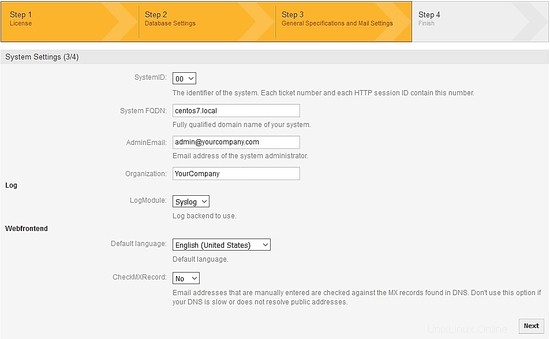
Configura impostazioni di sistema:compila i campi con le tue informazioni e premi Avanti:
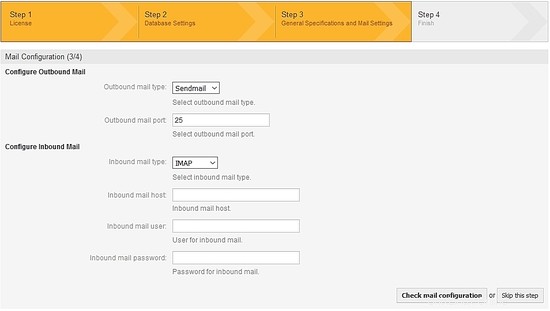
Configurazione e-mail OTRS:compila i campi relativi al tuo server di posta elettronica. Nella mia configurazione, per la posta in uscita uso SMPTTLS e la porta 587, per la posta in entrata, uso pop3, avrai bisogno di un account di posta elettronica. Controlla la configurazione della posta o salta questo passaggio:
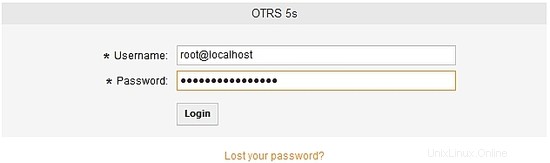
Per finire, prendi nota dell'utente e della password per accedere all'OTRS, dopo il login puoi modificare la password:
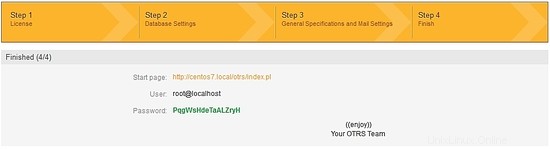
L'URL di accesso OTRS è https://centos7.local/otrs/index.pl?. Ricorda, centos7.local è il nome del mio server, inserisci il tuo hostname o indirizzo IP.:
Accedi all'OTRS:
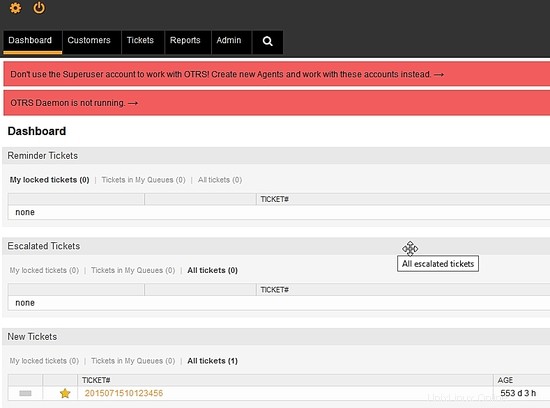
OTRS è installato e pronto per essere configurato con le tue regole di supporto o modello di business.