Per connetterti al server della coda dei messaggi RabbitMQ, puoi scrivere il tuo programma client utilizzando vari linguaggi di programmazione. Attualmente puoi scrivere client usando C#, erlang, java, perl, PHP, python e ruby.
Questo tutorial spiega come installare e configurare la libreria client RabbitMQ e l'estensione PHP AMQP.
Una volta installata l'estensione PHP AMQP, puoi scrivere il programma PHP utilizzando AMQP, che può connettersi al server RabbitMQ per manipolare i messaggi .
Parte 1:Installa la libreria del client RabbitMQ
1. Installa cmake
cmake è un sistema di compilazione open source utilizzato dalla libreria rabbitmq-c. È necessario installare la libreria rabbitmq-c prima di installare l'estensione PHP AMQP. Ma, per installare la libreria rabbitmq-c, abbiamo bisogno di cmake.
Dalla pagina di download di cmake, scorri verso il basso nella sezione Linux i386 e scarica il file cmake-2.8.10.2-Linux-i386.sh. Oppure usa wget per scaricarlo sul tuo sistema.
cd /usr/src
wget http://www.cmake.org/files/v2.8/cmake-2.8.10.2-Linux-i386.sh
Esegui il file cmake-2.8.10.2-Linux-i386.sh, che installerà cmake nella directory corrente come mostrato di seguito.
# /bin/sh cmake-2.8.10.2-Linux-i386.sh
Do you accept the license? [yN]: y
By default the CMake will be installed in:
  "/usr/src/cmake-2.8.10.2-Linux-i386"
Do you want to include the subdirectory cmake-2.8.10.2-Linux-i386?
Saying no will install in: "/usr/src" [Yn]: y
Using target directory: /usr/src/cmake-2.8.10.2-Linux-i386
Extracting, please wait...
tar: Read 4096 bytes from -
Unpacking finished successfully
Rinomina la directory cmake e verifica che cmake sia installato correttamente.
# cd /usr/src
# mv cmake-2.8.10.2-Linux-i386 cmake
# /usr/save/cmake/bin/cmake --version
cmake version 2.8.10.2
2. Scarica il client RabbitMQ
Innanzitutto installa la libreria librabbitmq, richiesta dall'estensione PHP AMQP.
Scarica il file zip dal repository git di rabbitmq-c.
cd /usr/src
unzip rabbitmq-c-master.zip
cd rabbitmq-c-master
3. Configura il client RabbitMQ
Usa cmake per configurare il client rabbitmq per l'installazione. Assicurati di specificare il PREFIX come /usr/local, dove verrà installato il client rabbitmq.
# mkdir build
# cd build
# /usr/src/cmake/bin/cmake -DCMAKE_INSTALL_PREFIX=/usr/local ..
-- The C compiler identification is GNU 4.1.2
-- Check for working C compiler: /usr/bin/cc
-- Check for working C compiler: /usr/bin/cc -- works
-- Detecting C compiler ABI info
-- Detecting C compiler ABI info - done
-- CMAKE_BUILD_TYPE not specified. Creating Release build
-- Found C inline keyword: inline
-- Looking for getaddrinfo
-- Looking for getaddrinfo - found
-- Looking for socket
-- Looking for socket - found
-- Looking for htonll
-- Looking for htonll - not found
-- Found POPT: /usr/include
-- Could NOT find XMLTO (missing:  XMLTO_EXECUTABLE)
-- Building rabbitmq as a shared library - yes
-- Building rabbitmq as a static library - no
-- Configuring done
-- Generating done
-- Build files have been written to: /usr/save/rabbitmq-c-master/build
4. Installa il client RabbitMQ
Dopo la configurazione, usa cmake per installare il client rabbitmq come mostrato di seguito. Questo installerà la libreria librabbitmq in /usr/local. L'output parziale è mostrato di seguito.
#  /usr/src/cmake/bin/cmake --build . --target install
Scanning dependencies of target rabbitmq
[  2%] Building C object librabbitmq/CMakeFiles/rabbitmq.dir/amqp_framing.c.o
[  4%] Building C object librabbitmq/CMakeFiles/rabbitmq.dir/amqp_api.c.o
..
[ 95%] Built target amqp-publish
[ 97%] Building C object tests/CMakeFiles/test_parse_url.dir/test_parse_url.c.o
[100%] Building C object tests/CMakeFiles/test_tables.dir/test_tables.c.o
[100%] Built target test_tables
Install the project...
-- Install configuration: "Release"
-- Installing: /usr/local/lib/pkgconfig/librabbitmq.pc
-- Installing: /usr/local/lib/librabbitmq.so.1.0.1
-- Installing: /usr/local/lib/librabbitmq.so.1
-- Installing: /usr/local/lib/librabbitmq.so
-- Installing: /usr/local/include/amqp.h
-- Installing: /usr/local/include/amqp_framing.h
-- Installing: /usr/local/bin/amqp-publish
-- Removed runtime path from "/usr/local/bin/amqp-publish"
-- Installing: /usr/local/bin/amqp-get
-- Removed runtime path from "/usr/local/bin/amqp-get"
-- Installing: /usr/local/bin/amqp-consume
-- Removed runtime path from "/usr/local/bin/amqp-consume"
-- Installing: /usr/local/bin/amqp-declare-queue
-- Removed runtime path from "/usr/local/bin/amqp-declare-queue"
-- Installing: /usr/local/bin/amqp-delete-queue
-- Removed runtime path from "/usr/local/bin/amqp-delete-queue"
5. Verifica il client RabbitMQ
La libreria viene fornita con un programma di esempio che puoi utilizzare per verificare che funzioni come previsto.
Da un terminale, procedi come segue. Questo sarà in uno stato di attesa.
# cd /usr/src/rabbitmq-c-master/build
# ./examples/amqp_listen localhost 5672 amq.direct test
Aprire un altro terminale e procedere come segue. Questo invierà un messaggio "ciao mondo" alla coda.
# cd /usr/src/rabbitmq-c-master/build
# ./examples/amqp_sendstring localhost 5672 amq.direct test "hello world"
Ora torna al primo terminale che era in stato di attesa, dove ora vedrai il messaggio "ciao mondo" come mostrato di seguito.
# ./examples/amqp_listen localhost 5672 amq.direct test
Result 0
Frame type 1, channel 1
Method AMQP_BASIC_DELIVER_METHOD
Delivery 1, exchange amq.direct routingkey test
Content-type: text/plain
----
00000000: 68 65 6C 6C 6F 20 77 6F : 72 6C 64                 hello world
0000000B:
Parte 2:Installa l'estensione PHP AMQP
Puoi installare amqp usando pecl, oppure puoi compilare dal sorgente.
Per installare utilizzando pecl, procedi come segue:
# pecl search amqp
amqp    1.0.9/(1.0.9 stable)       Communicate with any AMQP compliant server

# pecl install amqp
Per installare dal sorgente (che preferisco), segui i passaggi seguenti.
6. Scarica l'estensione PHP AMQP
Scarica l'ultima versione stabile dell'estensione PHP AMQP. L'attuale versione stabile è 1.0.10
cd /usr/src
wget http://pecl.php.net/get/amqp-1.0.10.tgz
tar xvfz amqp-1.0.10.tgz
cd amqp-1.0.9
7. Configura AMQP
Esegui phpize e configura come mostrato di seguito.
# phpize
Configuring for:
PHP Api Version:         20090626
Zend Module Api No:      20090626
Zend Extension Api No:   220090626

# ./configure --with-amqp
checking for egrep... grep -E
checking for a sed that does not truncate output... /bin/sed
..
creating libtool
appending configuration tag "CXX" to libtool
configure: creating ./config.status
config.status: creating config.h
8. Installa AMQP
Installa AMQP usando make e make install come mostrato di seguito. Viene visualizzato l'output parziale.
# make
..
creating amqp.la
(cd .libs && rm -f amqp.la && ln -s ../amqp.la amqp.la)
/bin/sh /usr/save/amqp-1.0.9/libtool --mode=install
cp ./amqp.la /usr/save/amqp-1.0.9/modules
cp ./.libs/amqp.so /usr/save/amqp-1.0.9/modules/amqp.so
cp ./.libs/amqp.lai /usr/save/amqp-1.0.9/modules/amqp.la
PATH="$PATH:/sbin" ldconfig -n /usr/save/amqp-1.0.9/modules
----------------------------------------------------------------------
Libraries have been installed in:
   /usr/save/amqp-1.0.9/modules

If you ever happen to want to link against installed libraries
in a given directory, LIBDIR, you must either use libtool, and
specify the full pathname of the library, or use the `-LLIBDIR'
flag during linking and do at least one of the following:
   - add LIBDIR to the `LD_LIBRARY_PATH' environment variable
     during execution
   - add LIBDIR to the `LD_RUN_PATH' environment variable
     during linking
   - use the `-Wl,--rpath -Wl,LIBDIR' linker flag
   - have your system administrator add LIBDIR to `/etc/ld.so.conf'

See any operating system documentation about shared libraries for
more information, such as the ld(1) and ld.so(8) manual pages.
----------------------------------------------------------------------
Build complete.
# make install Installing shared extensions: /usr/local/lib/php/extensions/no-debug-non-zts-20090626/ .. You should add "extension=amqp.so" to php.ini
9. Modifica php.ini e aggiungi l'estensione AMQP
Individua il file php.ini sul tuo sistema e aggiungi la seguente riga.
# vi /usr/local/lib/php.ini
extension=amqp.so
10. Verifica l'estensione PHP AMQP
Crea la seguente pagina di test che visualizzerà phpinfo e mettilo sotto gli htdocs del tuo Apache.
# vi /usr/local/apache2/htdocs/test.php
<?php
phpinfo();
?>
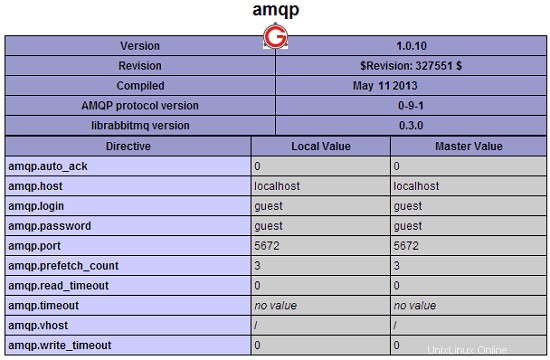
Ora, se chiami test.php dal tuo browser, vedrai che l'estensione PHP AMQP viene visualizzata nella pagina come mostrato di seguito. Ora puoi scrivere chiamate AMQP nel tuo codice PHP per parlare con il server RabbitMQ.