Nginx è un server Web open source, leggero e ad alte prestazioni, il server Web in più rapida crescita in tutto il mondo. Nginx funziona su sistemi operativi Linux, Windows, Mac OS e Solaris. NGINX continua a crescere in popolarità, quindi è necessario proteggere sempre più implementazioni NGINX.
In questo tutorial, spiegheremo alcuni popolari suggerimenti e trucchi per la sicurezza del server Nginx.
Requisiti
- Un server che esegue Ubuntu 18.04 o Debian 9.
- È stata impostata una password di root sul tuo server.
Installa Nginx
Innanzitutto, dovrai installare Nginx sul tuo sistema. Puoi installarlo eseguendo il seguente comando:
apt-get install nginx -y
Una volta installato Nginx, puoi controllare lo stato di Nginx con il seguente comando:
systemctl status nginx
Dovresti vedere il seguente output:
? nginx.service - A high performance web server and a reverse proxy server
   Loaded: loaded (/lib/systemd/system/nginx.service; enabled; vendor preset: enabled)
   Active: active (running) since Sun 2019-03-10 02:43:14 UTC; 4min 40s ago
     Docs: man:nginx(8)
  Process: 2271 ExecStop=/sbin/start-stop-daemon --quiet --stop --retry QUIT/5 --pidfile /run/nginx.pid (code=exited, status=0/SUCCESS)
  Process: 2281 ExecStart=/usr/sbin/nginx -g daemon on; master_process on; (code=exited, status=0/SUCCESS)
  Process: 2274 ExecStartPre=/usr/sbin/nginx -t -q -g daemon on; master_process on; (code=exited, status=0/SUCCESS)
 Main PID: 2285 (nginx)
    Tasks: 2 (limit: 1111)
   CGroup: /system.slice/nginx.service
           ??2285 nginx: master process /usr/sbin/nginx -g daemon on; master_process on;
           ??2290 nginx: worker process

Mar 10 02:43:14 ubuntu1804 systemd[1]: Starting A high performance web server and a reverse proxy server...
Mar 10 02:43:14 ubuntu1804 systemd[1]: nginx.service: Failed to parse PID from file /run/nginx.pid: Invalid argument
Mar 10 02:43:14 ubuntu1804 systemd[1]: Started A high performance web server and a reverse proxy server.
Aggiorna Nginx
Dovrai aggiornare il tuo server web Nginx poiché ci sono molti miglioramenti delle prestazioni, nuove funzionalità e correzioni di sicurezza vengono aggiunte. La maggior parte delle moderne distribuzioni Linux non verrà fornita con l'ultima versione di nginx negli elenchi di pacchetti predefiniti. Quindi dovrai aggiornare l'ultima versione di nginx tramite un gestore di pacchetti. Puoi aggiornare il tuo server web Nginx con il seguente comando:
apt-get update -y
apt-get install nginx --reinstall -y
Prevenire la divulgazione di informazioni
Innanzitutto, dovrai impedire a Nginx di divulgare le informazioni sulla versione.
Per impostazione predefinita, Nginx mostra il suo nome e la sua versione nelle intestazioni HTTP.
Puoi verificarlo con il seguente comando:
curl -I http://localhost
Dovresti vedere il seguente output:
HTTP/1.1 200 OK
Server: nginx/1.14.0 (Ubuntu)
Date: Sat, 09 Mar 2019 15:28:01 GMT
Content-Type: text/html
Content-Length: 10918
Last-Modified: Fri, 01 Feb 2019 16:05:17 GMT
Connection: keep-alive
ETag: "5c546e3d-2aa6"
Accept-Ranges: bytes
Nell'output sopra, dovresti vedere Nginx e la versione del sistema operativo.
Puoi nascondere queste informazioni modificando il file /etc/nginx/nginx.conf:
nano /etc/nginx/nginx.conf
Aggiungi i server_tokens offline all'interno della parte di configurazione http:
http {

        ##
        # Basic Settings
        ##
        server_tokens off;
Salva e chiudi il file, quando hai finito. Quindi, riavvia il server web Nginx per applicare le modifiche:
systemctl restart nginx
Ora, esegui di nuovo il comando curl:
curl -I http://localhost
Dovresti vedere il seguente output:
HTTP/1.1 200 OK
Server: nginx
Date: Sat, 09 Mar 2019 15:33:31 GMT
Content-Type: text/html
Content-Length: 10918
Last-Modified: Fri, 01 Feb 2019 16:05:17 GMT
Connection: keep-alive
ETag: "5c546e3d-2aa6"
Accept-Ranges: bytes
Limita gli IP dall'accesso
Nginx viene fornito con un semplice modulo chiamato ngx_http_access_module per consentire o negare un indirizzo IP specifico.
Se vuoi consentire il modulo Nginx 172.16.0.0/16 e negare da altre sottoreti. Quindi, apri il file /etc/nginx/sites-enabled/default:
nano /etc/nginx/sites-enabled/default
Apporta le seguenti modifiche all'interno del blocco server:
server {
        listen 80 default_server;
        listen [::]:80 default_server;

	allow 172.16.0.0/16;
    	deny  all;
Salva e chiudi il file, quando hai finito. Quindi, riavvia Nginx per applicare queste modifiche:
systemctl restart nginx
Ora, prova ad accedere al tuo server Nginx da un altro intervallo di indirizzi IP come 192.168.0.102.
Quindi, controlla il registro di Nginx con il seguente comando:
tail -f /var/log/nginx/error.log
Dovresti ottenere l'accesso vietato nel seguente output:
2019/03/09 16:13:01 [error] 11589#11589: *1 access forbidden by rule, client: 192.168.0.102, server: _, request: "GET /test/ HTTP/1.1", host: "172.16.0.122"
Proteggi Nginx con TLS
TLS (Transport Layer Security) è il successore di SSL (Secure Socket Layer). Fornisce HTTPS più forte ed efficiente e contiene più miglioramenti come Forward Secrecy, compatibilità con le moderne suite di crittografia OpenSSL e HSTS. Questo tutorial mostra come abilitare un certificato SSL autofirmato in Nginx. Se invece desideri utilizzare un certificato Let's Encrypt, dai un'occhiata qui: https://www.howtoforge.com/tutorial/nginx-with-letsencrypt-ciphersuite/
Innanzitutto, crea una directory per SSL con il seguente comando:
mkdir /etc/nginx/ssl/
Quindi, genera una chiave e un certificato con il seguente comando:
cd /etc/nginx/ssl/
Innanzitutto, genera la chiave con il seguente comando:
openssl genrsa -aes256 -out nginx.key 1024
Dovresti vedere il seguente output:
Generating RSA private key, 1024 bit long modulus
...++++++
.............................++++++
e is 65537 (0x010001)
Enter pass phrase for nginx.key:
Verifying - Enter pass phrase for nginx.key:
Quindi, genera csr con il seguente comando:
openssl req -new -key nginx.key -out nginx.csr
Fornisci tutte le informazioni come mostrato di seguito:
Generating RSA private key, 1024 bit long modulus
...++++++
.............................++++++
e is 65537 (0x010001)
Enter pass phrase for nginx.key:
Verifying - Enter pass phrase for nginx.key:
[email protected]:~# openssl req -new -key nginx.key -out nginx.csr
Enter pass phrase for nginx.key:
You are about to be asked to enter information that will be incorporated
into your certificate request.
What you are about to enter is what is called a Distinguished Name or a DN.
There are quite a few fields but you can leave some blank
For some fields there will be a default value,
If you enter '.', the field will be left blank.
-----
Country Name (2 letter code) [AU]:IN
State or Province Name (full name) [Some-State]:Gujarat
Locality Name (eg, city) []:Junagadh
Organization Name (eg, company) [Internet Widgits Pty Ltd]:IT
Organizational Unit Name (eg, section) []:IT
Common Name (e.g. server FQDN or YOUR name) []:HITESH
Email Address []:[email protected]

Please enter the following 'extra' attributes
to be sent with your certificate request
A challenge password []:admin
An optional company name []:IT
Quindi, firma il certificato con il seguente comando:
openssl x509 -req -days 365 -in nginx.csr -signkey nginx.key -out nginx.crt
Dovresti vedere il seguente output:
Signature ok
subject=C = IN, ST = Gujarat, L = Junagadh, O = IT, OU = IT, CN = HITESH, emailAddress = [email protected]
Getting Private key
Enter pass phrase for nginx.key:
Quindi, apri il file host virtuale predefinito di Nginx e definisci il certificato:
nano /etc/nginx/sites-enabled/default
Apporta le seguenti modifiche:
server {
        listen 192.168.0.100:443 ssl;
        root /var/www/html;
        index index.html index.htm index.nginx-debian.html;
        server_name _;
        ssl_certificate /etc/nginx/ssl/nginx.crt;
        ssl_certificate_key /etc/nginx/ssl/nginx.key;
        ssl_protocols       TLSv1 TLSv1.1 TLSv1.2;
Salva e chiudi il file, quando hai finito. Quindi, riavvia il server Nginx per applicare queste modifiche:
systemctl restart nginx
Proteggi con password la directory
Quando configuri un server web Nginx, puoi anche proteggere una directory specifica con una password. Puoi farlo usando il file .htpasswd.
Per farlo, crea il file passwd e aggiungici l'utente con il seguente comando:
mkdir /etc/nginx/.htpasswd
htpasswd -c /etc/nginx/.htpasswd/passwd admin
Dovresti vedere il seguente output:
New password:
Re-type new password:
Adding password for user admin
Quindi, crea una directory di test all'interno della radice web di Nginx con il seguente comando:
mkdir /var/www/html/test
Quindi, dai la proprietà all'utente www-data con il seguente comando:
chown -R www-data:www-data /var/www/html/test
Quindi, apri il file host virtuale predefinito di Nginx con il seguente comando:
nano /etc/nginx/sites-enabled/default
Quindi, proteggi la directory di test come mostrato di seguito:
        location /test {

	auth_basic  "Restricted";
	auth_basic_user_file   /etc/nginx/.htpasswd/passwd;
Salva e chiudi il file, quando hai finito. Quindi, riavvia il servizio Nginx per applicare queste modifiche:
systemctl restart nginx
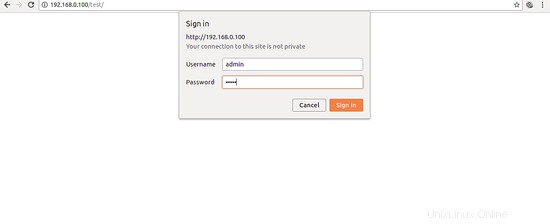
Quindi, apri il tuo browser web e digita l'URL http://your-server-ip/test. Ti verrà richiesto di inserire nome utente e password per accedere alla directory di test come mostrato nella pagina seguente:
Congratulazioni! hai protetto con successo il tuo server Nginx sul server Ubuntu 18.04. Spero che questo ti aiuterà a proteggere la tua applicazione ospitata sul server web Nginx. Sentiti libero di chiedermi se hai domande. Per ulteriori informazioni, puoi fare riferimento al documento sulla sicurezza di Nginx.