Let's Encrypt è un'autorità di certificazione che fornisce certificati SSL gratuiti per i siti Web. Tuttavia, non offre solo certificati SSL; automatizza inoltre la creazione, la convalida, la firma, l'implementazione e il rinnovo dei certificati.
Let's Encrypt è la più grande autorità di certificazione del mondo, utilizzata da oltre 250 milioni di siti web. È stato lanciato nel novembre 2014 con l'obiettivo che tutti i siti Web siano sicuri e utilizzino HTTPS.
Attualmente, Let's Encrypt supporta l'installazione automatica dei certificati su Apache, Nginx, Plex e Haproxy.
Qui vedremo come installare Let's Encrypt SSL Certificate per Nginx su Debian 11.
Prerequisiti
Ti consiglio di configurare l'installazione del server web Nginx sul tuo sistema prima di procedere ulteriormente.
LEGGI: Come installare lo stack LEMP su Debian 11
Crea host virtuale
Innanzitutto, dovremo creare un host virtuale Nginx per servire la versione HTTP del tuo sito web.
sudo nano /etc/nginx/conf.d/www.itzgeek.net.conf
Usa la configurazione seguente per il tuo sito web. Ricordati di modificare i valori in base alle tue esigenze.
Puoi rimuovere la sezione PHP Fast CGI se non utilizzi CMS come WordPress, Joomla, ecc. o applicazioni basate su PHP.
server {
   server_name itzgeek.net www.itzgeek.net;
   root /usr/share/nginx/www.itzgeek.net/;

   location / {
       index index.html index.htm index.php;
   }

   access_log /var/log/nginx/www.itzgeek.net.access.log;
   error_log /var/log/nginx/www.itzgeek.net.error.log;

   location ~ \.php$ {
      include fastcgi_params;
      fastcgi_intercept_errors on;
      fastcgi_pass unix:/run/php/php7.4-fpm.sock;
      fastcgi_param SCRIPT_FILENAME $document_root$fastcgi_script_name;
   }
}
Dopo aver creato il file di configurazione dell'host virtuale, crea una directory principale per contenere i file del tuo sito web.
sudo mkdir -p /usr/share/nginx/www.itzgeek.net/
Quindi, modifica la proprietà e il gruppo della directory.
sudo chown -R www-data:www-data /usr/share/nginx/www.itzgeek.net/
Infine, posiziona il file HTML di prova nella radice del documento del tuo dominio.
echo "This is a test site @ www.itzgeek.net" | sudo tee /usr/share/nginx/www.itzgeek.net/index.html
Ora dovrai riavviare il servizio Nginx per rileggere le configurazioni.
sudo systemctl restart nginx
Crea / Aggiorna record DNS
Per generare il certificato SSL Let's Encrypt per il tuo dominio, dovrai indirizzare il tuo dominio all'IP del tuo server. Quindi, vai al tuo registrar di domini e crea un record A/CNAME per il tuo dominio. Ad esempio, l'immagine seguente mostra il record A/CNAME per il dominio www.itzgeek.net.
La propagazione delle modifiche ai record DNS richiederà tempo. Quindi, attendi da alcuni minuti a ore, a seconda del TTL che hai impostato per il record DNS.

Installa il certificato SSL Let's Encrypt per Nginx
Installa Certbot
Oltre a puntare un dominio all'IP del tuo server, dovrai anche installare il client Certbot ACME sul tuo sistema. Il client Certbot gestisce l'emissione e l'installazione dei certificati senza tempi di inattività.
Certbot è ora disponibile come pacchetto snap per il sistema operativo Debian. Quindi, per prima cosa, installa il pacchetto Snapd.
sudo apt update

sudo apt install -y snapd
Quindi, aggiorna lo snapd all'ultima versione.
sudo snap install core; sudo snap refresh core
Infine, installa il client Certbot utilizzando il comando snap.
sudo snap install --classic certbot

sudo ln -s /snap/bin/certbot /usr/bin/certbot
Installa il certificato Let's Encrypt
Usa il comando certbot per creare un certificato Let's Encrypt e configura Nginx per utilizzare il certificato.
sudo certbot --nginx
Segui il prompt interattivo e installa il certificato.
Saving debug log to /var/log/letsencrypt/letsencrypt.log
Enter email address (used for urgent renewal and security notices)
 (Enter 'c' to cancel): admin@itzgeek.local << Enter Email ID

- - - - - - - - - - - - - - - - - - - - - - - - - - - - - - - - - - - - - - - -
Please read the Terms of Service at
https://letsencrypt.org/documents/LE-SA-v1.2-November-15-2017.pdf. You must
agree in order to register with the ACME server. Do you agree?
- - - - - - - - - - - - - - - - - - - - - - - - - - - - - - - - - - - - - - - -
(Y)es/(N)o: Y  << Agree to Terms and Conditions

- - - - - - - - - - - - - - - - - - - - - - - - - - - - - - - - - - - - - - - -
Would you be willing, once your first certificate is successfully issued, to
share your email address with the Electronic Frontier Foundation, a founding
partner of the Let's Encrypt project and the non-profit organization that
develops Certbot? We'd like to send you email about our work encrypting the web,
EFF news, campaigns, and ways to support digital freedom.
- - - - - - - - - - - - - - - - - - - - - - - - - - - - - - - - - - - - - - - -
(Y)es/(N)o: N << Subscriber to Newsletter
Account registered.

Which names would you like to activate HTTPS for?
- - - - - - - - - - - - - - - - - - - - - - - - - - - - - - - - - - - - - - - -
1: itzgeek.net
2. www.itzgeek.net
- - - - - - - - - - - - - - - - - - - - - - - - - - - - - - - - - - - - - - - -
Select the appropriate numbers separated by commas and/or spaces, or leave input
blank to select all options shown (Enter 'c' to cancel): 1,2 << Choose Site to Install Let's Encrypt SSL Certificate
Requesting a certificate for www.itzgeek.net

Successfully received certificate.
Certificate is saved at: /etc/letsencrypt/live/www.itzgeek.net/fullchain.pem
Key is saved at:         /etc/letsencrypt/live/www.itzgeek.net/privkey.pem
This certificate expires on 2022-01-17.
These files will be updated when the certificate renews.
Certbot has set up a scheduled task to automatically renew this certificate in the background.

Deploying certificate
Successfully deployed certificate for www.itzgeek.net to /etc/nginx/conf.d/www.itzgeek.net.conf
Congratulations! You have successfully enabled HTTPS on https://www.itzgeek.net

- - - - - - - - - - - - - - - - - - - - - - - - - - - - - - - - - - - - - - - -
If you like Certbot, please consider supporting our work by:
 * Donating to ISRG / Let's Encrypt:   https://letsencrypt.org/donate
 * Donating to EFF:                    https://eff.org/donate-le
- - - - - - - - - - - - - - - - - - - - - - - - - - - - - - - - - - - - - - - -
Una volta attivato HTTPS per il tuo dominio, il client Certbot collocherà le regole di riscrittura necessarie per reindirizzare il traffico da HTTP al sito HTTPS.
Nel mio caso, ha inserito due regole per i reindirizzamenti sotto.
- http://itzgeek.net>> https://itzgeek.net
- http://www.itzgeek.net>> https://www.itzgeek.net
Come puoi vedere, il primo reindirizzamento non è arrivato alla versione www HTTPS del sito web. Quindi, potrebbe essere necessario seguire la sezione seguente per configurarlo.
Reindirizza le richieste HTTP non www a www HTTPS con Nginx (opzionale)
Potresti voler configurare il server Nginx per reindirizzare il traffico dal sito HTTP non www al sito HTTPS WWW, ad esempio http://itzgeek.net>> https://www.itzgeek.net .
sudo nano /etc/nginx/conf.d/www.itzgeek.net.conf
Aggiungi il reindirizzamento evidenziato nella sezione SSL.
    listen 443 ssl; # managed by Certbot
 .    .    .
 .    .    .
    ssl_dhparam /etc/letsencrypt/ssl-dhparams.pem; # managed by Certbot

    if ($host = itzgeek.net) {
        return 301 https://www.itzgeek.net$request_uri;
    }
Quindi, riavvia il servizio Nginx.
sudo systemctl restart nginx
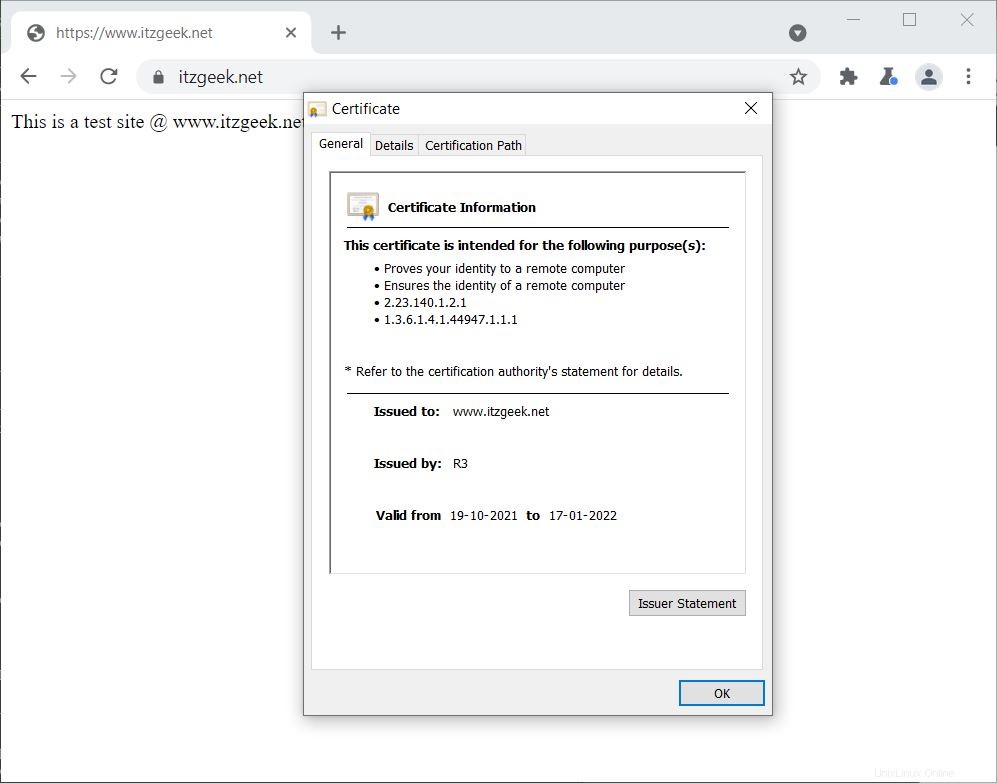
Verifica certificato Let's Encrypt
Puoi verificare il certificato Let's Encrypt visitando il tuo sito web.
http://il-tuo-http-sito-webO
https://tuo-https-sito-webDovresti ottenere la versione HTTPS del tuo sito ora.
Test del certificato SSL
Verifica il tuo certificato SSL Let's Encrypt per eventuali problemi e le relative valutazioni di sicurezza andando all'URL sottostante.
https://www.ssllabs.com/ssltest/analyze.html?d=www.itzgeek.netRinnova il certificato Let's Encrypt
I certificati Let's Encrypt hanno una validità di 90 giorni ed è altamente consigliabile rinnovarli prima che scadano. Grazie al servizio systemd, che funziona due volte al giorno e rinnova automaticamente i certificati in scadenza.
Tuttavia, ti consiglio di eseguire il comando seguente per simulare il rinnovo automatico del tuo certificato.
sudo certbot renew --dry-run
Risultato:
Saving debug log to /var/log/letsencrypt/letsencrypt.log

- - - - - - - - - - - - - - - - - - - - - - - - - - - - - - - - - - - - - - - -
Processing /etc/letsencrypt/renewal/www.itzgeek.net.conf
- - - - - - - - - - - - - - - - - - - - - - - - - - - - - - - - - - - - - - - -
Account registered.
Simulating renewal of an existing certificate for www.itzgeek.net

- - - - - - - - - - - - - - - - - - - - - - - - - - - - - - - - - - - - - - - -
Congratulations, all simulated renewals succeeded:
  /etc/letsencrypt/live/www.itzgeek.net/fullchain.pem (success)
- - - - - - - - - - - - - - - - - - - - - - - - - - - - - - - - - - - - - - - -
Se l'output conferma che il rinnovo sta funzionando correttamente, il rinnovo automatico avverrà come previsto.
Conclusione
È tutto. Spero che tu abbia imparato a installare Let's Encrypt SSL Certificate per Nginx su Debian 11. Condividi il tuo feedback nella sezione commenti.