ERPNext è un software ERP gratuito e open source scritto in Python sopra il framework Frappe e include contabilità, inventario, produzione, CRM, vendite, acquisti, gestione dei progetti, gestione delle risorse umane e altro ancora. ERPNext è un sistema ERP semplice, potente e facile da usare. Viene fornito con una bellissima interfaccia web che può essere utilizzata per gestire le attività quotidiane da una posizione centrale.
In questo tutorial impareremo come installare il software ERPNext sul server Debian 9.
Prerequisiti
- Un server che esegue Debian 9.
- Un utente non root con privilegi sudo.
Per iniziare
Prima di iniziare, si consiglia di aggiornare il repository dei pacchetti all'ultima versione. Puoi farlo eseguendo il seguente comando:
sudo apt-get update -y
sudo apt-get upgrade -y
Quindi, riavvia il sistema per applicare tutte le modifiche.
Installa dipendenze
ERPNext richiede Python versione 2.7 per funzionare correttamente. Puoi installare Python e altri pacchetti richiesti eseguendo il comando seguente:
sudo apt-get install python-minimal git build-essential python-setuptools python-dev libffi-dev libssl-dev curl -y
Dovrai anche installare lo strumento pip di Python per installare le dipendenze di Python. Puoi farlo eseguendo il seguente comando:
wget https://bootstrap.pypa.io/get-pip.py
sudo python get-pip.py
Quindi, installa ansible usando il comando pip:
sudo pip install ansible
Installa Node.js, Redis e Nginx
Per impostazione predefinita, l'ultima versione di Node.js non è disponibile in Debian 9. Quindi sarà necessario aggiungere il repository Nodesource per Node.js 8.x. Puoi farlo eseguendo il seguente comando:
sudo curl --silent --location https://deb.nodesource.com/setup_8.x | sudo bash -
Quindi, installa Node.js, Nginx e Redis eseguendo il comando seguente:
sudo apt-get install nodejs redis-server nginx -y
Una volta installati tutti i pacchetti, avvia il servizio Nginx e Redis e abilita l'avvio all'avvio con il seguente comando:
sudo systemctl start nginx
sudo systemctl enable nginx
sudo systemctl start redis-server
sudo systemctl enable redis-server
Installa e configura MariaDB
Per impostazione predefinita, l'ultima versione di MariaDB non è disponibile nel repository Debian 9. Quindi dovrai aggiungere il repository MariaDB per questo.
Innanzitutto, scarica e aggiungi la chiave di firma al tuo sistema con il seguente comando:
sudo apt-get install software-properties-common dirmngr
sudo apt-key adv --recv-keys --keyserver keyserver.ubuntu.com 0xF1656F24C74CD1D8
Quindi, aggiungi il repository MariaDB usando il seguente comando:
sudo add-apt-repository 'deb [arch=amd64,i386,ppc64el] http://ftp.utexas.edu/mariadb/repo/10.2/debian stretch main'
Infine, installa il server MariaDB con il seguente comando:
sudo apt-get update -y
sudo apt-get install mariadb-server libmysqlclient-dev -y
Successivamente, sarà necessario aggiungere il motore di archiviazione Barracuda al file di configurazione di MariaDB per la creazione dei database ERPNext. Puoi farlo modificando il file my.cnf:
sudo nano /etc/mysql/my.cnf
aggiungi le seguenti righe:
[mysqld]

innodb-file-format=barracuda
innodb-file-per-table=1
innodb-large-prefix=1
character-set-client-handshake = FALSE
character-set-server = utf8mb4
collation-server = utf8mb4_unicode_ci

[mysql]

default-character-set = utf8mb4
Salva e chiudi il file al termine, quindi avvia il servizio MariaDB e abilita l'avvio all'avvio con il seguente comando:
sudo systemctl restart mysql
sudo systemctl enable mysql
Quindi, proteggi MariaDB eseguendo lo script mysql_secure_installation:
sudo mysql_secure_installation
Questo script imposterà la password di root, rimuoverà gli utenti anonimi, non consentirà l'accesso root remoto e rimuoverà il database di test e l'accesso per proteggere MariaDB come mostrato di seguito:
Set root password? [Y/n] y
Remove anonymous users? [Y/n] y
Disallow root login remotely? [Y/n] y
Remove test database and access to it? [Y/n] y
Reload privilege tables now? [Y/n] y
Installa PDF Converter
Sarà inoltre necessario installare wkhtmltopdf per convertire l'HTML in PDF utilizzando il motore di rendering QT Webkit. Innanzitutto, installa le dipendenze richieste utilizzando il comando seguente:
sudo apt-get install libxext6 xfonts-75dpi xfonts-base libxrender1 -y
Quindi, scarica l'ultima versione di wkhtmltopdf utilizzando il seguente comando:
wget https://github.com/wkhtmltopdf/wkhtmltopdf/releases/download/0.12.4/wkhtmltox-0.12.4_linux-generic-amd64.tar.xz
Quindi, estrai il file scaricato nella directory /opt:
sudo tar -xvf wkhtmltox-0.12.4_linux-generic-amd64.tar.xz -C /opt
Quindi, crea un collegamento software per wkhtmltopdf utilizzando il seguente comando:
sudo ln -s /opt/wkhtmltox/bin/wkhtmltopdf /usr/bin/wkhtmltopdf
sudo ln -s /opt/wkhtmltox/bin/wkhtmltopdf /usr/bin/wkhtmltopdf
Installa Bench
Successivamente, dovrai installare Bench per installare e gestire l'applicazione ERPNext sul tuo sistema. Bench viene utilizzato anche per creare e gestire le configurazioni di Nginx e supervisore.
Prima di installare Bench, dovrai aggiungere un utente per Bench.
Innanzitutto, crea un utente Bench con il seguente comando:
sudo adduser bench
Quindi, fornisci le autorizzazioni sudo all'utente del banco.
sudo usermod -aG sudo bench
Successivamente, accedi con l'utente Bench e clona il repository di Bench con il seguente comando:
su - bench
git clone https://github.com/frappe/bench bench-repo
Infine, installa Bench usando il comando pip:
sudo pip install -e bench-repo
Installa ERPNext
Quindi, inizializza una directory bench con il framework frappe installato.
bench init erpnext
Quindi, cambia la directory in erpnext e crea un nuovo sito Frappe con il seguente comando:
cd erpnext
bench new-site test.example.com
Il comando precedente chiederà di fornire la password di root MySQL e ti chiederà di impostare una nuova password per l'account amministratore. La password dell'amministratore dovrà accedere alla dashboard dell'amministratore in un secondo momento.
Quindi, scarica i file di installazione di ERPNext dal repository Git con il seguente comando:
bench get-app erpnext https://github.com/frappe/erpnext
Quindi, installa ERPNext sul tuo sito appena creato.
bench --site test.example.com install-app erpnext
Infine, avvia l'applicazione Bench con il seguente comando:
bench start
Una volta che l'applicazione è stata avviata correttamente, dovresti vedere il seguente output:
13:40:10 system           | redis_socketio.1 started (pid=2618)
13:40:10 system           | worker_long.1 started (pid=2625)
13:40:10 system           | watch.1 started (pid=2619)
13:40:10 system           | redis_queue.1 started (pid=2626)
13:40:10 redis_socketio.1 | 2630:M 24 Feb 13:40:10.939 * Increased maximum number of open files to 10032 (it was originally set to 1024).
13:40:10 system           | web.1 started (pid=2629)
13:40:11 system           | schedule.1 started (pid=2634)
13:40:10 redis_socketio.1 |                 _._
13:40:10 redis_socketio.1 |            _.-``__ ''-._
13:40:10 redis_socketio.1 |       _.-``    `.  `_.  ''-._           Redis 3.0.6 (00000000/0) 64 bit
13:40:10 redis_socketio.1 |   .-`` .-```.  ```\/    _.,_ ''-._
13:40:10 redis_socketio.1 |  (    '      ,       .-`  | `,    )     Running in standalone mode
13:40:10 redis_socketio.1 |  |`-._`-...-` __...-.``-._|'` _.-'|     Port: 12000
13:40:10 redis_socketio.1 |  |    `-._   `._    /     _.-'    |     PID: 2630
13:40:10 redis_socketio.1 |   `-._    `-._  `-./  _.-'    _.-'
13:40:10 redis_socketio.1 |  |`-._`-._    `-.__.-'    _.-'_.-'|
13:40:10 redis_socketio.1 |  |    `-._`-._        _.-'_.-'    |           http://redis.io
13:40:10 redis_socketio.1 |   `-._    `-._`-.__.-'_.-'    _.-'
13:40:10 redis_socketio.1 |  |`-._`-._    `-.__.-'    _.-'_.-'|
13:40:10 redis_socketio.1 |  |    `-._`-._        _.-'_.-'    |
13:40:10 redis_socketio.1 |   `-._    `-._`-.__.-'_.-'    _.-'
13:40:10 redis_socketio.1 |       `-._    `-.__.-'    _.-'
13:40:10 redis_socketio.1 |           `-._        _.-'
13:40:10 redis_socketio.1 |               `-.__.-'
13:40:10 redis_socketio.1 |
13:40:11 system           | worker_default.1 started (pid=2639)
13:40:10 redis_socketio.1 | 2630:M 24 Feb 13:40:10.973 # WARNING: The TCP backlog setting of 511 cannot be enforced because /proc/sys/net/core/somaxconn is set to the lower value of 128.
13:40:10 redis_socketio.1 | 2630:M 24 Feb 13:40:10.974 # Server started, Redis version 3.0.6
13:40:10 redis_socketio.1 | 2630:M 24 Feb 13:40:10.974 # WARNING overcommit_memory is set to 0! Background save may fail under low memory condition. To fix this issue add 'vm.overcommit_memory = 1' to /etc/sysctl.conf and then reboot or run the command 'sysctl vm.overcommit_memory=1' for this to take effect.
13:40:10 redis_socketio.1 | 2630:M 24 Feb 13:40:10.974 # WARNING you have Transparent Huge Pages (THP) support enabled in your kernel. This will create latency and memory usage issues with Redis. To fix this issue run the command 'echo never > /sys/kernel/mm/transparent_hugepage/enabled' as root, and add it to your /etc/rc.local in order to retain the setting after a reboot. Redis must be restarted after THP is disabled.
13:40:10 redis_queue.1    | 2635:M 24 Feb 13:40:10.976 * Increased maximum number of open files to 10032 (it was originally set to 1024).
13:40:10 redis_queue.1    |                 _._
13:40:10 redis_queue.1    |            _.-``__ ''-._
13:40:10 redis_queue.1    |       _.-``    `.  `_.  ''-._           Redis 3.0.6 (00000000/0) 64 bit
13:40:10 redis_queue.1    |   .-`` .-```.  ```\/    _.,_ ''-._
13:40:10 redis_queue.1    |  (    '      ,       .-`  | `,    )     Running in standalone mode
13:40:10 redis_queue.1    |  |`-._`-...-` __...-.``-._|'` _.-'|     Port: 11000
13:40:10 redis_queue.1    |  |    `-._   `._    /     _.-'    |     PID: 2635
13:40:10 redis_queue.1    |   `-._    `-._  `-./  _.-'    _.-'
13:40:10 redis_queue.1    |  |`-._`-._    `-.__.-'    _.-'_.-'|
13:40:10 redis_queue.1    |  |    `-._`-._        _.-'_.-'    |           http://redis.io
13:40:10 redis_queue.1    |   `-._    `-._`-.__.-'_.-'    _.-'
13:40:10 redis_queue.1    |  |`-._`-._    `-.__.-'    _.-'_.-'|
13:40:10 redis_queue.1    |  |    `-._`-._        _.-'_.-'    |
13:40:10 redis_queue.1    |   `-._    `-._`-.__.-'_.-'    _.-'
13:40:10 redis_queue.1    |       `-._    `-.__.-'    _.-'
13:40:10 redis_queue.1    |           `-._        _.-'
13:40:10 redis_queue.1    |               `-.__.-'
13:40:10 redis_queue.1    |
13:40:10 redis_queue.1    | 2635:M 24 Feb 13:40:10.998 # WARNING: The TCP backlog setting of 511 cannot be enforced because /proc/sys/net/core/somaxconn is set to the lower value of 128.
13:40:10 redis_queue.1    | 2635:M 24 Feb 13:40:10.999 # Server started, Redis version 3.0.6
13:40:11 redis_queue.1    | 2635:M 24 Feb 13:40:11.000 # WARNING overcommit_memory is set to 0! Background save may fail under low memory condition. To fix this issue add 'vm.overcommit_memory = 1' to /etc/sysctl.conf and then reboot or run the command 'sysctl vm.overcommit_memory=1' for this to take effect.
13:40:11 redis_socketio.1 | 2630:M 24 Feb 13:40:11.000 * The server is now ready to accept connections on port 12000
13:40:11 system           | socketio.1 started (pid=2637)
13:40:11 redis_queue.1    | 2635:M 24 Feb 13:40:11.029 # WARNING you have Transparent Huge Pages (THP) support enabled in your kernel. This will create latency and memory usage issues with Redis. To fix this issue run the command 'echo never > /sys/kernel/mm/transparent_hugepage/enabled' as root, and add it to your /etc/rc.local in order to retain the setting after a reboot. Redis must be restarted after THP is disabled.
13:40:11 redis_queue.1    | 2635:M 24 Feb 13:40:11.029 * The server is now ready to accept connections on port 11000
13:40:11 system           | redis_cache.1 started (pid=2652)
13:40:11 system           | worker_short.1 started (pid=2651)
13:40:11 redis_cache.1    | 2660:M 24 Feb 13:40:11.100 * Increased maximum number of open files to 10032 (it was originally set to 1024).
13:40:11 redis_cache.1    |                 _._
13:40:11 redis_cache.1    |            _.-``__ ''-._
13:40:11 redis_cache.1    |       _.-``    `.  `_.  ''-._           Redis 3.0.6 (00000000/0) 64 bit
13:40:11 redis_cache.1    |   .-`` .-```.  ```\/    _.,_ ''-._
13:40:11 redis_cache.1    |  (    '      ,       .-`  | `,    )     Running in standalone mode
13:40:11 redis_cache.1    |  |`-._`-...-` __...-.``-._|'` _.-'|     Port: 13000
13:40:11 redis_cache.1    |  |    `-._   `._    /     _.-'    |     PID: 2660
13:40:11 redis_cache.1    |   `-._    `-._  `-./  _.-'    _.-'
13:40:11 redis_cache.1    |  |`-._`-._    `-.__.-'    _.-'_.-'|
13:40:11 redis_cache.1    |  |    `-._`-._        _.-'_.-'    |           http://redis.io
13:40:11 redis_cache.1    |   `-._    `-._`-.__.-'_.-'    _.-'
13:40:11 redis_cache.1    |  |`-._`-._    `-.__.-'    _.-'_.-'|
13:40:11 redis_cache.1    |  |    `-._`-._        _.-'_.-'    |
13:40:11 redis_cache.1    |   `-._    `-._`-.__.-'_.-'    _.-'
13:40:11 redis_cache.1    |       `-._    `-.__.-'    _.-'
13:40:11 redis_cache.1    |           `-._        _.-'
13:40:11 redis_cache.1    |               `-.__.-'
13:40:11 redis_cache.1    |
13:40:11 redis_cache.1    | 2660:M 24 Feb 13:40:11.115 # WARNING: The TCP backlog setting of 511 cannot be enforced because /proc/sys/net/core/somaxconn is set to the lower value of 128.
13:40:11 redis_cache.1    | 2660:M 24 Feb 13:40:11.115 # Server started, Redis version 3.0.6
13:40:11 redis_cache.1    | 2660:M 24 Feb 13:40:11.115 # WARNING overcommit_memory is set to 0! Background save may fail under low memory condition. To fix this issue add 'vm.overcommit_memory = 1' to /etc/sysctl.conf and then reboot or run the command 'sysctl vm.overcommit_memory=1' for this to take effect.
13:40:11 redis_cache.1    | 2660:M 24 Feb 13:40:11.116 # WARNING you have Transparent Huge Pages (THP) support enabled in your kernel. This will create latency and memory usage issues with Redis. To fix this issue run the command 'echo never > /sys/kernel/mm/transparent_hugepage/enabled' as root, and add it to your /etc/rc.local in order to retain the setting after a reboot. Redis must be restarted after THP is disabled.
13:40:11 redis_cache.1    | 2660:M 24 Feb 13:40:11.116 * The server is now ready to accept connections on port 13000
13:40:16 socketio.1       | listening on *: 9000
13:40:34 worker_long.1    | 13:40:34 RQ worker u'rq:worker:Node1.2632.long' started, version 0.10.0
13:40:34 worker_long.1    | 13:40:34 *** Listening on long...
13:40:34 worker_long.1    | 13:40:34 Cleaning registries for queue: long
13:40:34 worker_default.1 | 13:40:34 RQ worker u'rq:worker:Node1.2646.default' started, version 0.10.0
13:40:34 worker_default.1 | 13:40:34 *** Listening on default...
13:40:34 worker_default.1 | 13:40:34 Cleaning registries for queue: default
13:40:34 worker_short.1   | 13:40:34 RQ worker u'rq:worker:Node1.2661.short' started, version 0.10.0
13:40:34 worker_short.1   | 13:40:34 *** Listening on short...
13:40:34 worker_short.1   | 13:40:34 Cleaning registries for queue: short
13:40:34 web.1            |  * Running on http://0.0.0.0:8000/ (Press CTRL+C to quit)
Accedi all'interfaccia Web ERPNext
ERPNext è ora installato e funziona sulla porta 8000 . È ora di accedere all'interfaccia Web di ERPNext.
Apri il tuo browser web e digita l'URL http://test.exaple.com:8000 , verrai reindirizzato alla seguente pagina:
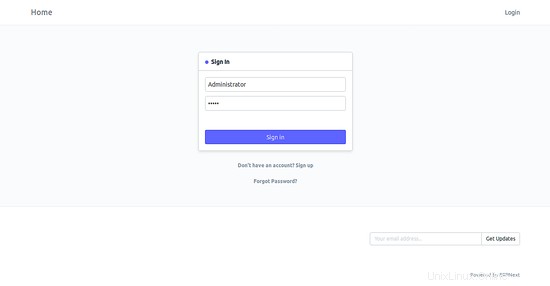
Qui, fornisci le credenziali del tuo account amministratore e fai clic su Accedi pulsante, dovresti vedere la seguente pagina:
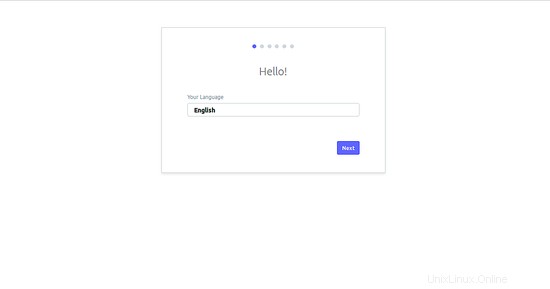
Qui, scegli la lingua inglese e fai clic su Avanti pulsante, dovresti vedere la seguente pagina:

Qui, scegli il tuo Paese, Fuso orario e Valuta, quindi fai clic su Avanti pulsante, dovresti vedere la seguente pagina:

Qui, fornisci il tuo nome, e-mail e password, quindi fai clic su Avanti pulsante, dovresti vedere la seguente pagina:
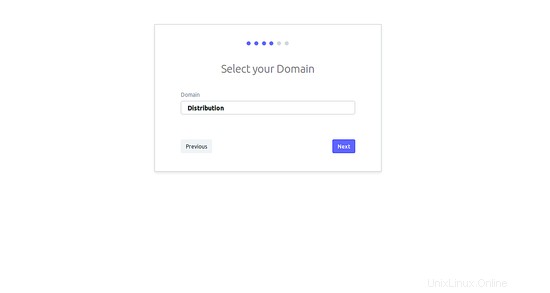
Qui, seleziona il tuo Dominio come desideri, quindi fai clic su Avanti pulsante, dovresti vedere la seguente pagina:

Qui, fornisci il nome e l'abbreviazione della tua azienda, quindi fai clic su Avanti pulsante, dovresti vedere la seguente pagina:
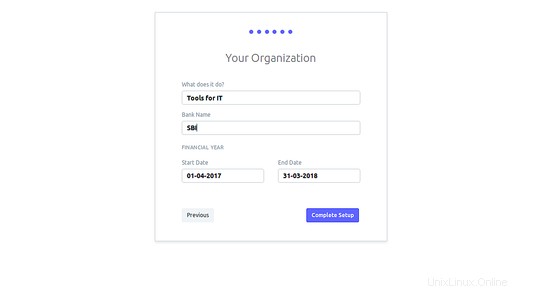
Qui, fornisci i dettagli della tua organizzazione e fai clic su Completa configurazione pulsante, dovresti vedere la seguente pagina:

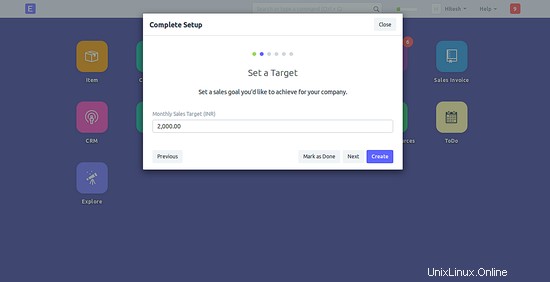
Qui, imposta un obiettivo che vorresti raggiungere per la tua azienda, quindi fai clic su Crea pulsante, dovresti vedere la seguente pagina:
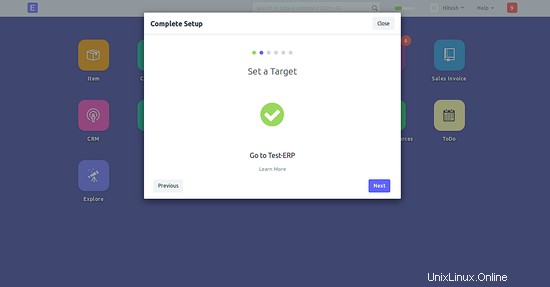
Qui, fai clic su Avanti per continuare, dovresti vedere la seguente pagina:
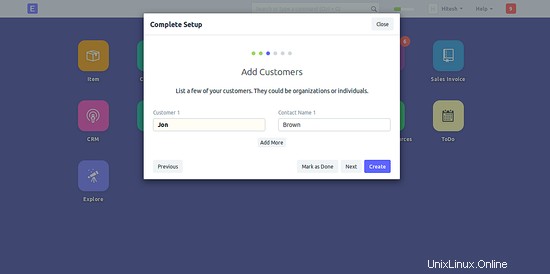
Qui, aggiungi i clienti che desideri aggiungere, quindi fai clic su Crea pulsante, dovresti vedere la seguente pagina:
Qui, fai clic su Avanti per continuare, dovresti vedere la seguente pagina:

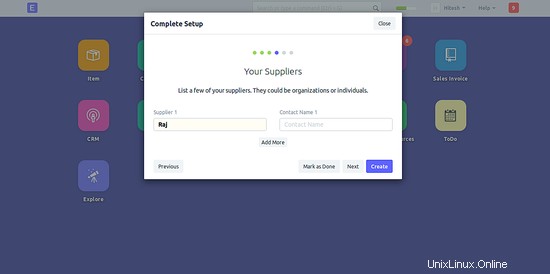
Qui, aggiungi i fornitori che desideri aggiungere, quindi fai clic su Crea pulsante, dovresti vedere la seguente pagina:
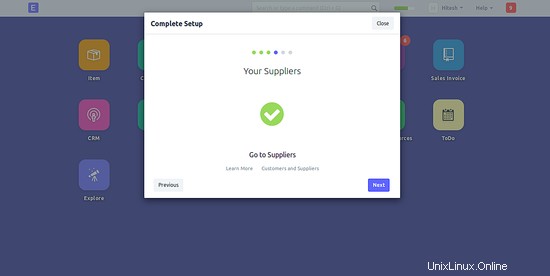
Qui, fai clic su Avanti per continuare, dovresti vedere la seguente pagina:
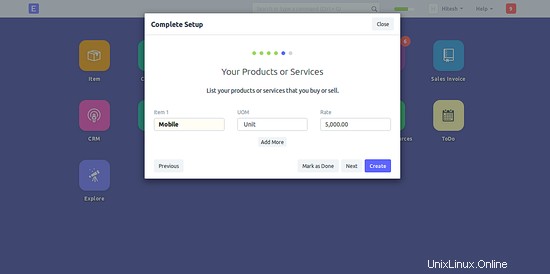
Qui, aggiungi i prodotti e i servizi che desideri acquistare o vendere, quindi fai clic su Crea pulsante, dovresti vedere la seguente pagina:
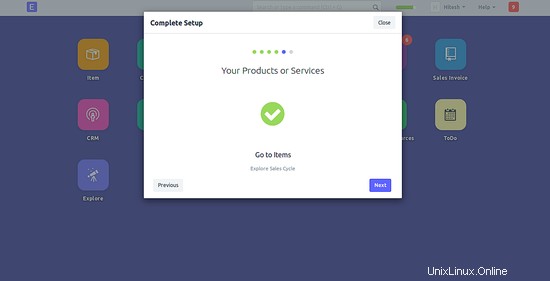
Qui, fai clic su Avanti per continuare, dovresti vedere la seguente pagina:
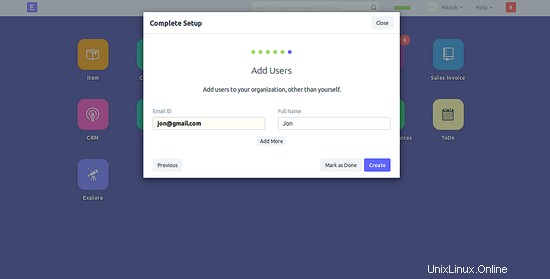
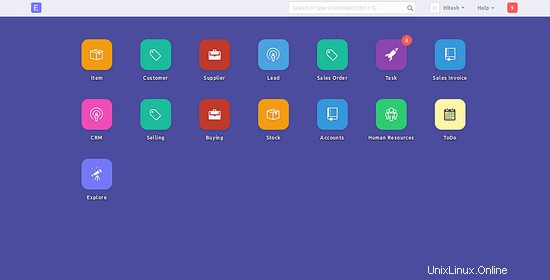
Qui, aggiungi utenti alla tua organizzazione, quindi fai clic su Crea pulsante, dovresti vedere la dashboard di ERPNext seguente pagina:
Conclusione
Congratulazioni! hai installato e configurato correttamente ERPNext sul server Debian 9. Ora puoi utilizzare facilmente l'applicazione per gestire la tua azienda. Per ulteriori informazioni, fare riferimento alla pagina della documentazione ufficiale di ERPNext all'indirizzo Doc.